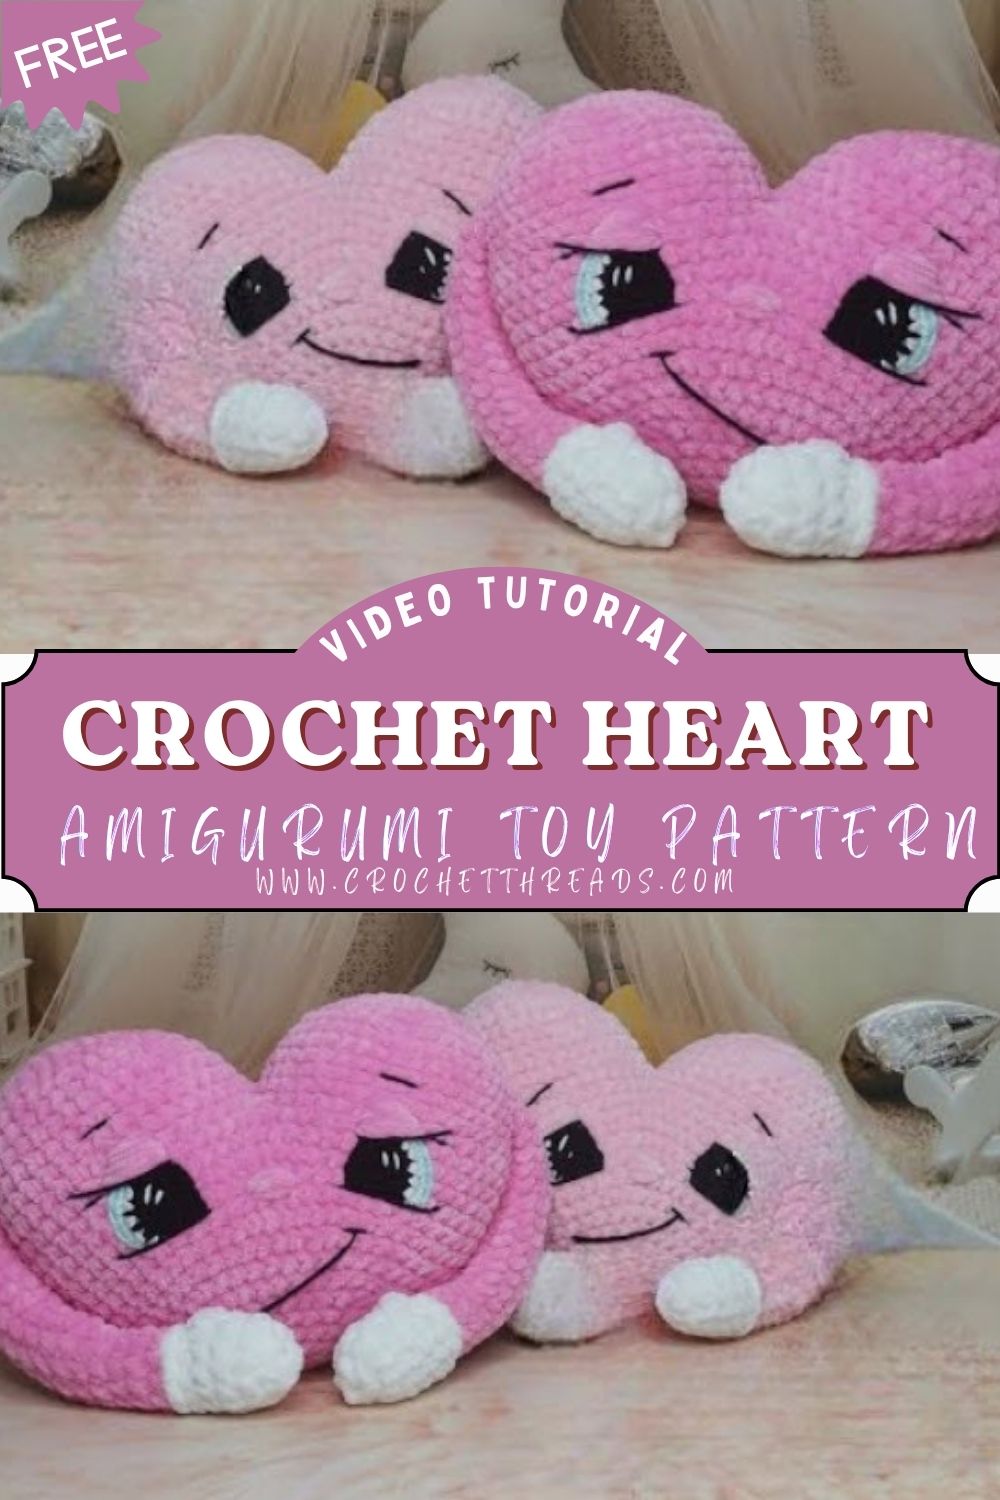
Sweet Crochet Heart Plushie Amigurumi Toy Pattern for Beginners
Soft stitches and sweet pastel colors create a calming, cozy vibe that fits any room. This Crochet Heart Amigurumi Toy Pattern creates a rounded crochet heart plush with an expressive face and tiny details.
A squishy amigurumi heart toy also makes a cute crochet heart for birthdays, Valentine surprises, or desk décor. This crochet gift idea works as a simple, lovable heart plushie pattern for beginners.
Why This Crochet Heart Is So Adorable
Rounded 3D curves form two puffy top bumps and a soft point at the bottom. Gentle embroidery turns the heart into a kawaii friend with a warm, huggable look.
A Perfect Handmade Gift Idea
Handmade hearts feel personal and meaningful, even in small sizes. Add it to a gift bag, place it on a pillow, or use it as sweet seasonal décor.
Basic single crochet rounds shape the plush smoothly, and small decreases create the heart point. Tiny hands and feet are quick, so progress feels fast and satisfying.
Materials Needed
Yarn and Colors
- Soft yarn (chenille or acrylic): 40–60 g pink (main)
- Optional second pink shade for contrast: 10–15 g
- White yarn for hands/feet: 10–15 g
Tools and Notions
- Crochet hook: 3 mm to 5 mm (tighter is better for plush)
- Fiberfill stuffing: 20–30 g
- Black yarn or embroidery floss for face: 1–2 m
- Tapestry needle, scissors, stitch marker
Abbreviations
- MR: magic ring
- ch: chain
- sc: single crochet
- inc: increase (2 sc in 1 st)
- dec: decrease (sc2tog)
- sl st: slip stitch
- st: stitch
Skill Level
Beginner to Easy.
Single crochet, simple increases, and decreases are the main skills used.
Finished Size
Approx 9–12 cm (3.5–4.7 in) wide using plush yarn and a 4–5 mm hook.
Size may vary based on yarn thickness and tension.
Time Planning
Total Time
1.5 to 3 hours,s depending on experience and yarn type.
Suggested Breakdown
- Domes: 35–60 min
- Joining and shaping: 30–50 min
- Hands/feet: 20–35 min
- Face and assembly: 20–35 min
Important Notes Before Starting (5 points)
- Use a hook that makes dense fabric so stuffing does not show.
- Mark the first stitch of each round and move the marker every round.
- Make both domes identical for a balanced heart shape.
- Stuff slowly, shaping as the work closes.
- Embroider the face after stuffing for better placement.
Step-by-Step Pattern
A. Heart Body (Make 2 Domes)
Work in a spiral. Use pink yarn.
Make Dome 1:
R1: MR, 6 sc (6)
R2: inc x6 (12)
R3: (sc, inc) x6 (18)
R4: (2 sc, inc) x6 (24)
R5: (3 sc, inc) x6 (30)
R6: (4 sc, inc) x6 (36)
R7–R9: sc around (36) for 3 rounds
Fasten off, leave a short tail.
Make Dome 2:
Repeat R1–R9 exactly.
Do not fasten off after R9.
B. Joining the Heart
Bring Dome 1 and Dome 2 together with the right sides facing out.
Round Join: sc around Dome 2 until reaching the closest point to Dome 1.
Next, sc into a stitch on Dome 1 to connect, then sc around Dome 1.
Then, sc back into Dome 2 and finish the round.
Continue 2–3 rounds of sc around the full shape to stabilize the top.
Meanwhile, add 1 extra sc at each join point if a gap appears.
C. Bottom Shaping and Closing
Start narrowing to form the heart point.
Work a decrease round with 4–6 dec spaced evenly around.
Next, work 1 plain sc round to keep the curve smooth.
Then repeat another decrease round.
Next, begin stuffing, pushing the filling into both top bumps.
Then keep adding stuffing as the opening becomes smaller.
Finally, continue decreasing until a small hole remains.
Fasten off and weave the tail through the last stitches to close.
D. Hands and Feet (Make 2–4)
Use white yarn. Make 2 for feet, or 4 for hands and feet.
R1: MR, 6 sc (6)
R2: (sc, inc) x3 (9)
R3: sc around (9)
R4: dec x4, sc (5)
Lightly stuff for round “paws,” or leave flat for tiny feet.
Fasten off and leave a long sewing tail.
E. Facial Features (Embroidery)
Place the face centered between the top bumps, slightly above the middle.
Embroider eyes using small vertical stitches or tiny curves.
Next, stitch a simple smile, slightly curved upward.
Optional blush: add a few soft pink stitches on each cheek.
Assembly Instructions
Positioning
Pin the feet near the bottom front, evenly spaced.
Then pin hands slightly higher on the sides for a hugging look.
Sewing
Sew each part with small, tight stitches.
Next, pull ends inside the body and weave in securely.
Finishing Touches
Final Shaping
Gently squeeze the heart to round the edges.
Then press the top cleft inward with fingers to define the heart dip.
Extra Details
Add blush, a tiny bow, or a small stitched highlight near the eyes.
Finally, trim fuzz and hide any visible ends.
Beginner Tips (5 points)
- Count stitches every round until it feels comfortable.
- Use a locking stitch marker, especially with plush yarn.
- Keep tension steady so the heart looks smooth.
- Stuff in small pieces for an even shape.
- Test face placement with pins before stitching.
Common Mistakes to Avoid (5 points)
- Uneven domes from missed increases.
- Loose stitches that show stuffing through the fabric.
- Gaps at the join where domes connect.
- Overstuffing the top so the heart looks bumpy.
- Embroidery pulled too tight, causing puckering.
Variations Ideas
Color Themes
Try red, peach, lavender, pastel rainbow, or a two-tone heart.
Add-Ons
Attach a bow, mini flower, or a tiny letter patch.
Turn it into a keychain by adding a loop on top.
Size Changes
Use thicker yarn for a bigger plush, or thinner yarn for a mini version.
Add or remove a couple of additional rounds to adjust the width.
Uses
Gift and Decor
A sweet handmade gift for friends, partners, or kids.
Cute Valentine décor for shelves and bedside tables.
Everyday use
Room decoration, desk buddy, or a comforting pocket plush.
A simple handmade item that looks adorable in photos, too.
Conclusion
This Crochet Heart Amigurumi Toy Pattern is soft, beginner-friendly, and full of charm. The rounded heart shape works up quickly, and the tiny face makes it feel extra special.
Choose gentle pinks, add little white hands and feet, and enjoy the calm rhythm of stitching. A finished crochet heart plush is always worth hugging or gifting.