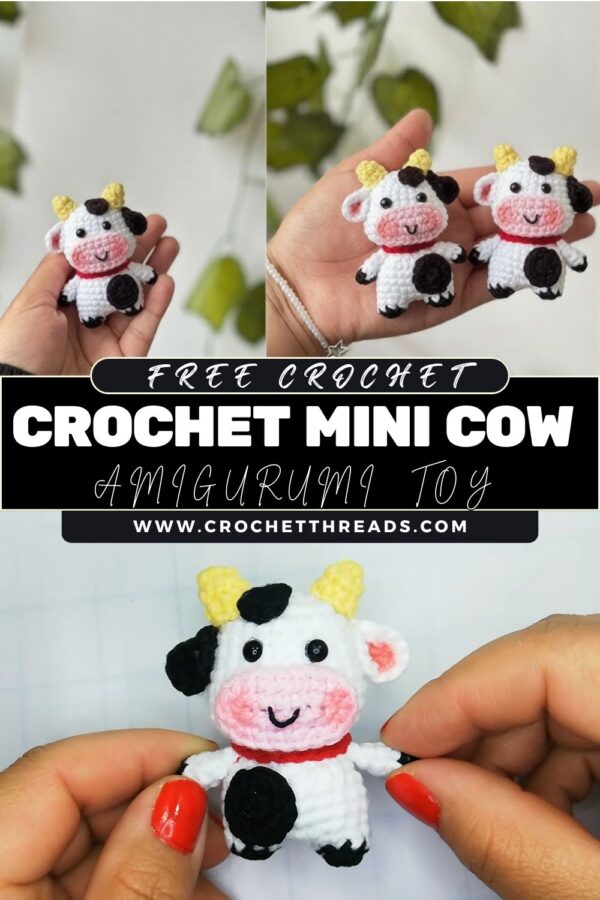
Cute Crochet Mini Cow Amigurumi Pattern Toy
Looking for a crochet cow pattern that’s small, sweet, and simple to make? This amigurumi cow tutorial-style pattern walks you through a mini crochet cow with a pink muzzle, black spots, tiny horns, and a bright red collar. It’s a perfect handmade crochet toy for gifts, plus you can easily turn it into a cute cow keychain with a small loop.
This mini crochet cow amigurumi pattern is a sample, inspired by the design details shown: a white crochet body, pink snout/muzzle, black spots on the head and body, small yellow horns, a red collar, and small black eyes with a cute smiling face. The finished cow is palm-sized, giving it that soft, handmade aesthetic that looks professional but stays beginner-friendly.
You’ll crochet the pieces separately (head, muzzle, ears, horns, body, arms, legs, spots, and collar), then assemble with clear placement tips so the face looks balanced and neat. If you’re new to amigurumi, don’t worry, this beginner crochet pattern uses basic stitches, simple shaping, and includes stuffing/assembly guidance.
Note: Stitch counts can vary by yarn, hook, and tension. This is an inspired/sample pattern, not an exact transcription from any video.
Materials
- Yarn (worsted/DK recommended)
- White (main)
- Pink (muzzle)
- Black (spots + eyes if embroidering)
- Yellow (horns)
- Red (collar)
- Crochet hook: 2.5–3.5 mm (choose smaller than yarn label for tighter fabric)
- Stuffing: polyester fiberfill
- Safety eyes: 6–8 mm black (or black yarn to embroider)
- Tapestry needle (assembly)
- Stitch markers
- Scissors
- Optional:
- Keychain ring + small chain (to make a cute cow keychain)
- Blush/pastel pink chalk (for cheeks)
Crochet Abbreviations
- MR = magic ring
- ch = chain
- sc = single crochet
- inc = increase (2 sc in the same stitch)
- dec = invisible decrease (sc2tog)
- sl st = slip stitch
- st(s) = stitch(es)
- rnd = round
- BLO = back loop only (optional, noted if used)
Finished Size
Palm-sized mini plush: approx. 9–12 cm (3.5–4.75 in) tall, depending on yarn/hook/tension.
Skill Level
Beginner to Intermediate (easy amigurumi)
Skills used: working in rounds, increases/decreases, basic shaping, and simple sewing.
Color Details
To match the design:
- Body/Head: White
- Muzzle: Pink
- Spots: Black (on head + body)
- Horns: Yellow (small)
- Collar: Red (thin band around neck)
- Eyes: Small black (safety eyes or embroidered)
- Expression: Smiling mouth (embroidered)
Pattern Overview
You will crochet:
- Head (white, round)
- Pink muzzle (oval/rounded piece)
- Ears (white outer + optional black spot/pink inner detail)
- Horns (yellow, tiny cones)
- Body (white, slightly oval)
- Arms (2 small white tubes)
- Legs (2 small white legs)
- Spots (black appliqués)
- Collar (red strip)
Then:
- Add eyes + smile
- Attach muzzle, horns, ears
- Sew the head to the body
- Add arms/legs/spots/collar
- Final shaping for a neat look
11. Step-by-Step Pattern (Detailed)
H2: Head (White)
Rnd 1: MR, 6 sc (6)
Rnd 2: inc x6 (12)
Rnd 3: (sc, inc) x6 (18)
Rnd 4: (2 sc, inc) x6 (24)
Rnd 5: (3 sc, inc) x6 (30)
Rnd 6: (4 sc, inc) x6 (36)
Rnd 7–10: sc around (36)
Place eyes (if using safety eyes):
- Insert 6–8 mm eyes between Rnd 8 and Rnd 9, about 6–7 stitches apart.
- Keep them centred so the muzzle can sit below.
Rnd 11: (4 sc, dec) x6 (30)
Rnd 12: (3 sc, dec) x6 (24)
Rnd 13: (2 sc, dec) x6 (18)
Rnd 14: (sc, dec) x6 (12)
Stuff firmly (rounded but not overstuffed).
Rnd 15: dec x6 (6)
Fasten off, close hole.
Head-shaping tip: After stuffing, pinch lightly from front to back to create a gentle “face” plane where the muzzle will sit.
H2: Snout / Muzzle (Pink)
This muzzle should look like a soft, rounded oval.
Rnd 1: MR, 6 sc (6)
Rnd 2: inc x6 (12)
Rnd 3: (sc, inc) x6 (18)
Rnd 4: sc around (18)
Fasten off with a long tail for sewing.
Optional nostrils: With black yarn, embroider two small vertical stitches on the muzzle, spaced evenly.
Placement: Centre the muzzle under the eyes, with the top edge of the muzzle sitting about 1–2 rounds below the eyes.
H2: Ears (Make 2, White)
Rnd 1: MR, 6 sc (6)
Rnd 2: (sc, inc) x3 (9)
Rnd 3: sc around (9)
Fasten off with a long tail.
Shape: Fold the ear slightly (like a small taco fold) and stitch the base closed with 2–3 small stitches.
Optional detail (spots): You can sew a tiny black spot onto one ear for extra “cow” character.
H2: Horns (Make 2, Yellow)
Small horns should be short and subtle.
Rnd 1: MR, 4 sc (4)
Rnd 2: (sc, inc) x2 (6)
Rnd 3: sc around (6)
Fasten off with the tail.
Lightly stuff the base only (or leave unstuffed for softer horns).
H2: Body (White)
A simple, compact oval body for a palm-sized plush.
Rnd 1: MR, 6 sc (6)
Rnd 2: inc x6 (12)
Rnd 3: (sc, inc) x6 (18)
Rnd 4: (2 sc, inc) x6 (24)
Rnd 5: (3 sc, inc) x6 (30)
Rnd 6–8: sc around (30)
Rnd 9: (3 sc, dec) x6 (24)
Rnd 10: sc around (24)
Stuff firmly, keeping the body smooth.
Rnd 11: (2 sc, dec) x6 (18)
Rnd 12: (sc, dec) x6 (12)
Rnd 13: dec x6 (6)
Fasten off, close hole.
Proportion note: The body should be slightly smaller than the head so the cow looks “cute and mini.”
H2: Arms (Make 2, White)
Rnd 1: MR, 6 sc (6)
Rnd 2–5: sc around (6)
Lightly stuff the bottom half only.
Fasten off with a long tail for sewing.
Tip: Understuffing arms keeps them neat and prevents stiffness.
H2: Legs (Make 2, White)
Rnd 1: MR, 6 sc (6)
Rnd 2: (sc, inc) x3 (9)
Rnd 3–5: sc around (9)
Stuff more firmly than arms.
Fasten off with a long tail.
Optional flatter base: Add one more round of sc (9) and slightly flatten while stuffing.
H2: Spots (Black)
Make a few small organic spots in different sizes. Here are two easy options.
Spot A (Small, make 1–2)
Rnd 1: MR, 5 sc (5)
Rnd 2: inc x5 (10)
Fasten off with the tail.
Spot B (Medium, make 1–2)
Rnd 1: MR, 6 sc (6)
Rnd 2: (sc, inc) x3 (9)
Rnd 3: (2 sc, inc) x3 (12)
Fasten off.
Placement idea:
- 1 spot on the side of the head
- 1–2 spots on front or side of body
Keep them asymmetrical for a natural cow pattern.
H2: Collar (Red)
A simple neck band.
Option 1: Crochet strip (recommended)
- ch 26–35 (wrap around neck; adjust length)
- Row 1: sc in 2nd ch from hook and across
Fasten off, leave tails. Tie or sew into a ring.
Option 2: Surface crochet
- Surface sl st around the neck seam after the head is attached.
Optional charm: Add a tiny yellow-stitched “bell” dot, or sew on a small bead (if not for small children).
H2: Face Assembly (Eyes, Smile, Muzzle)
- Eyes: If not using safety eyes, embroider small black eyes using 2–3 wraps of yarn per eye.
- Muzzle: Sew the pink muzzle centred below the eyes.
- Start by pinning it in place.
- Stitch evenly around, using small, neat stitches.
- Smile: With black yarn, embroider a simple smile:
- Make a small curved line starting under the muzzle centre.
- Keep it subtle for a “cute smiling face.”
Face proportions (important):
- Eyes: upper-mid head area
- Muzzle: centred under eyes (not too low)
- Smile: just under the muzzle, small curve
H2: Final Assembly
Attach parts in this order for the cleanest results:
- Attach the spots (head + body) before joining the head to the body (easier to sew flat).
- Attach horns on top of head:
- Place them between Rnd 4–6, about 4–6 stitches apart.
- Attach ears slightly lower and outward than horns:
- Around Rnd 6–8, angled slightly to the sides.
- Sew head to body:
- Align the centre of the head with the centre of the body.
- Use a whip stitch through both loops for a strong seam.
- Sew arms to the upper sides of the body (just under the neck).
- Sew legs to the bottom front of the body, spaced evenly so the cow can sit.
- Add a red collar around the neck seam and secure it at the back.
- Final shaping: massage and adjust stuffing so it looks smooth and symmetrical.
Round-by-Round or Stitch Guidance (Notes)
- Always use a stitch marker to track the start of rounds.
- Keep tension tight so stuffing doesn’t show through.
- If your cow looks too large or holes appear:
- go down 0.5 mm in hook size
- Or use slightly thicker yarn with tighter tension
Stuffing and Shaping Tips
- Stuff in small amounts, pushing the filling into curves (cheeks and the top of the head).
- Avoid overstuffing the head. Overstuffing can stretch stitches and make eyes look “sunken.”
- For a neat body:
- stuff firmly at the base
- Then reduce stuffing near the neck so the head sits cleanly
Assembly Tips
- Pin first, sew second: Use sewing pins or spare yarn pieces to hold placement.
- Use the same yarn colour as the piece you’re attaching for invisible seams.
- Count stitches between parts (ears/horns/eyes) to keep symmetry.
- Weave in ends carefully and tuck them inside the plush for a clean,n professional finish.
Common Beginner Mistakes to Avoid
- Skipping stitch counts: leads to lopsided shaping—count rounds often.
- Loose tension: creates holes and visible stuffing. Use a smaller hook if needed.
- Placing the muzzle too low makes the face look long; keep it closer to the eyes.
- Overstuffing limbs: arms/ears can look sti. Light stuffing is best.
- Rushing assembly: most “professional look” comes from careful placement and sewing.
Customization Ideas
- Turn it into a cute cow keychain: add a small loop on top of the head (ch 10–15, sl st back) and attach a keyring.
- Add tiny cheeks with a blush tint for extra sweetness.
- Swap the collar colours (pink, blue, green) to suit different themes.
- Make a sleepy cow: embroider curved closed eyes instead of safety eyes.
- Add a tiny tail: ch 6–8 with a small black tip.
Care Instructions
- Best for gentle handling as a handmade plush.
- Spot clean with mild soap and cool water.
- If washing is needed: hand-wash, squeeze (don’t wring), reshape, and air-dry.
- If using safety eyes/beads, keep away from very young children.
Who Can Use This Pattern
- Beginners learning amigurumi shaping and basic assembly
- Intermediate crocheters wanting a quick, cute project
- Gift-makers creating a handmade crochet toy for birthdays, baby showers, or stocking stuffers
- Sellers/designers looking for an inspired mini crochet cow style (make sure to credit your own work and follow platform rules)
Conclusion
This mini crochet cow pattern is a charming, palm-sized amigurumi cow with a white body, pink muzzle, black spots, tiny yellow horns, and a bright red collar finished with small black eyes and a sweet smile. It’s beginner-friendly, works up quickly, and looks wonderfully “soft handmade,” making it a standout gift or desk buddy. If you try this crochet cow pattern, save it for later, share it with a crochet friend, and bookmark this page so you can come back and make a full herd in different colours.