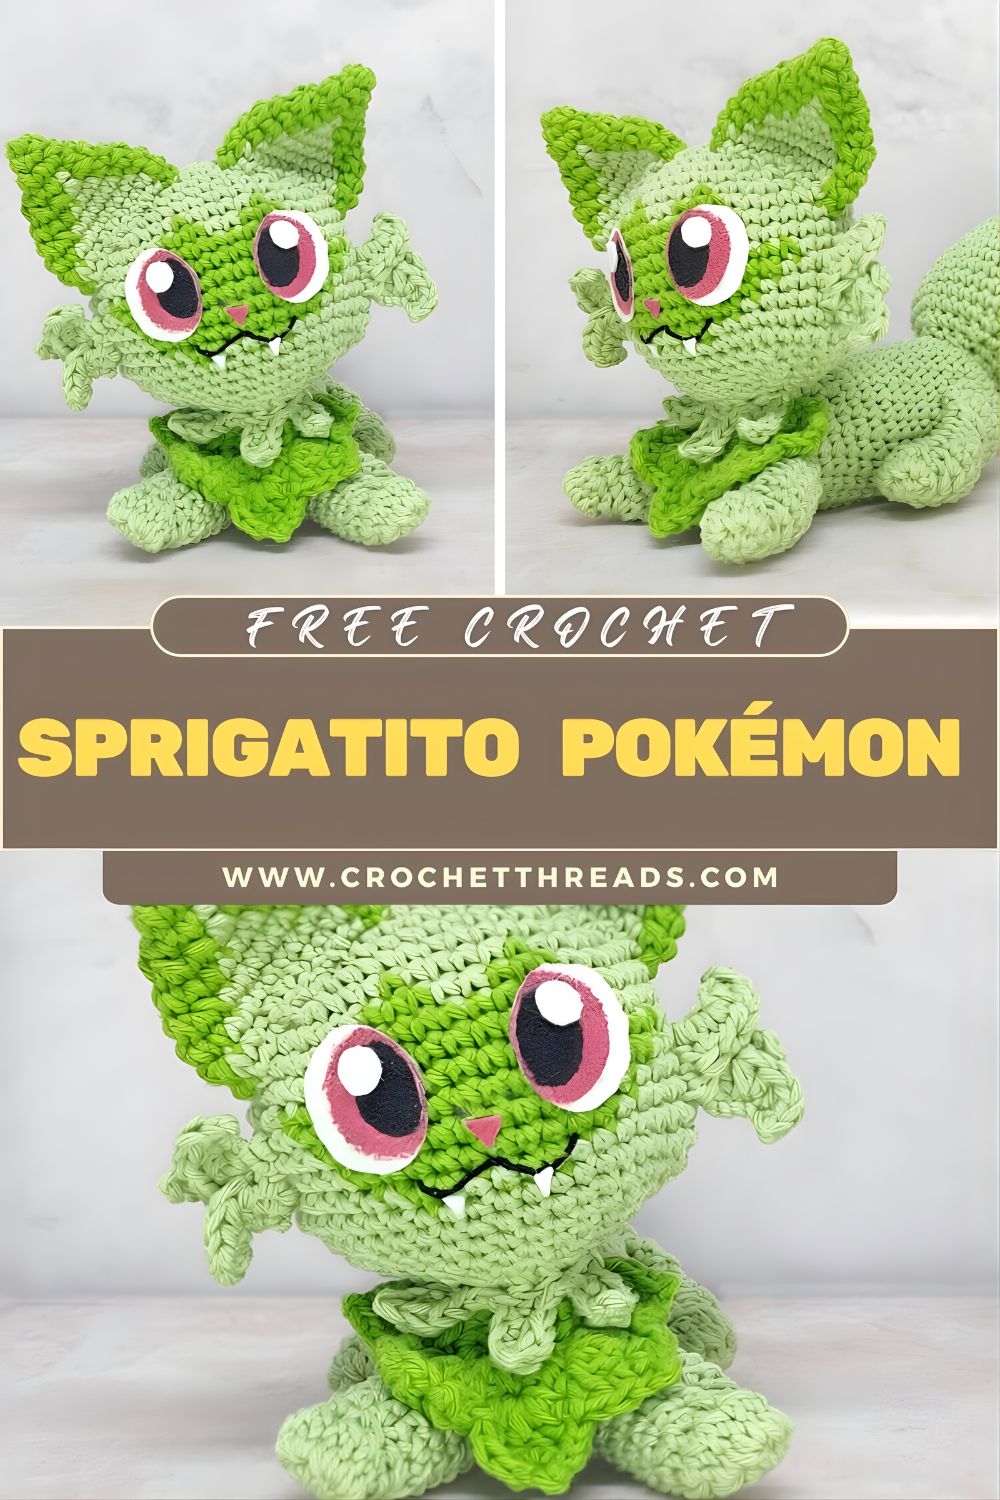
Cute Crochet Sprigatito Pattern Beginner Pokémon Cat Amigurumi
Looking for a fun crochet Pokémon project that’s cute, giftable, and beginner-friendly? Save this crochet Sprigatito plush tutorial and make your own Pokémon-inspired amigurumi cat! This step-by-step Pokémon crochet pattern shows how to crochet the head and body, stitch perky ears with dark green accents, add tiny legs, and shape a thick, curved tail. The best part is the leafy neck collar,r an easy detail that makes the finished crochet plush toy instantly recognizable and extra adorable.
A Sprigatito crochet amigurumi is a green Pokémon-inspired cat plush with a round head, expressive eyes, pointed ears, and a leafy neck ruff, le instantly recognizable and totally huggable. Pokémon crochet toys are so popular because they’re nostalgic, collectible, and fun to customize in different yarns and sizes. If you’ve been wanting a friendly crochet sprigatito pattern, this beginner-focused guide keeps the shaping simple and the pieces manageable. You’ll end up with a charmiPokémonmon crochet plush using an easy amigurumi cat pattern and a perfect DIY Pokémon toy.
MATERIALS NEEDED
- Light green yarn (main color)
- Dark green yarn (ear accents + leaf collar details)
- 3–4 mm crochet hook (choose smaller for tighter stitches)
- Safety eyes (10–14 mm, depending on size) or felt eye pieces
- Polyester stuffing
- Yarn needle (tapestry needle)
- Stitch marker
- Scissors
- Fabric glue (helpful for felt details or securing small accents)
CROCHET ABBREVIATIONS
- MR – Magic Ring
- sc – single crochet
- inc – increase (2 sc in the same stitch)
- dec – decrease (sc2tog; invisible decrease recommended)
- sl st – slip stitch
- ch – chain
- hdc – half double crochet
STEP-BY-STEP CROCHET PATTERN
Notes (read first):
- Work in continuous rounds unless stated.
- Use a stitch marker to mark the first stitch of each round.
- For a neat amigurumi look, use tight tension and a hook on the smaller side.
- Finished size varies by yarn and hook; with worsted + 3.5 mm, expect ~7–9 in tall.
HEAD (Light Green)
- Rnd 1: MR, 6 sc (6)
- Rnd 2: inc x6 (12)
- Rnd 3: (sc, inc) x6 (18)
- Rnd 4: (2 sc, inc) x6 (24)
- Rnd 5: (3 sc, inc) x6 (30)
- Rnd 6: (4 sc, inc) x6 (36)
- Rnd 7: (5 sc, inc) x6 (42)
- Rnd 8–12: sc around (42) — 5 rounds
- Rnd 13: (5 sc, dec) x6 (36)
- Rnd 14: (4 sc, dec) x6 (30)
- Rnd 15: (3 sc, dec) x6 (24)
Add eyes: Place safety eyes between Rnds 10–11, about 7–9 stitches apart (adjust for the “big-eyed” look).
12. Rnd 16: (2 sc, dec) x6 (18)
- Rnd 17: (sc, dec) x6 (12)
- Stuff firmly, shaping the face.
- Rnd 18: dec x6 (6)
Fasten off, close opening, weave in ends.
BODY (Light Green)
- Rnd 1: MR, 6 sc (6)
- Rnd 2: inc x6 (12)
- Rnd 3: (sc, inc) x6 (18)
- Rnd 4: (2 sc, inc) x6 (24)
- Rnd 5: (3 sc, inc) x6 (30)
- Rnd 6–9: sc around (30) — 4 rounds
- Rnd 10: (3 sc, dec) x6 (24)
- Rnd 11–12: sc around (24) — 2 rounds
- Rnd 13: (2 sc, dec) x6 (18)
- Stuff the body firmly (slightly oval is cute).
- Rnd 14: (sc, dec) x6 (12)
- Rnd 15: dec x6 (6)
Fasten off, close opening. Leave a tail if you prefer sewingthe head/body more securely.
EARS (Make 2)
Outer ear (Light Green)
- Rnd 1: MR, 4 sc (4)
- Rnd 2: (sc, inc) x2 (6)
- Rnd 3: (2 sc, inc) x2 (8)
- Rnd 4: (3 sc, inc) x2 (10)
- Rnd 5: sc around (10)
Fasten off, leave a tail for sewing.
Inner ear accent (Dark Green, optional but very “Sprigatito”)
- Ch 2
- Row 1: 2 sc in 2nd ch from hook (2)
- Row 2: ch 1, turn, inc, sc (3)
- Row 3: ch 1, turn, inc, sc, sc (4)
Fasten off, leave tail, or use fabric glue to attach centered inside ear.
Shape: Lightly pinch the base so the ear looks triangular and perky.
LEGS (Make 4, Light Green)
Small, simple legs work best for a chibi plush.
- Rnd 1: MR, 6 sc (6)
- Rnd 2: (sc, inc) x3 (9)
- Rnd 3–4: sc around (9)
Lightly stuff. Flatten top and sc through both layers to close (4–5 sc).
Fasten off, leave a tail.
TAIL (Light Green)
A thick tail looks extra plushy. To make it curve, you’ll add a few uneven rounds.
- Rnd 1: MR, 6 sc (6)
- Rnd 2: inc x6 (12)
- Rnd 3: (sc, inc) x6 (18)
- Rnd 4–7: sc around (18)
- Rnd 8 (curve shaping): 10 sc, dec x4 (14)
- Rnd 9: sc around (14)
- Stuff firmly.
- Flatten opening and sc through both layers to close (7 sc).
Fasten off, leave a long sewing tail.
Optional “fluff” look: surface crochet a few short lines or add a small dark-green tip accent if you’d like more detail.
LEAF COLLAR (Dark Green)
This is the signature leafy neck decoration. You’ll crochet a chain “ring,” then add leaf points around it.
- Base ring: ch 24–30 (fit around the neck; test by wrapping around the body’s top).
- sl st to first ch to form a ring (don’t twist).
- Leaf edge (repeat around): (sl st, ch 2, hdc, dc, hdc, ch 2, sl st) into next chain space.
- This makes a leaf-like point.
- Continue around until you like the fullness.
- Fasten off, leave tails for sewing to the neck.
Tip: If you want chunkier leaves, use (sl st, ch 2, hdc, dc, dc, hdc, ch 2, sl st).
FACE DETAILS
Eyes:
- If using safety eyes: position them for a wide, cute expression (slightly low on the face). Add small white felt/yarn highlights for extra sparkle.
- If using felt: cut oval/round shapes and glue; let dry completely.
Nose + mouth (embroidery):
- With dark green or black embroidery floss/yarn:
- Stitch a tiny straight nose (1–2 stitches).
- Add a small “smile” curve under it (simple U shape).
Optional cheek blush:
- A tiny pink embroidery stitch or pastel chalk (sealed gently) adds charm.
ASSEMBLY
- Sew head to body: Center the head on top of the body. Pin first, then sew with small whip stitches. Add a bit more stuffing at the neck before closing.
- Attach legs: Place 2 legs at the front bottom and 2 at the back bottom. A slightly wider stance helps it sit nicely. Sew securely.
- Attach tail: Sew to the back of the body, slightly above the legs. Angle it outward for a playful pose.
- Attach ears: Position on the top sides of the head. Keep them symmetrical and slightly forward-facing for a cute expression.
- Add leaf collar: Wrap around the neck seam and tack it in place with a few stitches (or a dot of fabric glue on the underside).
- Final check: Tug gently on pieces to ensure everything is secure. Weave in all ends inside the body/head.
CROCHET TIPS FOR BEGINNERS
- Keep stitches tight: Amigurumi looks best when stuffing doesn’t show—use a 3–3.5 mm hook if your stitches are loose.
- Use a stitch marker every round: It’s the easiest way to avoid losing your place.
- Stuff gradually, not all at once: Small pieces of stuffing prevent lumps and help keep the head perfectly round.
- Pin before sewing: Use pins or stitch markers to place ears/legs evenly before committingtoh stitches.
- Choose smooth yarn for learning: A basic worsted acrylic or cotton blend makes counting stitches much easier than fuzzy novelty yarn.
DESIGN VARIATIONS
- Pastel Sprigatito: Use mint + sage accents for a softer, kawaii look.
- Mini keychain version: Use DK yarn and a 2.5–3.0 mm hook; add a hanging loop on the head.
- Baby toy version: Skip safety eyes and embroider the eyes instead; use cotton yarn for easy washing.
- Rainbow Pokémon cat: Create a multicolor body and keep the collar dark green—super fun for craft fairs.
USES FOR THIS CROCHET PLUSH
- A handmade toy for Pokémon lovers
- A thoughtful Pokémon fan gift (birthdays, holidays, party favors)
- Cute kids’ room decoration or nursery shelf plush
- A standout craft fair product (offer custom colors!)
- A small keychain plush for backpacks (mini version)
CONCLUSION
This Sprigatito-inspired plush is the kind of project that’s hard to make “just one” of. Once you see that round face, big eyes, and leafy collar come together, you’ll want a whole squad in different colors. The crochet Sprigatito pattern is beginner-friendly, works up quickly, and makes an adorable Pokémon crochet plush for gifting or collecting. Take your time with the assembly, stuff evenly, and don’t be afraid to personalize the expression. When you finish, snap a photo and share your cute little Pokémon cat!