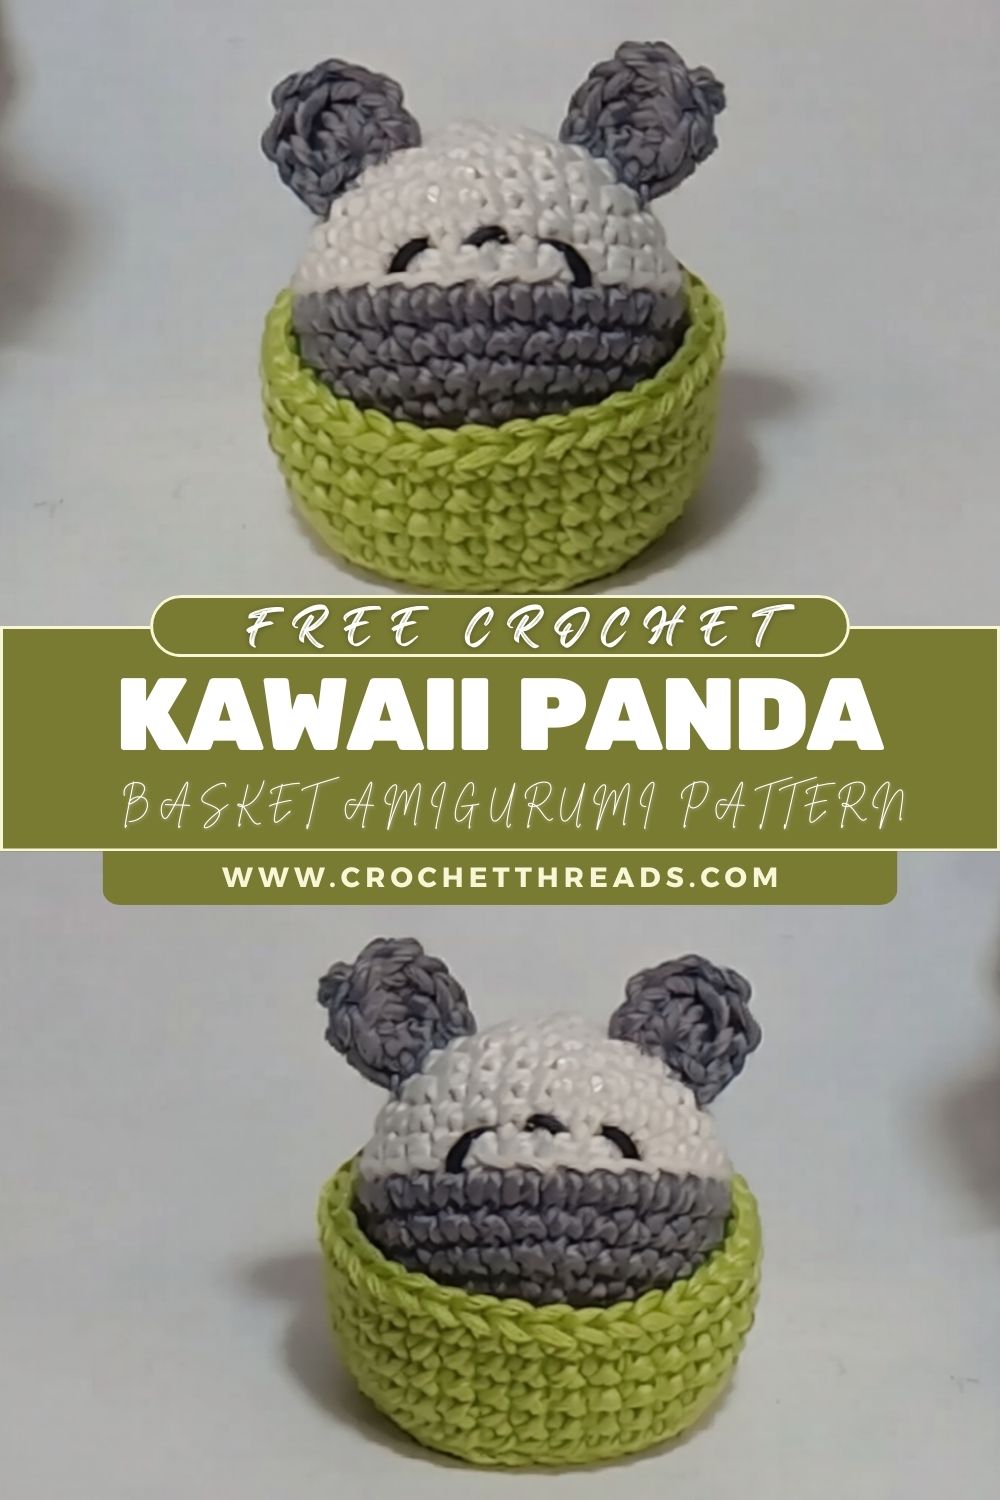
Crochet Kawaii Panda Basket Amigurumi Pattern
This Crochet Panda project is a cute Amigurumi Panda head that sits inside a tiny Crochet Panda Basket, a perfect Kawaii Panda Crochet Pattern for beginners. With simple shaping, minimal sewing, and an easy basket build, it’s quick to finish and adorable on display. If you love compact amigurumi, this little panda is a satisfying weekend make.
A kawaii crochet panda basket combines two favourite crochet trends: mini amigurumi and practical decor. In this project, you’ll crochet a rounded panda head with tiny ears and a sweet, sleepy expression, then create a small basket to hold the panda snugly, like a peekaboo plush display. Panda amigurumi designs are popular because they’re instantly recognizable, work beautifully in simple shapes, and look adorable with small facial details. The classic panda colour blocking (white head, darker eye/nose area) creates a high-impact look even with beginner-friendly stitches.
This Amigurumi Panda pattern is designed to be approachable: it uses basic single-crochet rounds, smooth increases and decreases, and simple embroidery for the facial features. The basket is built from a simple flat circle base plus straight walls, an ideal technique for beginners.
You can use this Crochet Panda Basket as desk decor, nursery shelf styling, or a handmade gift topper. It also serves as a tiny storage basket for stitch markers, rings, or earbuds, and it’s a charming collectable when made in different colours or expressions.
Finished Design Description
The finished piece features a compact panda head with a smooth, rounded silhouette and gentle tapering at the bottom so it nestles inside the basket. Two small, round ears sit symmetrically on top, giving the panda a classic, chubby look.
The face has a darker grey eye-and-nose area stitched on as a separate panel, which makes the sleepy eyes pop. The expression is simple and calm: curved embroidered eyes and a tiny nose/mouth detail for a relaxed, kawaii vibe.
The panda sits in a light green mini crochet basket with a sturdy circular base and neat vertical walls. The style is minimal, clean, and decorative, and it’s perfect for beginners and fast enough to make in a single session.
Approximate size (with DK/light worsted yarn + 3.0–3.5 mm hook):
- Panda head: ~2.5–3 in (6–7.5 cm) across
- Basket: ~3–3.5 in (7.5–9 cm) across, ~2 in (5 cm) tall
Materials Needed
Yarn (DK or light worsted recommended):
- White (panda head)
- Dark grey or charcoal (face patch + optional ear accents)
- Light green (basket)
- Black embroidery thread or black yarn (sleepy eyes + nose/mouth)
- Optional: pink thread (tiny blush cheeks)
Tools & Notions:
- Crochet hook: 3.0 mm (tight fabric for amigurumi)
- If you crochet loosely, use 2.5 mm
- Polyester fiberfill stuffing
- Yarn needle (tapestry needle)
- Stitch marker (or scrap yarn)
- Scissors
- Optional: 6–8 mm safety eyes (this pattern uses embroidery for a sleepy look, but eyes are optional)
Crochet Abbreviations
- MR = Magic Ring
- ch = chain
- sc = single crochet
- inc = increase (2 scthe in same stitch)
- dec = decrease (single crochet 2 stitches together)
- sl st = slip stitch
- st = stitch
- BLO = back loop only
- FLO = front loop only
- ( ) = repeat instructions within parentheses
- [ ] = stitch count at end of round
Step-by-Step Crochet Pattern
Notes before you start:
- Work in continuous rounds unless stated. Use a stitch marker to mark the first stitch of each round.
- For a smoother look, use invisible decreases.
- Stuff firmly, but don’t overstuff—especially the lower part that sits inside the basket.
Part 1 – Crochet Panda Head (White)
Round 1: MR, 6 sc into MR. [6]
Round 2: inc around. [12]
Round 3: (sc, inc) around. [18]
Round 4: (2 sc, inc) around. [24]
Round 5: (3 sc, inc) around. [30]
Round 6: (4 sc, inc) around. [36]
Round 7: (5 sc, inc) around. [42]
Rounds 8–12: sc around. [42] (5 rounds)
Round 13: (5 sc, dec) around. [36]
Round 14: (4 sc, dec) around. [30]
Round 15: (3 sc, dec) around. [24]
Round 16: (2 sc, dec) around. [18]
Begin stuffing. Shape into a smooth ball.
Round 17: (sc, dec) around. [12]
Add a bit more stuffing, keeping the bottom slightly flatter so it sits nicely in the basket.
Round 18: Dec around. [6]
Fasten off, close the opening, and weave in ends.
Part 2 – Crochet Panda Face Section (Dark Grey Patch)
This is a small, oval-shaped panel that sits on the lower front half of the head.
Round 1: MR, 6 sc. [6]
Round 2: inc around. [12]
Round 3: (sc, inc) around. [18]
Round 4: sc around. [18]
Round 5: (2 sc, dec) around. [12]
Fasten off, leave a long tail for sewing.
Placement tip: Position the patch centred on the face, slightly lower (so the sleepy eyes sit just above/into the top edge of the patch).
Part 3 – Crochet Panda Ears (Make 2, Dark Grey or White)
Round 1: MR, 6 sc. [6]
Round 2: inc around. [12]
Round 3: (sc, inc) around. [18]
Round 4: sc around. [18]
Fasten off, leave a tail for sewing.
Do not stuff; flatten into a semicircle.
Part 4 – Crochet Basket Base (Light Green)
Round 1: MR, 6 sc. [6]
Round 2: inc around. [12]
Round 3: (sc, inc) around. [18]
Round 4: (2 sc, inc) around. [24]
Round 5: (3 sc, inc) around. [30]
Round 6: (4 sc, inc) around. [36]
Round 7: (5 sc, inc) around. [42]
Round 8: (6 sc, inc) around. [48]
This makes a basket wide enough for the panda’s head to sit snugly.
Part 5 – Basket Walls (Light Green)
Round 9 (turning round): BLO sc around. [48]
This creates a crisp corner between the base and the walls.
Rounds 10–14: sc around. [48] (5 rounds)
Adjust height here if you want a deeper basket.
Optional neat edge:
Round 15: sl st around OR (sc, ch 1, skip 1) around for a tiny decorative edge.
Fasten off, weave in ends.
Optional stiffening (beginner-friendly): Use a slightly smaller hook for the basket or insert a felt circle in the base after finishing.
Part 6 – Assembly Instructions
1) Attach the Face Patch
- Pin the dark grey patch to the head, centred on the front.
- Sew around the edge with small whip stitches, smoothing as you go so it lies flat.
2) Add the Ears
- Place ears on the top sides of the head, about 6–8 stitches apart (adjust to your preference).
- Sew each ear securely; stitch through both the ear and the head at several points for stability.
3) Embroider the Sleepy Face
Using black embroidery thread or thin black yarn:
- Eyes: Stitch two curved “closed eyes” above the patch (simple, shallow arcs).
- Nose: Make a tiny vertical or triangular nose centred on the patch.
- Mouth: Add a short “Y” or small curved line under the nose.
Optional: add tiny blush dots with pink thread.
4) Insert Panda into Basket
- Place the panda head into the basket. It should sit snugly and peek out.
- If you want it permanently attached, tack it in place with a few hidden stitches through the bottom of the head into the inside basket wall.
5) Final Shaping
- Gently roll the head between your palms to smooth it.
- Adjust the ear angle and face placement with a few extra stitches, if needed, for symmetry.
Tips for Beginners
- Use a stitch marker every round—losing your first stitch is the #1 cause of uneven shapes.
- Count every round before moving on; correct stitch counts, keep the head perfectly round.
- Aim for tight stitches so stuffing doesn’t show (size down your hook if needed).
- Invisible decreases make the head look smoother and more professional.
- Pin before sewing (ears and patch). Removable pins or spare yarn pieces make placement easy.
Customization Ideas
- Yarn colours: Make a brown “bear” version, a pink bunny in a basket, or a pastel panda (lavender patch + white head).
- Basket colours: Try beige (natural woven look), yellow (spring vibe), or striped walls.
- Expressions: Swap sleepy eyes for tiny “dot eyes,” add eyebrows, or stitch a little tongue.
- Size: Use thicker yarn and a larger hook for a larger plush; use crochet thread for a micro keychain. Keep the same pattern—just match hook to yarn and crochet tightly.
FAQs
1) Can I use worsted-weight yarn for this Crochet Panda Basket?
Yes. Use a smaller hook than the yarn label recommends (often 3.5–4.0 mm) to keep the fabric tight, and expect a larger finished piece.
2) How do I stop the basket from flaring outward?
Make sure Round 9 is worked in BLO, then keep your tension steady on wall rounds. If it still flares, go down one hook size for the walls.
3) Do I have to use safety eyes?
No. This design looks best with embroidered sleepy eyes, and embroidery is also safer for gifts intended for small children.
4) My panda head doesn’t sit nicely in the basket—what can I do?
Slightly flatten the bottom of the head while stuffing and reduce stuffing near the very bottom. You can also sew a few hidden tacking stitches to anchor it.
5) What’s the easiest way to make the face look centred?
Find the head’s “front” by placing the closing point at the back. Then align the patch centre with the head centreline and pin it before sewing.
Conclusion
This Kawaii Panda Crochet Pattern creates a charming Amigurumi Panda head tucked into a sweet Crochet Panda Basket—a quick, beginner-friendly project with big decorative payoff. Whether you display it on your desk, add it to a nursery shelf, or gift it as a handmade collectable, it’s a cute make that’s easy to customise. Pick your favourite colours, stitch up the basket and panda, and enjoy a tidy little crochet companion that’s guaranteed to brighten any corner.