
Exceptional Crochet Damru Keychain Simple and Fun Pattern for Beginners
Handmade crochet pieces always carry a special charm, but designs like this damru keychain bring something truly unique to the table. Its eye-catching shape and cultural touch make it stand out from typical crochet accessories.
From adding personality to your keys to creating a thoughtful, handmade gift, this crochet damru keychain is both creative and meaningful. The compact size and structured design make it an enjoyable project for anyone who loves experimenting with small, detailed crochet items.
Crochet amigurumi designs continue to grow in popularity among handmade craft lovers because they’re fun, portable, and easy to personalize. Amigurumi is the technique of crocheting small stuffed shapes, usually worked in spirals, then shaping them with increases, decreases, and stuffing. Once you understand the basic “shape-building” idea, you can create everything from animals to food charms to cultural symbols.
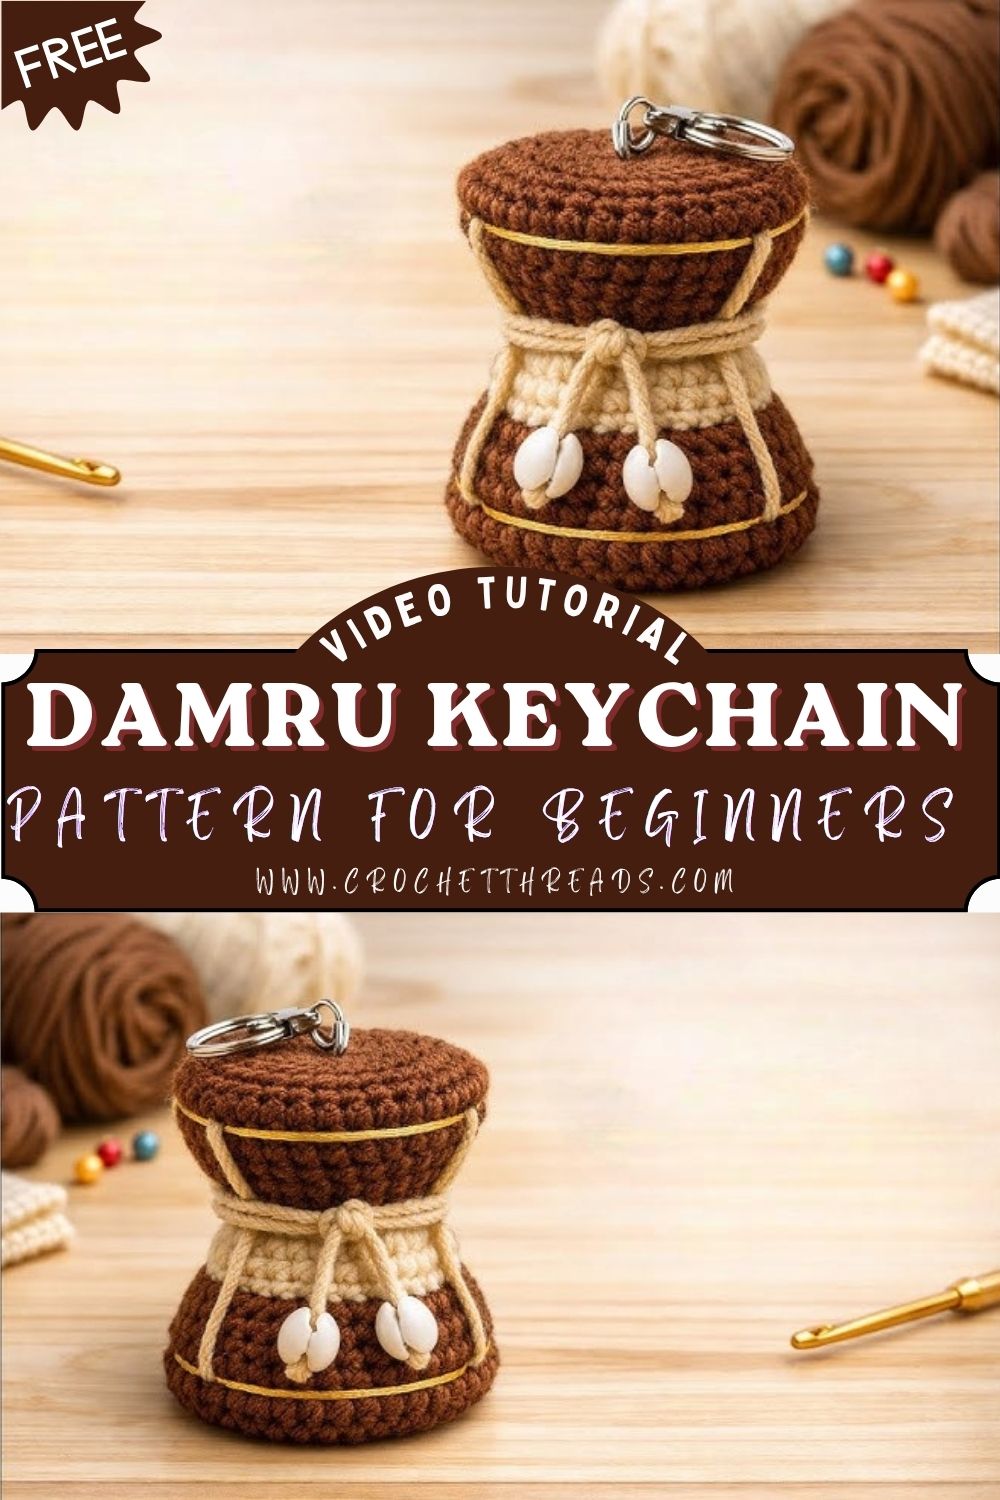
The damru is a traditional hourglass-style drum shape known for its distinctive silhouette: two rounded ends and a cinched middle. That shape translates beautifully into crochet because it’s basically a mirrored form that creates one rounded side and then builds the second. It’s also trending as a keychain idea because it looks striking even in a small size, makes a thoughtful gift, and can be used as decor on backpacks, zipper pulls, rearview mirror hangings, or even as a small festive ornament. The best part is that the stitches are beginner-friendly: mostly single crochet, simple increases, and neat decreases, plus a little finishing work to attach beads and a keychain ring.
Materials Needed
- Cotton yarn (2–3 colors: brown, beige, white)
- Crochet hook (2.5mm–3.5mm)
- Polyester fiberfill stuffing
- Yarn needle
- Stitch marker
- Scissors
- Beads (for decorative hanging strings)
- Keychain ring
Abbreviations
- sc = single crochet
- inc = increase (2 sc in same st)
- dec = decrease (single crochet 2 together)
- sl st = slip stitch
- ch = chain
- st = stitch
Skill Level
Beginner to intermediate.
You’ll need to be comfortable working in the round, counting stitches, and placing a stitch marker. The shaping is straightforward, but keeping the two sides symmetrical takes a bit of attention—very doable with slow, steady counting.
Step-by-Step Pattern
Notes before you start:
- Work in continuous rounds (spiral) unless you choose to join rounds. Spiral rounds look clean and are great for amigurumi.
- Place a stitch marker in the first stitch of each round and move it up every round.
- Finished size depends on the yarn and hook. With cotton yarn and a 2.5–3.0 mm hook, you’ll get a compact, keychain-friendly piece.
- Color changes are optional. You can keep one solid color, or add simple stripes to make it look more “drum-like.”
TOP ROUND (FIRST SIDE)
Round 1: Start with a magic ring, 6 sc into the ring (6)
Pull tight to close the center.
Round 2: inc in each st around (12)
Round 3: (sc, inc) around (18)
Round 4: (2 sc, inc) around (24)
At this point, you have a neat, flat circle that will become the “face” of the first rounded end. If your circle is trying to ruffle, your tension may be loose—go down a hook size or crochet a bit tighter. If it’s cupping too fast, you may be crocheting too tightly, but it usually settles once you add more rounds.
Round 5: sc around (24)
Round 6: sc around (24)
These even rounds start giving the first end some depth. For a more rounded “bulb,” keep two even rounds. For a slightly flatter end, do only one even round. I like two because it makes the keychain feel plump and polished.
BODY (CENTER NARROW PART)
Now the magic happens: we narrow down to create the hourglass center.
- Reduce stitches gradually
Round 7: (2 sc, dec) around (18)
Round 8: (sc, dec) around (12)
You should already see the shape pulling inward. Don’t worry if it looks dramatic—it’s exactly what you want for that damru pinch.
- Work a few even rounds to create a narrow middle
Round 9: sc around (12)
Round 10: sc around (12)
Round 11 (optional): sc around (12)
Two rounds give a short, neat middle. Three rounds give a slightly longer center band, which can be nice if you plan to wrap decorative yarn around it later. If you’re making it as a keychain, I recommend two rounds so it stays compact.
BOTTOM ROUND (SECOND SIDE)
Now we build the second rounded end to mirror the first.
- Increase again to mirror the top
Round 12: (sc, inc) around (18)
Round 13: (2 sc, inc) around (24)
- From the second rounded side
Round 14: sc around (24)
Round 15: sc around (24)
At this stage, you have the full damru silhouette: rounded end, narrow center, rounded end. You can lightly stuff now, or wait until you start closing. I prefer to begin stuffing here so I can shape both ends evenly.
CLOSING
- Stuff firmly
Add stuffing in small pieces. First, push the stuffing into the bottom, rounded end, and shape it with your fingers until it is smooth. Next, add a little stuffing into the top end as well (you can use the back of your hook or a pencil to push it into place). After that, check the center: it should feel firmer than empty, but not bulging. The center is meant to stay “pinched,” so avoid packing it too tightly. - Decrease to close neatly.
Round 16: (2 sc, dec) around (18)
Round 17: (sc, dec) around (12)
Pause here and check the shape. If the bottom end looks slightly flat, add a tiny bit more stuffing before the opening gets too small.
Round 18: dec around (6)
Fasten off, leaving a tail long enough to sew.
Thread the tail onto your yarn needle. Then weave through the front loops of the remaining 6 stitches and pull tight to close the hole neatly. Pass the needle through the center and out the side, pull gently to sink the closure, and trim the yarn end after weaving it in securely.
Assembly
Assembly is where your crochet damru keychain really comes to life.
Decide which orientation you want: one end will be the “top” where the keychain ring sits. Next, take a length of yarn (or strong thread) in a matching or contrasting color and wrap it around the narrow center a few times to create a decorative band. After that, knot it tightly and hide the knot at the back of the center band.
Then, create the classic hanging decorations. Cut 2–4 short strands (depending on how full you want the look). Attach them to the center band using a simple lark’s head knot or by sewing them on with a yarn needle. I like two strands on each side for balance, but you can do one on each side for a simpler, minimal style.
Add beads. Thread one or more beads onto each strand. Then tie a secure knot under the last bead to keep it in place. If the bead hole is large, you can tie two knots or add a tiny seed bead at the end as a stopper.
Finally, attach the keychain ring. You have a couple of easy options:
- Yarn loop method: Crochet a small chain loop (ch 10–14; adjust for ring size), slip-stitch to form a loop, then sew the loop firmly onto the top end of the damru.
- Direct stitch method: Use strong yarn or thread to sew through the top stitches and around the keychain ring multiple times, forming a tight, reinforced connection.
Whichever method you choose, tug gently to test strength. A keychain gets pulled a lot, so it’s worth reinforcing.
Finishing Touch
shape the damru evenly. Use your hands to smooth each rounded end, then pinch the center slightly so the hourglass curve is clear. Next, check the symmetry: if one side looks larger, you can carefully move a bit of stuffing from one end to the other by pushing it through the middle.
Then, hide all yarn ends. Weave ends in different directions inside the amigurumi so they don’t work loose. If you used separate strands for the bead strings, make sure each one is double-knotted and trimmed neatly.
Finally, do a quick “real life” test. Hold it by the keychain ring, let it dangle, and see if the bead strings fall nicely and if the damru sits straight. Adjust the strand lengths if needed—small tweaks make a big difference in how professional it looks.
Tips for Beginners
- Maintain consistent tension so the surface looks neat and the stuffing doesn’t show.
- Count stitches carefully in every round to keep the shape smooth
- Don’t overstuff the center, or the hourglass pinch will disappear
- Use a stitch marker for rounds so you don’t accidentally skip or add stitches
- Keep both sides symmetrical by matching the same number of increases and even rounds
Conclusion
Crocheting a damru keychain is one of those projects that feels small but special. The shaping is simple: build one rounded side, narrow down, then mirror the other side—yet the finished look is instantly recognizable and full of character. Once you’ve made one, it’s hard to stop, because changing colors, adding stripes, or switching bead styles can make each crochet damru look totally different.
Try earthy combinations like brown and beige for a traditional vibe, or go bold with black and white, bright red, or even leftover scrap yarn for a playful twist. Whether you keep it for yourself, add it to your bag, or wrap it up as a handmade gift, a Crochet Damru Keychain is a memorable little craft that shows real love and time in every stitch.


