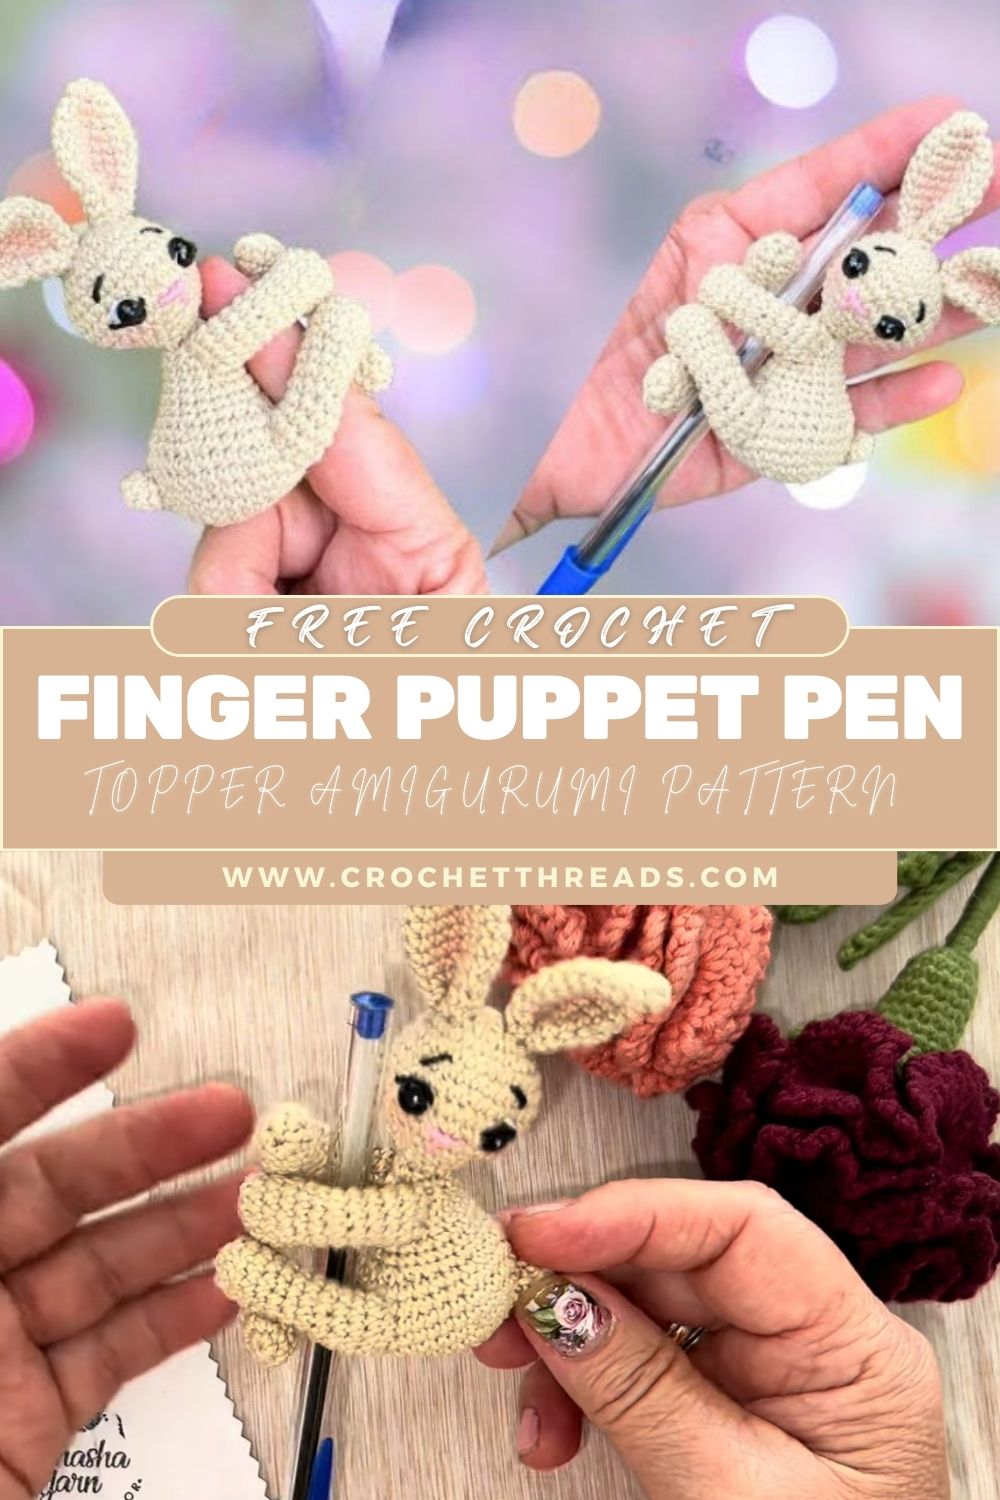
Crochet Finger Puppet Pen Topper Amigurumi Pattern
Tiny crochet toys have a special kind of magic, quick to make, fun to customize, and impossible not to smile at. This super cute crochet bunny is designed as a finger puppet and also works beautifully as a pen topper. With simple shaping and friendly embroidery, it’s a perfect beginner project that still looks polished and gift-worthy. If you love kawaii-style amigurumi, this little bunny is about to become your new favourite quick make.
This crochet bunny finger puppet/pen topper is a small amigurumi bunny with a rounded head, long, floppy ears, and tiny arms positioned as if it’s giving a hug. The base is left open so it can slide onto a finger for play or onto a pen/pencil to become a cute desk companion.
This super cute crochet bunny pattern is especially great for beginners because it uses mainly single crochet, easy increases/decreases, and minimal sewing. The pieces are small, so you can practice shaping without committing to a large project, and you’ll build confidence with clean finishing.
Best of all, this bunny is wonderfully versatile: use it as a finger puppet, pen topper, small toy, part favour, desk decoration, stocking stuffer, teacher gift, or add a loop to turn it into a keychain charm. One pattern, ern so many cute possibilities
Materials Needed
Here’s what you’ll need for a neat, sturdy result:
- Yarn: soft cotton or acrylic (DK/light worsted works best)
- Main colour (white, cream, pastel pink, grey, etc.)
- Small amounts of pink yarn (nose/cheeks)
- Black embroidery thread or black yarn (eyes, smile)
- Crochet hook: 2.5–3.5 mm (choose a smaller hook for tighter stitches)
- Yarn needle (tapestry needle)
- Stitch marker (or a scrap of yarn)
- Stuffing/fiberfill (small amount)
- Scissors
- Safety eyes (6 mm) or embroidery thread (recommended for very small puppets)
- Optional: a pen or pencil (if making a pen topper)
- Optional: keychain ring, small ribbon bow, or mini bell
Crochet Abbreviations (US Terms)
- MR = magic ring
- sc = single crochet
- inc = increase (2 sc in same st)
- dec = decrease (sc 2 together; invisible decrease recommended)
- sl st = slip stitch
- ch = chain
- st = stitch
- rnd = round
Step-by-Step Crochet Bunny Pattern
Pattern Notes (Read First)
- Work in continuous rounds unless stated.
- Use a stitch marker to mark the first stitch of each round.
- Keep stitches tight (amigurumi looks best with no gaps).
- The head is lightly stuffed; the base stays unstuffed, so it fits a finger/pen.
Finished size (typical): about 2.5–3.5 in (6–9 cm) tall,l depending on yarn/hook.
Head
Working on the main colour.
Rnd 1: 6 sc in MR (6)
Rnd 2: inc in each st (12)
Rnd 3: (1 sc, inc) rep around (18)
Rnd 4: (2 sc, inc) rep around (24)
Rnd 5: (3 sc, inc) rep around (30)
Rnd 6–8: sc around (30)
Place eyes (if using safety eyes):
Insert eyes between Rnd 7 and Rnd 8, about 6–7 stitches apart. (Adjust to your bunny’s “cuteness” slightly closer looks extra kawaii.)
9: (3 sc, dec) rep around (24)
Rnd 10: (2 sc, dec) rep around (18)
Start stuffing firmly but gently, round, not overpacked.
11: (1 sc, dec) rep around (12)
Add a little more stuffing to shape the cheeks.
12: Dec around (6)
Fasten off, close the opening neatly, and weave in the end.
Body (Upper Body + Neck)
Small, rounded body that connects to the open base.
Rnd 1: 6 sc in MR (6)
Rnd 2: inc around (12)
Rnd 3: (1 sc, inc) rep around (18)
Rnd 4: sc around (18)
Rnd 5: (1 sc, dec) rep around (12)
Rnd 6: sc around (12)
Lightly stuff the upper body only (optional). Keep it soft so it sits nicely on a finger/pen.
Fasten off,f leaving a long tail for sewing the head to the body.
Base / Finger Opening (Sleeve)
This is the part that slides onto a finger or pen. You can crochet it directly onto the body for a seamless look.
Join yarn to the bottom of the body (or continue if you didn’t fasten off).
Rnd 1: sc around evenly into the last body round (12)
Rnd 2–7: sc around (12)
Try it on your finger or a pen as you go:
- For a thicker pen, add 1 increase round: (2 sc, inc) rep around to reach 16 sts, then continue sc rounds.
- For a shorter puppet, stop at Rnd 6.
Finishing edge (optional): sl st around for a neat rim.
Fasten off and weave in ends.
Ears (Make 2)
Long floppy bunny ears, worked in rounds for a smooth shape.
Rnd 1: 6 sc in MR (6)
Rnd 2: (1 sc, inc) rep around (9)
Rnd 3–7: sc around (9)
Rnd 8: (2 sc, inc) rep around (12)
Rnd 9–12: sc around (12)
Fasten off, leave a long tail for sewing.
Ear shaping tip: Flatten the ear base. You can add 1–2 small stitches through the base to create a gentle fold.
Arms (Make 2)
Tiny arms positioned like a hug (perfect for finger puppet play and pen toppers).
Rnd 1: 5 sc in MR (5)
Rnd 2: inc around (10)
Rnd 3: sc around (10)
Rnd 4: (3 sc, dec) rep around (8)
Rnd 5: sc around (8)
Lightly stuff the “hand” end only (optional).
Flatten opening and sc through both layers to close (4 sc).
Fasten off, leave a tail for sewing.
Facial Details (Embroidery-Friendly Option)
If you are not using safety eyes, embroider them:
- Eyes: two small vertical stitches or tiny curved “U” shapes
- Optional eyelashes: add 2 short stitches at the outer corner of each eye
- Nose: small pink triangle or a tiny satin-stitched dot
- Mouth: a short line down from the nose, then a tiny “Y” split or curved smile
Assembly Instructions
Follow this order for the cleanest, easiest finish:
1: Sew Head to Body
- Centre the head on top of the body.
- Use long-tail and whip stitches to join the pieces.
- Stitch all the way around for stability (finger puppets get handled a lot).
2: Attach Ears Symmetrically
- Place ears on top of the head, slightly toward the sides.
- Align them so they look even from the front.
- Sew securely around the ear base.
3: Attach Arms in a Hugging Position
- Sew arms to the upper sides of the body, slightly forward.
- Angle inward so they look like the bunny is hugging your finger or gripping the pen.
4: Add Eyes
- If using safety eyes, they’re already set.
- If embroidering, stitch eyes now and check spacing before knotting off.
5: Embroider Nose and Smile
- Nose centred between the eyes and above the mouth area.
- Keep stitches small; tiny features look cuter at this scale.
6: Fit Check (Finger or Pen)
- Slide onto a finger or pen.
- If the opening is snug, gently stretch with your fingers. If it’s too loose next time, reduce rounds or use a smaller hook.
Customization Ideas
- Different colours: classic white bunny, pastel pink, lavender, baby blue, or speckled yarn for a “sprinkle bunny.”
- Accessories: tiny bow, mini scarf, flower on one ear, or a little crochet collar.
- Keychain version: stitch a small loop at the top of the head (ch 10, sl st to form a loop) and attach a keyring.
- Bigger or smaller: use thicker yarn for a larger bunny or crochet thread for a micro version.
- Nursery or desk decor: make a trio in matching colours and display them in a small cup of pens or on a shelf.
Beginner Tips
- Use stitch markers so your rounds stay consistent, and your shaping stays smooth.
- Count stitches every round; it prevents lopsided heads and uneven ears.
- Don’t overstuff: the head should be firm but not stretched; the base should stay flexible.
- Choose soft yarn: cotton gives crisp stitches; acrylic feels plush and cuddly.
- Keep tension consistent: tight, even stitches make amigurumi look “store-bought” polished.
Common Mistakes to Avoid
- Twisted or wavy base opening: keep the same stitch count each round and avoid accidental increases.
- Eyes placed too high/low: aim for the upper half of the head; check symmetry before securing.
- Overstuffing the body: too much stuffing makes it hard to fit on a finger or pen.
- Ears sewn unevenly: pin first, then sew—small changes make a big difference.
- Loose stitches showing stuffing: use a smaller hook and maintain snug tension.
Why This Pattern Is Special
This bunny is special because it’s more than cute, and it’s useful. You get a sweet mini amigurumi that doubles as a finger puppet for play and a pen topper for everyday joy, all in one beginner-friendly pattern. The small size makes it quick to finish; the details are simple yet expressive; and it’s easy to customize for gifts, party favours, and craft sales.
Conclusion
If you’re craving a quick project with maximum cuteness, this Super Cute Crochet Bunny Finger Puppet / Pen Topper Pattern is a perfect choice. s It’s beginner-friendly, endlessly customizable, and guaranteed to make people smile, whether it’s peeking from a pencil cup or hopping onto a little finger for play. Pick your favourite yarn colour, take your time with the face, and enjoy creating your own tiny bunny companion.