Sparkling Crochet Fluffy Cat Toy Beginner Amigurumi Plush Pattern
If you love quick and cozy crochet projects, this Sparkling Crochet Fluffy Cat Toy Beginner Amigurumi Plush will feel like pure comfort in your hands. It’s fluffy and chunky, with that sweet, sleepy face that makes it look extra calm and cute.
This plush cat is perfect for beginners because it’s mostly one simple body shape with very little sewing. Plus, chenille yarn gives it that soft, gift-ready look even when the stitches are basic.
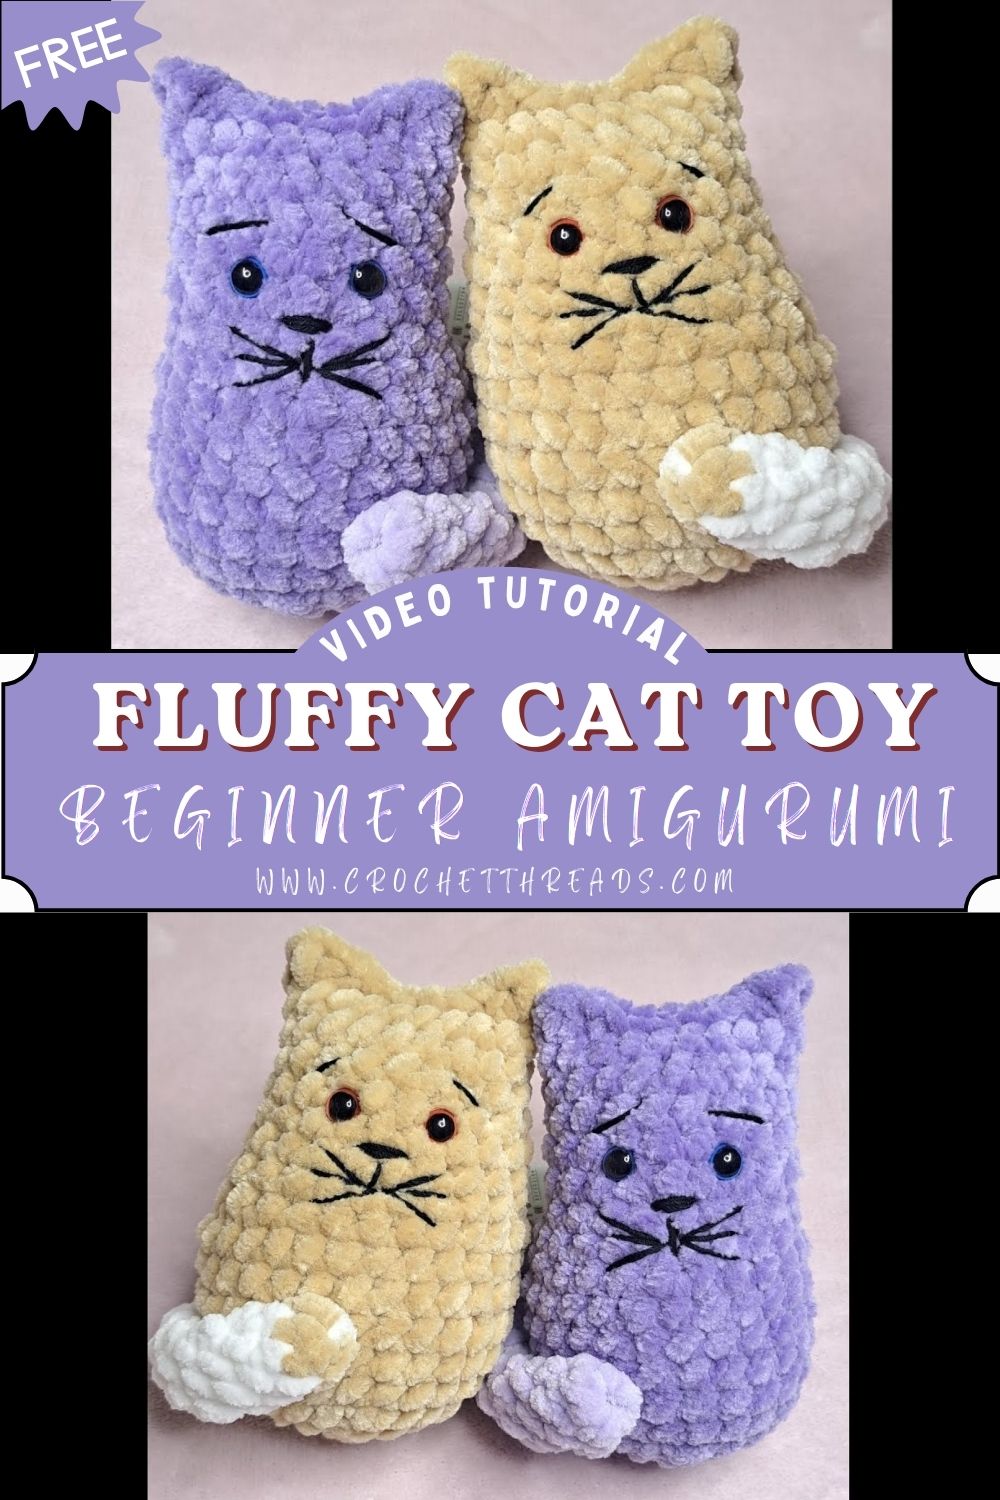
The design is very kawaii-inspired, especially with the sleepy embroidered eyes and simple whiskers. Meanwhile, the small triangle ears and the tiny tail detail give it that classic cat look without making the project complicated. It’s the kind of fluffy cat crochet that looks adorable sitting on a desk, shelf, or nursery table.
Later, you can easily personalize it by changing colors, adding little patches, or even making a mini keychain version. Overall, this Sparkling Crochet Fluffy Cat Toy Beginner Amigurumi Plush is beginner-friendly, quick to finish, and looks like a premium plush thanks to its fluffy texture.
Materials Needed
- Chenille or velvet yarn: 80 g (super bulky or chunky plush yarn)
- Crochet hook: 5 mm (use 4 mm for tighter stitches, 6 mm for bigger plush)
- Embroidery thread or thin yarn (black or dark brown): 2 to 3 m for face
- Fiberfill stuffing: 35 g
- Yarn needle
- Stitch marker
- Scissors
- Optional: pink thread for blush, contrast yarn for whiskers, small ribbon for decoration
Skill Level
Beginner-friendly.
You only need basic stitches like single crochet, increase, and decrease. The body is mostly a single piece, so it’s a calm project that doesn’t require complex joinery.
Time Planning at a Glance
- Body making time: 40 to 55 minutes
- Ears + tail time: 15 to 20 minutes
- Face detailing time: 15 minutes
- Finishing time: 10 minutes
Total time: about 1.5 hours
Sizing Tips
- Thicker chenille yarn makes a bigger plush, while thinner plush yarn makes it smaller.
- A smaller hook gives tighter stitches and helps keep stuffing from showing through.
- Try to keep your tension steady because plush yarn can hide stitches, so counting matters more than seeing.
Instructions
1) Body (Main Plush Shape)
Making time: 40 to 55 minutes
First, crochet the body in continuous rounds, using a stitch marker to mark the start of each round.
- Start with a small oval or round base (choose what feels easiest), then increase to build a soft, wide bottom.
- Next, crochet even rounds to create the rounded rectangular body look. Keep checking the shape with your hand; it should feel like a soft pillow.
- Meanwhile, begin stuffing lightly once the opening is wide enough. Add stuffing slowly so the plush stays even, not lumpy.
- Later, use decreases to close the top while keeping the corners rounded.
- Finally, close the opening neatly and secure the end.
Tip: Because the toy has no limbs, the main body is the whole character, so focus on smooth shaping and balanced stuffing.
2) Ears Creation
Making time: 10 to 15 minutes
Next, make two small triangle ears.
- Crochet a tiny triangle by increasing slightly, then tapering off.
- Keep the ears slightly rounded rather than sharp, as plush yarn naturally looks softer.
- Finally, attach them near the top corners of the body with minimal sewing.
3) Tail (Optional Detail)
Making time: 5 minutes
Meanwhile, you can add a small, rounded tail for extra cuteness.
- Crochet a tiny bobble-like piece or a short tube shape.
- Stuff it lightly, then sew it near the plush’s lower back.
- Keep it small, so it matches the simple style.
4) Face Detailing
Making time: 15 minutes
Later comes the most relaxing part, the sleepy kawaii face.
- Use embroidery thread or thin yarn to stitch sleepy curved eyes. Keep them low and centered.
- Add a tiny nose between the eyes, then stitch a short mouth line if you like.
- Next, embroider simple whiskers on both sides, keeping them even.
- Finally, step back and check symmetry before tying off inside the plush.
Placement tip: The face looks cutest when the eyes are slightly closer together and not too high up.
Assembly Instructions
- First, pin the ears in place to check balance, then sew them securely.
- Next, attach the tail (if using) and weave ends inside.
- Meanwhile, shape the plush with your hands like a soft pillow to smooth out stuffing.
- Finally, do one last check to ensure the face sits straight and the plush stands upright.
Basic Tips for Beginners
- First, use a stitch marker every round because plush yarn hides stitches.
- Next, count stitches often, especially after increases and decreases.
- Meanwhile, crochet a little tighter than normal so stuffing doesn’t peek through.
- Later, stuff in small amounts and spread it evenly with your fingers.
- Finally, use a bright light to help you see the stitch tops in fluffy yarn.
Common Mistakes to Avoid
- Overstuffing: it can stretch stitches and ruin the smooth look.
- Uneven shape: happens when increases or decreases are skipped, so counting is key.
- Wrong yarn choice: Regular acrylic won’t give the same fluffy plush feel as chenille or velvet.
Variations to Personalize
- Pastel cat: cream, baby pink, mint, or lavender.
- Neutral cat: beige, grey, or white with light whiskers.
- Bright cat: yellow, teal, or hot pink for a fun kawaii vibe.
- Add stripes or patches using contrast yarn on the body.
- Make a keychain version by using thinner plush yarn and a smaller hook, then add a loop at the top.
Finishing Tips
- Weave in ends slowly so they don’t pop out from the plush texture.
- Shape the toy gently in your hands to keep the body evenly rounded.
- Optional: if your yarn allows it, lightly brush the surface to boost the fluffy look, but test on a small area first.
Tutor Suggestions for Beginners
First, watch the tutorial once just to understand the flow. Next, replay it while crocheting, pausing after each round. Meanwhile, keep your stitch marker moving every round so you never lose your place. Finally, practice single crochet, increases, and decreases on a small swatch before starting if the plush yarn feels slippery.
Conclusion for ( Crochet Fluffy Cat Toy )
This fluffy cat toy is one of those simple amigurumi projects that looks extra special because of the plush yarn. It’s beginner-friendly, quick to finish, and doesn’t need separate limbs or heavy sewing. The sleepy embroidered face makes it feel calm and cute, perfect for decor or gifting. Once you make one, you will want to try different colors and tiny expressions. Finally, take your time with stuffing and face placement, and enjoy every soft stitch.