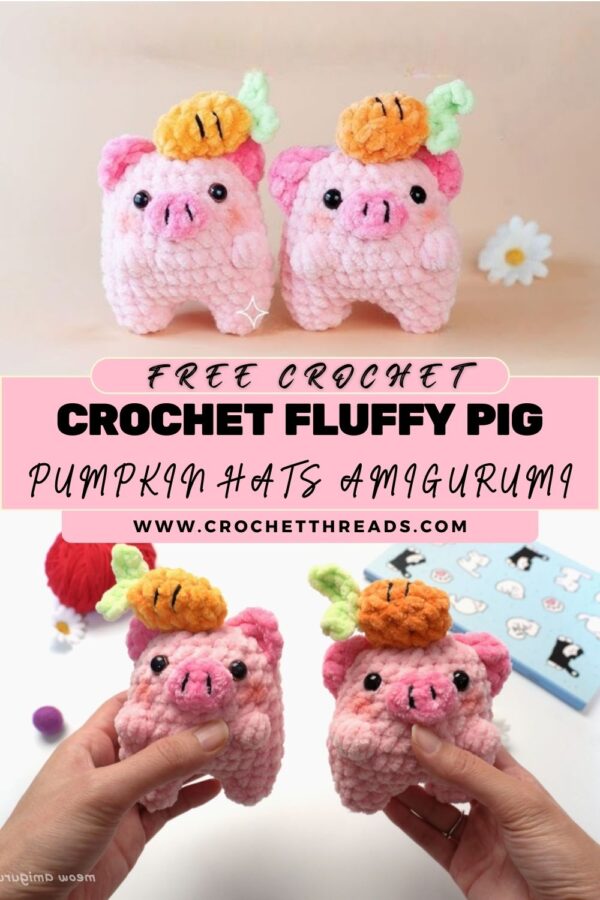
Crochet Fluffy Pig Plushies Pumpkin Hats Amigurumi Pattern
If you’ve been searching for a cute, fluffy crochet pig plushie project with a cosy seasonal twist, these amigurumi pig plushies with tiny pumpkin hats are the perfect make. Using plush/chenille yarn, simple shaping, and beginner-friendly stitches, you’ll create soft, pastel, handmade pigs with a kawaii vibe ideal for gifts, fall décor, and craft fair bestsellers.
These cut,,e fluffy crochet/amigurumi pig plushies with tiny pumpkin hats are inspired by the sweete,scosiestsyy, pastel aesthetic: two soft p, in,k fluffy pig plushies with a ch,ubb,y rounded body, tiny ears, a s,impl,e cute snout, and glossy black safety eyes for that extra “aww” factor. Each plush gets a small orange pumpkin hat that sits right on top, finished with a green leaf detail, making them feel festive without being complicated.
This pattern is designed to be beginner-friendly yet detailed enough for intermediate crocheters, especially if you’re new to plush yarn. The construction is straightforward: a rounded head-and-body, short little legs, small arms (optional but adorable), and quick add-ons (ears, snout, and pumpkin hat). The result is a soft, cosy, kawaii handmade toy that looks amazing in photos and is perfect for Pinterest, Etsy listings, and heartfelt gifting.
Note: This design is inspired by a cute fluffy pig amigurumi with a pumpkin accessory. The pattern below is an original, “inspired-by” creation and is not copied from any existing design.
earing a tiny pumpkin hat. It’s special because:
- Plush yarn = instant cuddle factor and a premium look.
- The shaping is simple and forgiving (great for beginners).
- The pumpkin hat adds a seasonal, giftable theme without a ton of extra work.
- The final style is soft, cosy, pastel, and kawaii, perfect for modern crochet aesthetics.
Materials Needed
- Pink plush/chenille yarn (main pig body)
- Orange yarn (pumpkin hat)
- Green yarn (leaf/stem)
- Crochet hook size: typically 4.5 mm–6 mm for plush yarn (use what gives tight stitches)
- Safety eyes: glossy black, 10–12 mm recommended
- Stuffing: polyester fiberfill
- Yarn needle (tapestry needle)
- Stitch marker (highly recommended)
- Scissors
- Optional embroidery thread: pink/black for nostrils, smile, or blush
Abbreviations
- MR = magic ring
- sc = single crochet
- inc = increase (2 sc in the same stitch)
- dec = decrease (invisible decrease recommended)
- sl st = slip stitch
- ch = chain
- rep = repeat
- sts = stitches
Helpful Notes Before You Start
- Work in continuous rounds unless stated otherwise.
- Use a stitch marker to mark the first stitch of each round.
- With plush yarn, stitch definition can be subtle. Counting is your best friend.
- For a neater plush toy, use invisible decreases.
ThBodyttern
Head and Body (one piece)
In pink plush yarn.
This creates the signature rounded plush pig body, chubby, simple, and beginner-friendly.
R1: MR, 6 sc (6)
R2: inc around (12)
R3: (sc, inc) rep 6 times (18)
R4: (2 sc, inc) rep 6 times (24)
R5: (3 sc, inc) rep 6 times (30)
R6: (4 sc, inc) rep 6 times (36)
R7: (5 sc, inc) rep 6 times (42)
R8: (6 sc, inc) rep 6 times (48)
R9–R15: sc around (48)
(These rounds build the chubby height.)
Safety Eye Placement
Insert 10–12 mm safety eyes between R11 and R12, about 8–9 sts apart (adjust for your preferred “cute” expression).
Tip: For extra kawaii proportion, place eyes slightly lower and wider.
R16: (6 sc, dec) rep 6 times (42)
R17: (5 sc, dec) rep 6 times (36)
R18: (4 sc, dec) rep 6 times (30)
R19: (3 sc, dec) rep 6 times (24)
Start stuffing firmly, shaping a smooth round belly.
R20: (2 sc, dec) rep 6 times (18)
Stuff more especially around the lower half to keep the pig sitting nicely.
R21: (sc, dec) rep 6 times (12)
R22: dec around (6)
Fasten off, close the hole, weave in ends.
Legs (make 4)
In pink plush yarn.
These are short legs that match the body, quishy-quishyyy, chubby body.
R1: MR, 6 sc (6)
R2: inc around (12)
R3–R4: sc around (12)
Fasten off, leaving a tail for sewing. Lightly stuff (optional; many plush legs don’t need stuffing).
Placement tip: Attach legs evenly on the bottom so the pig sits stably—two front, two back—like little nubs.
Arms (optional, make 2)
Arms add extra character, especially if you want the pig to “hug” the pumpkin hat.
R1: MR, 6 sc (6)
R2: (sc, inc) rep 3 times (9)
R3–R5: sc around (9)
Lightly stuff just the tip (optional).
Flatten and sc through both layers to close (about 4–5 sc).
Fasten off, leave a tail for sewing.
Ears (make 2)
Small ears keep the face extra cute and plush.
R1: MR, 6 sc (6)
R2: (sc, inc) rep 3 times (9)
R3: sc around (9)
Flatten (do not stuff), fasten off, leaving a tail.
Ear shaping tip: Stitch the ear on with a slight fold to give it a soft “cup” shape.
Snout (make 1)
In pink plush yarn (or a slightly lighter pink if you want contrast).
A simple,e cute snout gives the pig instant personality.
R1: MR, 6 sc (6)
R2: inc around (12)
R3: (sc, inc) rep 6 times (18)
R4: sc around (18)
Fasten off, leave a long tail. Lightly stuff.
Optional nostrils: Use embroidery thread to stitch two small vertical nostrils centred on the snout.
Pumpkin Hat (make 1)
In orange yarn (plush or smooth; both work; smooth yarn may show ribbing better).
This is a tiny pumpkin hat that sits right on top of the head.
R1: MR, 6 sc (6)
R2: inc around (12)
R3: (sc, inc) rep 6 times (18)
R4: (2 sc, inc) rep 6 times (24)
R5: sc around (24)
R6: sc around (24)
R7: (2 sc, dec) rep 6 times (18)
R8: sc around (18)
Fasten off, leave a tail for sewing.
Pumpkin “Segments” (optional but adorable)
Using orange yarn tail (or a new strand), create pumpkin ridges. Thread the needle
- le through the centre of the hat, run down the side, and pull gently to indent.
- Repeat 4–6 times evenly around to form segments.
Tie off inside.
Leaf/Stem Detail (make 1)
In green yarn.
This adds the signature green leaf/stem detail.
Stem
Ch 4, sl st in 2nd ch from hook and next 2 ch (3 sl sts). Fasten off, leave a tail.
Leaf
Join green yarn (or use a new piece):
Ch 5, sl st in 2nd ch from hook, sc in next ch, hdc in next ch, sc in next ch.
Fasten off, leave a tail.
Sew the stem and leaf to the top of the pumpkin hat.
Assembly (Step-by-Step)
Attach the Snout
- Center the snout on the face, typically around R12–R15 area (adjust to taste).
- Sew it on neatly, adding a small bit of stuffing before closing.
- If adding nostrils, embroider them after sewing.
Add the Ears
- Place ears on the upper sides of the head, roughly around R7–R9.
- Keep them symmetrical by pinning first and checking from the front.
Sew on Legs
- Arrange four legs on the bottom of the body.
- Make sure the pig sits without wobbling: set it on a table and adjust before sewing tightly.
Sew on Arms (Optional)
- Place arms on the sides, around R14–R16.
- Angle them slightly forward for a cuddly pose.
Attach Pumpkin Hat
- Position the hat on top of the head (centred).
- Sew around the base of the hat securely, stitching through both hat and head stitches.
Finishing Touches
- Weave in all ends carefully (plush yarn likes to shed—secure knots inside).
- Optional: Add a tiny smile with black embroidery thread.
- Optional: Add blush cheeks with pink embroidery or a tiny amount of cosmetic blush (seal lightly if needed).
- Give the plush a final “shape massage” Plush yarn responds well to gentle shaping.
Helpful Tips (Especially for Plush Yarn)
Working with Plush/Chenille Yarn
- Use a slightly smaller hook than the label suggests to avoid gaps.
- Count stitches by feel, run your fingers over the round, and mark increases.
- If you lose track, place extra stitch markers every 10–12 stitches.
Proper Stuffing (for a Chubby, Smooth Body)
- Stuff in small layers rather than one big clump.
- Firm stuffing helps the pig keep its rounded, plush body shape.
- Avoid overstuffing near the closing rounds to prevent stretching gaps.
Placing Safety Eyes
- Try a “test pin”: inse insert the pplac place the, then cocoir confirm thesion before locling s.
- Wider spacing = sweeter, calmer expression; closer = more “baby” look.
Symmetrical Assembly
- Pin everything first (ears, snout, legs, arms).
- Look at the plush from the front, side, and top before sewing.
- Use the round counts as landmarks to keep placement consistent, especially if making two matching pig plushies.
Customization Ideas
- Change the pumpkin colours to cream, green, or pastel lavender for a whimsical look.
- Make seasonal versions:
- Winter: tiny beanie + scarf
- Spring: flower crown
- Summer: strawberry hat
- Add accessories: a bow under one ear, a mini scarf, and a tiny heart patch on the belly.
- Create different sizes:
- Use thinner yarn (DK + 2.5–3.25 mm hook) for a mini pig
- Use jumbo plush yarn for a big cuddle plush
Who Will Love This Project?
- Amigurumi beginners wanting a simple, forgiving plush pattern
- Crochet lovers who adore pastel kawaii aesthetics
- DIY gifters making fall-themed care packages
- Handmade sellers looking for a cute seasonal twist that photographs beautifully
- Makers who want a quick, satisfying “weekend plushie” make
FAQ (5+ Questions)
1) Can I use regular acrylic yarn instead of plush yarn?
Yes. The pig will look more “classic amigurumi” and less fluffy. Use a smaller hook (often 2.75–3.5 mm) and expect a smaller finished size.
2) What if I don’t want to use safety eyes?
You can embroider eyes with black yarn or embroidery thread. This is also preferred for toys intended for children under 3.
3) How do I keep the pumpkin hat from sliding off?
Sew it on with multiple anchor points around the base. If you want it removable, stitch a small elastic loop inside the hat and secure it under a few head stitches.
4) My plush yarn stitches are hard to see—what should I do?
Use stitch markers frequently, count often, and work in good lighting. Some crocheters like to use a smooth “helper strand” alongside plush yarn, but it’s optional.
5) Why does my pig look lumpy after stuffing?
Cut the stuffing into smaller pieces and distribute the fiberfill evenly. B:ody Gentroll the finished body between your hands to smooth it out.
6) Can I make the snout a different colour?
Absolutely—light pink, blush, or even makeup makes the cute face stand out.
Tips for Selling or Photographing Finished Items
- Photograph in soft natural light near a window; plush textures look best with gentle shadows.
- Use a cosy pastel background (a cream blanket, light wood, or soft pink backdrop) to match the handmade aesthetic.
- Style with fall props: mini pumpkins, knit scarf, cinnamon sticks, or warm-toned leaves.
- For selling: clearly list materials, size, and safety notes (especially if using safety eyes).
- Create “pair listings” (two pigs together) and “single pig” options bundles often convert well.
Conclusion
These fluffy pig plushies are the perfect mix of beginner-friendly construction and boutique-cute style, complete with a tiny pumpkin hat for a cosy seasonal twist. If you love soft textures, rounded amigurumi shapes, and quick, satisfying makes, this inspired-by cute fluffy pig amigurumi with a pumpkin accessory is a must-try for your crochet queue.