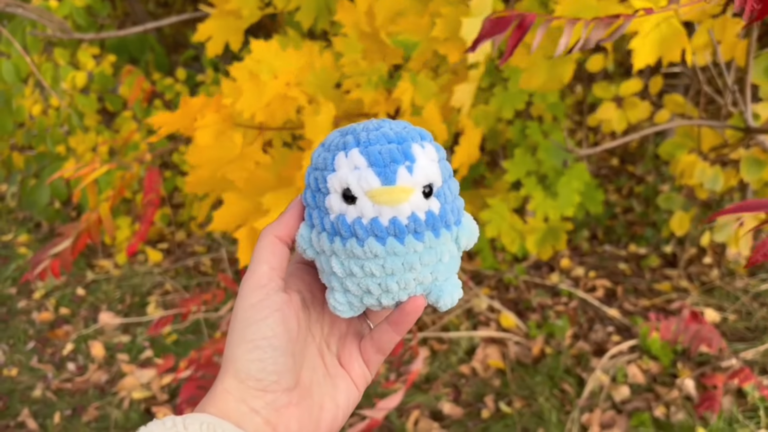
Crochet Bulbasaur Inspired Crochet Pocket Monster Amigurumi Pattern
Crochet this Bulbasaur-inspired pocket monster amigurumi pattern: beginner-friendly, irresistibly kawaii, fast stash-buster. Customizable colors, leafy bulb, sprinkle-on spots, perfect geeky gift, craft fairs, and cozy weekend make.
Bring nostalgic charm to your hooks with this Crochet Bulbasaur Inspired Pocket Monster Amigurumi Pattern beginner-friendly, fast, and irresistibly cute. Worked in simple single crochet with easy increases and invisible decreases, this mini plush builds quickly, stuffs neatly, and holds its shape for a polished finish.

Customize colors, add leafy bulb details and spots, and size it up or down with yarn weight. Perfect for quick weekend makes, gifts, and market bundles, this little companion is a joy to stitch and display.
Uses:
- Geeky gift for gamers and anime lovers
- Desk buddy or plant-shelf guardian
- Bag charm/keychain upgrade
Crochet Bulbasaur Inspired Pocket Monster Amigurumi Pattern
Ready to stitch an adorable, chubby pocket monster that’s soft, squishy, and full of nostalgic charm? This Crochet Bulbasaur-Inspired Pocket Monster Amigurumi Pattern is written for beginners yet polished enough for seasoned makers. Moreover, it is based on a chenille-yarn demo, so you can confidently work with fluffy yarn, while it also includes simple adjustments for cotton. Additionally, you’ll learn how to keep pieces flat (not cone-shaped), how to get clean decreases, and how to shape the bulb neatly. Furthermore, clear steps, estimated times, and practical tips keep you moving with zero guesswork. Consequently, by the end, you’ll have a cuddly, compact companion perfect for gifting, markets, or your cozy shelf.
Materials and Tools (Exact sizes and practical specifics)
- Yarn (bulky chenille recommended: Premier Parfait Chunky or similar)
- Main mint/teal body color (MC): approximately 80–100 g (1 skein is usually enough)
- Darker mint/teal for spots (CC1): approximately 10–15 g
- Green for bulb (CC2): approximately 30–50 g
- Cotton alternative: DK-weight cotton (e.g., Hobbii Rainbow Cotton 8/8); use the same colors; yardage similar, but the weight is lighter, so the total grams will be less
- Hook: 4.5 mm crochet hook (for chenille); alternatively, 3.0–3.5 mm for DK cotton
- Safety eyes: oval style, 9–12 mm pair for chenille size (use 6–8 mm for cotton size)
- Stuffing: high-quality polyester fiberfill (e.g., Fairfield Poly-Fil), enough to firmly fill head and body
- Brown embroidery thread/floss for mouth and nostrils (a small length, about 30–60 cm)
- Fabric glue or flexible all-purpose glue that dries clear (optional, for securing eyes or felt spots)
- Metal darning needle (pointed tip preferred for precision)
- Stitch marker or scrap yarn (contrasting color)
- Sewing pins and fine-tip tweezers (for placement and tidy finishing)
- Scissors
Finished Size
- Using Parfait Chunky and a 4.5 mm hook: approximately 12–15 cm (4.7–6 in) tall, chubby and compact.
- Using DK cotton and a 3.0–3.5 mm hook: approximately 9–11 cm (3.5–4.3 in) tall.
Gauge
- Gauge is not critical for amigurumi; however, ensure stitches are tight enough to prevent stuffing from showing. Additionally, if your fabric is overly stiff or “cones,” loosen tension slightly or go up 0.5 mm in hook size.
Abbreviations (US Terms)
- MR = magic ring (or use CH-2 center as chenille-friendly alternative)
- ch = chain
- sc = single crochet
- inc = increase (2 sc in the same stitch)
- dec = invisible decrease (front loops only)
- sl st = slip stitch
- st(s) = stitch(es)
- R = round
- FO = fasten off
Pre-Notes and Yarn-Specific Advice
- For chenille, start in a CH-2 center instead of a tight magic ring to avoid snapping. Additionally, use moderate tension (not too tight) to prevent “coning.” Furthermore, combine yarn under and yarn over when making sc to create compact X-shaped stitches that help keep pieces flat and even. Finally, use the invisible decrease through the front loops only for smooth shaping without gaps.
Step-by-Step Pattern With Times
Note: Times are estimates for average speed with chenille yarn. Moreover, adjust as needed for your pace.
1) Head (about 45–60 minutes)
- R1: CH 2, work 6 sc in second chain from hook (or MR 6). [6]
- R2: Inc around. [12]
- R3: (sc, inc) around. [18]
- R4: Split your even count to stagger increases: sc, inc, sc; repeat around. [24]
- R5: (3 sc, inc) around. [30]
- R6: Split even count again: 2 sc, inc, 2 sc; repeat around. [36]
- R7–R9: Sc around (3 rounds for chenille). [36]
- For cotton, work 4 rounds here instead to keep the head from stretching tall.
- Next inc round: (5 sc, inc) around. [42]
- Next 2 rounds: Sc around (2 rounds). [42]
- Begin decreases: (5 sc, dec) around. [36]
- Next round: Split even count for smoother shaping: 2 sc, dec, 2 sc; repeat. [30]
- Next round: (3 sc, dec) around. [24]
- Pause to place eyes if using safety backs now (recommended for child-safe gifts). Additionally, position eyes about 7 stitches apart and approximately between two adjacent rounds near the cheek area (roughly between R11–R12 of the head build), then secure firmly. Furthermore, if you prefer perfect alignment, you may glue eyes later after assembly.
- Next round: Dec in every stitch around. [12]
- Sl st into next st, FO with tail, and close the opening by weaving through front loops of the remaining 12 sts and gently cinching three stitches at a time to avoid yarn snap. Finally, weave securely.
Tip: Because we decreased sharply to 12, the base becomes flatter and cuter (chibi style) rather than a perfect sphere. Consequently, this gives a sweet, compact head.
2) Ears (make 2) (about 10–12 minutes each)
- R1: CH 2 and work 4 sc in the second chain (or MR 4). [4]
- R2: (sc, inc) around. [6]
- R3 (chenille only): (sc, inc) around. [9]
- Sl st to close, FO with a long tail for sewing. Additionally, tuck the starting tail inside as light stuffing.
Placement note: Ears will sit between head rounds approximately R5–R8, mirrored on each side of the midline. Moreover, pin in place for symmetry before sewing.
3) Body (about 45–60 minutes)
- R1: CH 2 and work 8 sc in the second chain (or MR 8). [8]
- R2: Inc around. [16]
- R3: (sc, inc) around. [24]
- R4: Split even: sc, inc, sc; repeat. [32]
- R5: (3 sc, inc) around. [40]
- R6–R11: Sc around (6 rounds) to build a deep bowl. [40]
- R12: (3 sc, dec) around. [32]
- R13: Sc around. [32]
- R14: 14 sc, dec, 14 sc, dec. [30]
- R15–R16: Sc around (2 rounds). [30]
- Sl st, FO with a long tail for sewing to the head. Additionally, lightly stuff for now, and remember you’ll firmly finish stuffing during assembly.
4) Limbs (make 4) (about 8–10 minutes each)
- R1: CH 2 and work 6 sc in the second chain (or MR 6). [6]
- R2: (sc, inc) around. [9]
- R3–R4: Sc around (2 rounds). [9]
- Sl st, FO with sewing tail. Additionally, do not stuff or stuff very lightly if you prefer flatter nubs.
5) Bulb (about 45–60 minutes, including shaping)
- R1: CH 2 and work 10 sc in the second chain (or MR 10). [10]
- R2: Inc around. [20]
- R3: (sc, inc) around. [30]
- R4: Split even: sc, inc, sc; repeat. [40]
- R5–R9: Sc around (5 rounds for chenille). [40]
- For cotton, do only 3 rounds here to keep proportions.
- R10: Split even to begin taper: sc, dec, sc; repeat. [30]
- R11: (sc, dec) around. [20]
- Lightly stuff now to keep it soft enough for shaping later. Moreover, avoid overstuffing so the cinched segments form cleanly.
- R12: Dec around. [10]
- R13: Sc around. [10]
- R14: (sc, inc) around to create the sprout top. [15]
- Invisible finish: Cut a long tail and form a faux final stitch by skipping the next st, threading under both loops of the following st, then returning through the back loop of the last worked stitch. Consequently, this levels the height and hides the jog.
Segment shaping (creates six bulb sections like a cute pumpkin):
- First, thread the long tail down one round below the top edge, then pass straight through the center bottom (R1 center), and finally exit at the top center. Additionally, tug gently to create a subtle groove.
- Next, repeat across the opposite side to divide the bulb in half. Furthermore, continue in an “X” pattern to create four sections, and then add two more evenly spaced lines for a total of six. Moreover, adjust by nudging each groove with your needle until the sections look evenly sized. Lastly, whip a few discreet stitches over the top center to close any visible opening, and then bring the yarn to the bottom for sewing to the body.
Important: Pull gently to avoid snapping chenille; alternatively, use a strong acrylic or cotton yarn in a similar color for the shaping pass if you tend to pull tighter.
Assembly (about 30–45 minutes)
- Head to body:
- First, pin the body to the head so the rim meets roughly across head rounds where it naturally sits snug, spanning about four rows (approximately head R8–R12 region). Additionally, mark only the top curve with pins initially so you can adjust while sewing.
- Next, stitch through both loops on the body and into the head fabric between stitches, following the pinned arc. Furthermore, stretch the body slightly to “hug” the head for extra chubby cuteness.
- Before closing the last 4–5 cm, stuff the body firmly until it feels full and resilient. Consequently, this step keeps your plush from collapsing over time.
- Ears:
- Then, locate the midline of the face, either by eye placement or by drawing a temporary line with pins. Additionally, place ears between head rounds R5–R8 so they mirror each other front-to-back and side-to-side. Moreover, sew around each ear base securely, weaving ends into the head.
- Limbs:
- After that, positionthe two front limbs low and forward on the body, and then place the two hind limbs slightly farther back and lower. Additionally, pin and test the “sit” before sewing so it balances upright. Furthermore, stitch each nub on with small, firm passes and weave in ends.
- Bulb:
- Finally, center the bulb over the back of the body and align the grooves symmetrically. Moreover, pin in place, sew around the base securely, and then hide the tail through the body.
Face and Spots (about 15–25 minutes)
- Eyes: If you waited to glue oval eyes for perfect symmetry, then lightly mark positions with pins first. Additionally, keep them about 7 stitches apart and two rounds tall on the cheek level. Furthermore, glue and allow to dry fully per your adhesive instructions.
- Mouth and nostrils: With brown embroidery thread, embroider a tiny V-smile and add two tiny nostril dots just above. Moreover, take small, confident stitches and anchor securely inside the head.
- Spots: With your darker mint/teal, add two to four body spots. Additionally, either embroider small filled ovals, crochet mini circles (MR 4–5 sc, sl st to close), or cut tiny felt ovals and glue neatly. Furthermore, distribute spots across the head and body for balance.
Pro Tips for a Flawless Finish
- Prevent coning: Use moderate tension and combine yarn under with yarn over in your sc to produce a slightly more compact X-shaped top. Additionally, stagger increases (by splitting even-number sets in half) to avoid a hexagon silhouette and keep it nicely round.
- Invisible decreases: Work through front loops only and give a tiny tug after each dec. Moreover, this closes gaps and keeps the fabric smooth, especially in chenille.
- Stuffing strategy: Fluff Poly-Fil before inserting and pack the edges first like a “pinch pot,” then fill the center. Consequently, this prevents lumpy spots and helps maintain shape long-term.
- Use metal tools: A metal darning needle and fine tweezers make sewing precise and reduce fuzz snagging. Additionally, pin placements generously, then step back and evaluate symmetry from multiple angles before stitching permanently.
- Manage chenille shedding: If your sewing strand starts to fray, then switch to a fresh length or use a matching strong acrylic/cotton strand just for the pass-through sewing.
Common Mistakes (and How to Avoid Them)
- Over-tight tension with chenille: This creates coning and snapped strands. Instead, relax your grip slightly and use a slightly larger hook if needed.
- Skipping staggered increases: This leads to polygonal shaping. Therefore, split even-number increase rounds (e.g., sc, inc, sc) for a rounder outcome.
- Loose decreases: This leaves visible gaps. Consequently, always tighten gently after each invisible dec, especially when decreasing multiple stitches in a row.
- Overstuffing the bulb: This prevents clean segment grooves. Therefore, stuff lightly first, cinch segments, and only add a whisper more if needed.
- Understuffing the body: This makes the plush collapse. Instead, add a generous final stuffing before closing the head-to-body seam.
- Misaligned face and ears: This looks “off” even if the stitches are neat. Therefore, pin, step back, and adjust until everything mirrors perfectly before sewing.
- Using dull plastic needles: This snags fibers and causes frustration. Instead, use a pointed metal darning needle for precise passes.
Variations and Customizations for (Crochet Pocket Monster Amigurumi)
- Cotton version: Reduce a round in the head’s plain rows and a few rounds in the bulb’s side walls as noted above to preserve proportions. Additionally, downsize safety eyes to 6–8 mm.
- Size shifts: Upsize to super-bulky velvet yarn with a 5.0–6.0 mm hook for a jumbo buddy; alternatively, downsize to sport-weight cotton with a 2.75–3.0 mm hook for a keychain mini.
- Eye style: Try round safety eyes, embroidered eyes, or felt eyes glued neatly for baby-safe gifts. Additionally, add tiny white thread dots for sparkle.
- Colorways: Make a pastel “shiny” version in mint-and-rose, a monochrome minimalist palette, or a holiday edition with a tiny Santa hat on one ear.
- Extra details: Surface-stitch faint leaf veins on the bulb using a slightly darker green. Moreover, add teeny freckles with French knots or blush the cheeks lightly with powder makeup sealed with a mist of hairspray.
Troubleshooting Quick Guide
- Head is pointy on top: Add a little more stuffing and gently massage the shape. Additionally, check that your increases were staggered in early rounds.
- Bulb grooves won’t hold: Remove a pinch of stuffing and cinch again with firmer passes. Furthermore, consider using a stronger yarn strand for the shaping thread.
- Yarn keeps snapping: Reduce tugging force, cinch in small increments (every 2–3 stitches), and consider swapping in a cotton strand for the shaping/assembly passes.
Estimated Total Time
- Head: 45–60 minutes
- Ears: 20–24 minutes total
- Body: 45–60 minutes
- Limbs: 32–40 minutes total
- Bulb including shaping: 45–60 minutes
- Assembly and details: 45–70 minutes
Total: Approximately 3.5–5 hours, depending on experience, yarn type, and finishing style.
Care and Safety
- Spot clean gently with a damp cloth and mild soap. Additionally, avoid machine washing chenille pieces to prevent matting.
- For babies and toddlers, replace safety eyes with embroidered eyes for maximum safety. Furthermore, secure all knots inside and weave tails thoroughly.
SEO Notes and Keywords
- Suggested keywords to include in your listing or blog: “Crochet Bulbasaur amigurumi,” “pocket monster plush pattern,” “Bulbasaur crochet pattern beginner friendly,” “chenille yarn amigurumi,” “Premier Parfait Chunky plush,” “oval safety eyes,” “invisible decrease amigurumi,” and “pumpkin-style bulb shaping.”
Final Thoughts for (Crochet Pocket Monster Amigurumi)
Because this pattern balances beginner clarity with pro polish, you’ll enjoy every stitch while learning techniques that level up all your future plushies. Moreover, the chenille-specific tricks make the fluffy yarn approachable and fun. Additionally, the clever shaping delivers that irresistibly stout, huggable silhouette. Consequently, your Bulbasaur-inspired buddy will look adorable on a shelf, on a con table, or in a gift bag. Finally, if you want extra visual guidance,