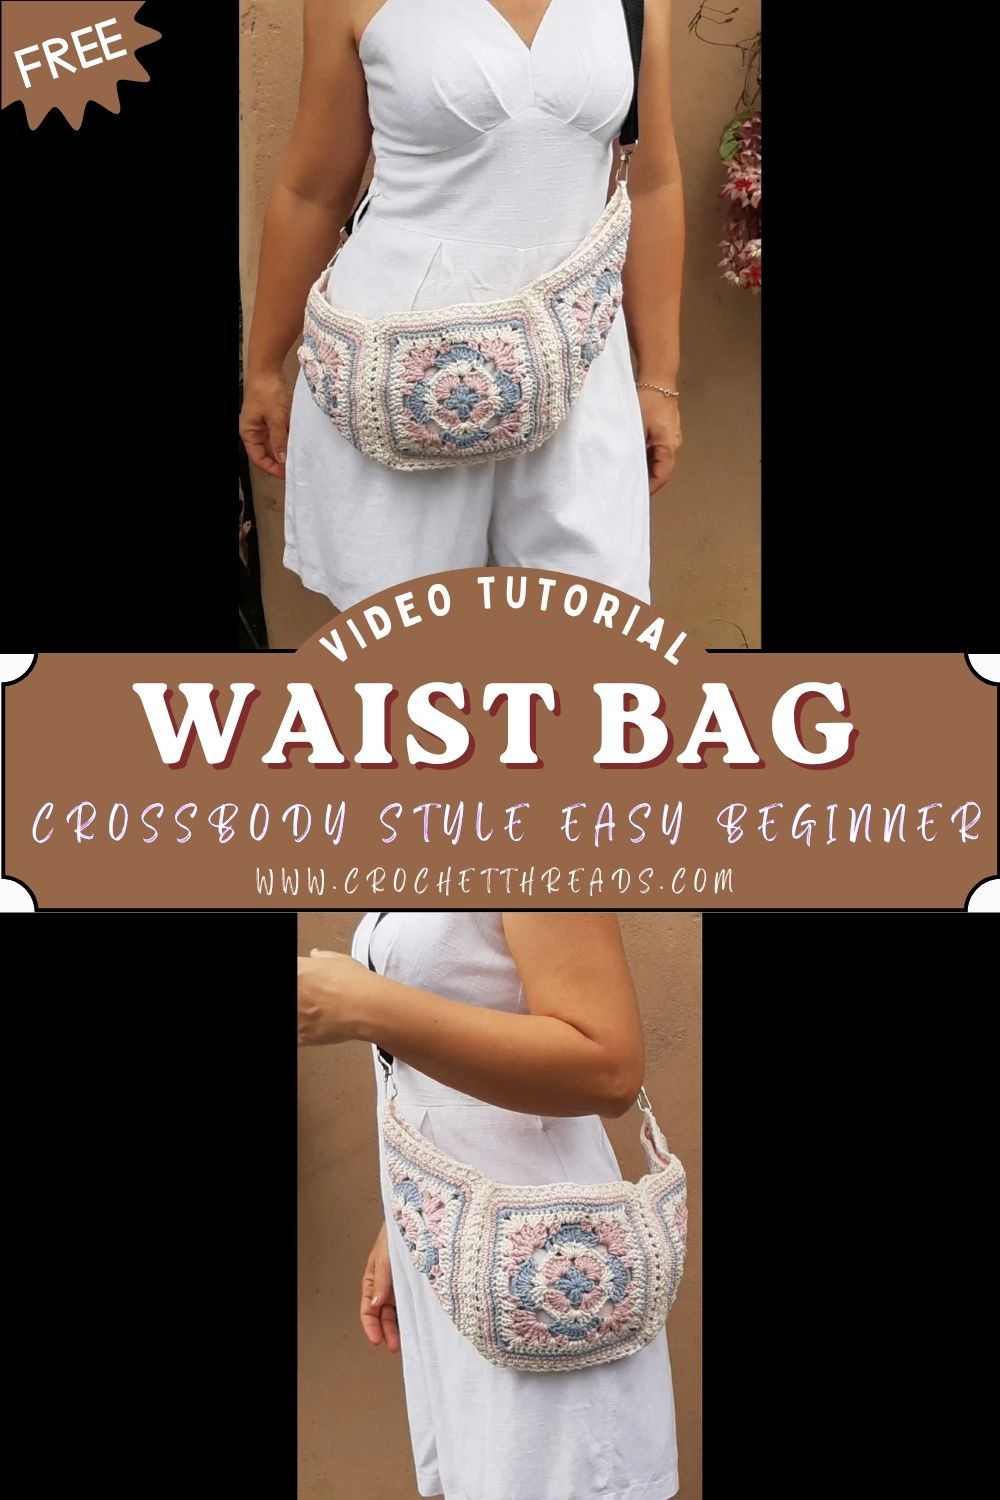
Passionate Crochet Waist Crossbody Bag Easy Beginner Pattern
A Crochet Waist Crossbody Bag combines style and convenience in one handmade piece. Because it sits close to the body, this handmade crossbody bag keeps everyday essentials safe while still looking cute and wearable.
The granny square look adds instant charm, especially in soft pastels like cream, pink, and blue. As a granny-square crochet bag-and-belt-bag hybrid, this beginner-friendly crochet bag feels practical, lightweight, and perfect for daily errands.
Crochet bags are trending because they feel personal, reusable, and easy to match with simple outfits. First, the texture makes even basic stitches look special; next, color changes turn a small project into a statement accessory. Additionally, a handmade piece can be adjusted for size, strap length, and pocket needs. Therefore, a Crochet Waist Crossbody Bag is a smart project for anyone who wants something both useful and stylish.
Meanwhile, waist and crossbody bags have become everyday favorites because they keep hands free and items close at hand. After that, the design stays comfortable for walks, markets, travel days, and quick coffee runs. Most importantly, this beginner crochet bag uses granny square-style panels, simple joining, and a steady border to create a structured yet flexible body. As a result, this crochet belt bag looks polished without needing advanced techniques.
Materials Needed
- Yarn type: Cotton or acrylic yarn in soft pastels
- Cream: 100 g (main background)
- Pink: 50 g (accent)
- Blue: 50 g (accent)
- Yarn weight: Medium Worsted (4)
- Hook size: 4.0 mm (main) and optional 3.5 mm (for tighter edging)
- Stitch markers: 6–10 markers (helpful for corners and strap placement)
- Tapestry needle: 1 for sewing and weaving ends
- Scissors: 1 pair
- Bag strap options:
- Crochet strap: uses the same yarn (instructions included below)
- Ready-made strap: 1 adjustable strap, 2.5 cm (1 inch) wide, length 80–130 cm with clips (optional)
- Optional finishing items:
- Lining fabric: 1 piece 25 cm x 35 cm cotton fabric
- Zipper: 20 cm zipper (or magnetic snap 18 mm or 1 button 15–20 mm)
- Matching sewing thread if adding lining or zipper
Skill Level
Beginner / Easy.
First, the project uses basic stitches like single crochet and double crochet. Next, the bag comes together with simple panel joining and a clean border, making it easy for first-time bag makers.
Making Time (Overview)
Total time: 5–8 hours, either in one weekend or split into short sessions.
Additionally, a beginner pace works perfectly here because each granny square panel finishes quickly and feels motivating.
Step-by-Step Instructions
Stitches used (common): chain (ch), slip stitch (sl st), single crochet (sc), half double crochet (hdc), double crochet (dc)
Note: Granny squares can be made in any favorite method; however, the steps below keep the square simple, textured, and beginner-friendly.
Body (3 Clear Steps)
1) Create granny square panels (center floral or textured design) — 2–3 hours
Make 6 granny square-style panels, each about 12 cm x 12 cm (5 in x 5 in).
Panel layout suggestion:
- 2 panels for the front
- 2 panels for the back
- 1 panel for one side
- 1 panel for the other side
Simple textured “flower-center” square (repeat for each panel):
- Round 1 (pink): Make a magic ring or ch 4 and join. Then crochet 12 dc into the ring. Next, join with sl st and fasten off.
- Round 2 (blue): Join into any stitch. After that, (ch 2, 2 dc in same stitch), then skip 1 stitch and repeat around to create soft petal bumps. Next, join and fasten off.
- Round 3 (cream): Join into a gap. Then build the square corners using (3 dc, ch 2, 3 dc) in the corner gaps. Meanwhile, place 3 dc in each side gap. Next, join.
- Round 4 (cream): Continue granny-style: corners get (3 dc, ch 2, 3 dc), and each side gap gets 3 dc. After that, join and fasten off.
Finally, weave in ends neatly on the back of each square.
2) Join panels to form a bag shape — 1.5–2.5 hours
First, lay the squares in the preferred arrangement so the colors feel balanced. Next, decide on a joining method:
Option A: Slip stitch join (structured look)
- Place two squares right sides together.
- Next, working through both loops, sl st across one edge.
- After that, repeat until the needed panel is built.
Option B: Single crochet join (decorative ridge)
- Place squares wrong sides together for a raised ridge on the outside.
- Next, sc evenly along the edge, placing 1 sc per stitch/space.
- After that, repeat for each seam.
Bag formation:
- Join two squares for the front panel.
- Next, join the two squares for the back panel.
- After that, attach one side square to the left edges of both front and back.
- Then, attach the other square side to the right edges of both the front and back.
At this point, the bag body becomes a tube-like shape with an open top and open bottom.
3) Build base and side structure — 45–75 minutes
Next, create a simple base to close the bottom and add stability.
Base method (crocheted rectangle):
- Measure the bottom opening width. It should be close to 24 cm (9.5 in) if each square is 12 cm wide.
- Then, ch enough to match that width (usually ch 36–42 with worsted yarn).
- After that, work hdc rows until the rectangle depth matches the bag depth (usually 8–10 cm / 3–4 in).
- Finally, sew or crochet the base rectangle onto the bottom opening with sc or sl st.
Meanwhile, add a firm border around the top opening to help the bag hold shape.
Additional Parts
Strap (adjustable or fixed length) 45–90 minutes
A comfortable strap matters, especially for a Crochet Waist Crossbody Bag worn crossbody.
Crochet strap (sturdy and beginner-friendly):
- First, ch 160–220 depending on desired length (about 90–120 cm / 35–47 in).
- Next, sc in the 2nd ch from the hook and sc across.
- After that, ch 1, turn, and sc across for 3–5 rows to create a strap about 2.5–3.5 cm (1–1.5 in) wide.
- Finally, add one edging round of sc along the long sides for strength.
Strap length tip:
- For a waist/belt fit: 70–95 cm
- For crossbody fit: 95–125 cm
Edging/border for neat finish 30–50 minutes
- First, join the cream yarn at the top opening.
- Next, sc evenly around, placing extra stitches at corners to keep it flat.
- After that, add a second round of sc or hdc for a clean, structured rim.
- Finally, switch to a 3.5 mm hook for the last round if a tighter edge is preferred.
Closure (zipper, button, or flap) 30–75 minutes
Choose one closure based on comfort and skill level.
A: Button loop closure (easiest)
- First, sew a 15–20 mm button onto the top front edge.
- Next, crochet a loop on the opposite side: ch 10–14, then sl st back to form a loop.
- Finally, test-fit and tighten stitches as needed.
B: Magnetic snap (clean and modern)
- First, mark snap placement inside the top edges.
- Next, reinforce the area with a small fabric patch or extra crochet stitches.
- Finally, install the snap securely.
C: Zipper (most secure)
- First, hand-stitch the zipper to the lining fabric.
- Next, sew the lining into the bag.
- Finally, topstitch around the zipper edge if desired.
Details / Accessories
Decorative edging 15–25 minutes
First, add a final round of crab stitch (reverse sc) or a simple picot edge for a boutique finish. Next, keep the stitch count steady so the edge does not ripple.
Color transitions included in square time
Meanwhile, keep pastel changes tidy by pulling new colors through the last yarn-over of the final stitch. After that, tighten the first stitch of each new color to avoid gaps.
Optional lining attachment — 45–90 minutes
- First, cut fabric to match the bag interior: about 25 cm x 35 cm, then fold and sew side seams.
- Next, slip the lining inside and pin around the top edge.
- After that, hand-stitch the lining to the inner rim with small, neat stitches.
- Finally, trim threads and check that the lining sits flat.
Assembly
- Join all panels securely
First, reinforce stress points by stitching over seam ends twice, especially near corners and strap areas. Next, weave ends deep into the seams for extra hold. - Attach the strap evenly
After that, mark strap placement on both sides of the bag—about 2–3 cm below the top edge. Then attach with tight whip stitches or sc through the strap and the bag edge. Finally, tug gently to confirm strength. - Add closure neatly
Next, attach the chosen closure carefully and test it several times. After that, adjust stitch tension if the top edge pulls. Finally, trim and hide the remaining ends.
Beginner-Friendly Tips
- Maintain consistent tension: First, keep stitches even so squares stay the same size.
- Count stitches carefully: Next, count corner spaces every round to prevent wavy edges.
- Block granny squares if needed: After that, lightly steam-block or wet-block squares so joining becomes easier and cleaner.
Special Features
- Granny square textured design: Pastel panels create a soft, classic crochet style.
- Soft yet structured shape: A firm border and sturdy seams help the bag hold its shape while remaining flexible.
- Lightweight and wearable: The lightest weight yarn keeps the bag practical without feeling heavy.
- Stylish crossbody look: The strap placement keeps the bag secure and comfortable across the body.
Sizing Tips
- Add more squares for a bigger bag: First, expand the front and back to 3 squares wide for extra space.
- Adjust strap length easily: Next, chain more for longer crossbody wear or fewer for a waist fit.
- Use thicker yarn for a a larger size. After that, switch to bulky yarn and a larger hook for a bigger, softer bag.; Just keep stitching tight for durability.
Finishing Tips
First, secure loose ends properly by weaving them through multiple stitches in different directions. Next, keep edges neat by placing corner stitches consistently on every panel. After that, check the strap strength by pulling firmly from both ends before daily use. Finally, shape the bag by smoothing seams and gently flattening the base so it sits comfortably against the body.
Common Mistakes to Avoid
- Uneven granny squares: First, use the same hook and stitch count for every square.
- Loose joins: Next, join with firm tension and reinforce seam starts and ends.
- Weak strap attachment: After that, sew the strap on with multiple passes and consider adding a small reinforced patch inside.
- Incorrect sizing: Finally, measure squares before joining, because small differences can affect the final bag shape.
Variations & Customization Ideas
- Change color palette: First, try sage, lavender, and cream for a calm look, or peach and sky blue for a brighter vibe.
- Add boho tassels: Next, attach a small tassel zipper pull or side charm for movement.
- Use different square patterns. After that, swap in a sunburst square, solid granny square, or stripe square for variety.
- Turn into a shoulder bag or pouch: Finally, shorten the strap to make it a shoulder bag, or remove it completely for a zip pouch.
Tutor Suggestions FOR ( Crochet Waist Crossbody Bag)
First, patience helps most during joining, because neat seams make the whole bag look professional. Next, focus on tidy corners and consistent stitch height, since granny squares show small differences more clearly. Meanwhile, take short breaks between panels to avoid tension changes from hand fatigue. Finally, keep going even if the first square is not perfect, because each new panel improves speed and confidence.
Conclusion
A Crochet Waist Crossbody Bag made from pastel granny square-style panels offers a sweet blend of comfort and everyday practicality. First, the soft cream, pink, and blue palette keeps the design stylish; next, the structured yet flexible body makes it easy to wear all day. After that, a sturdy strap turns the bag into a true hands-free favorite, whether worn as a crochet belt bag or a handmade crossbody bag.