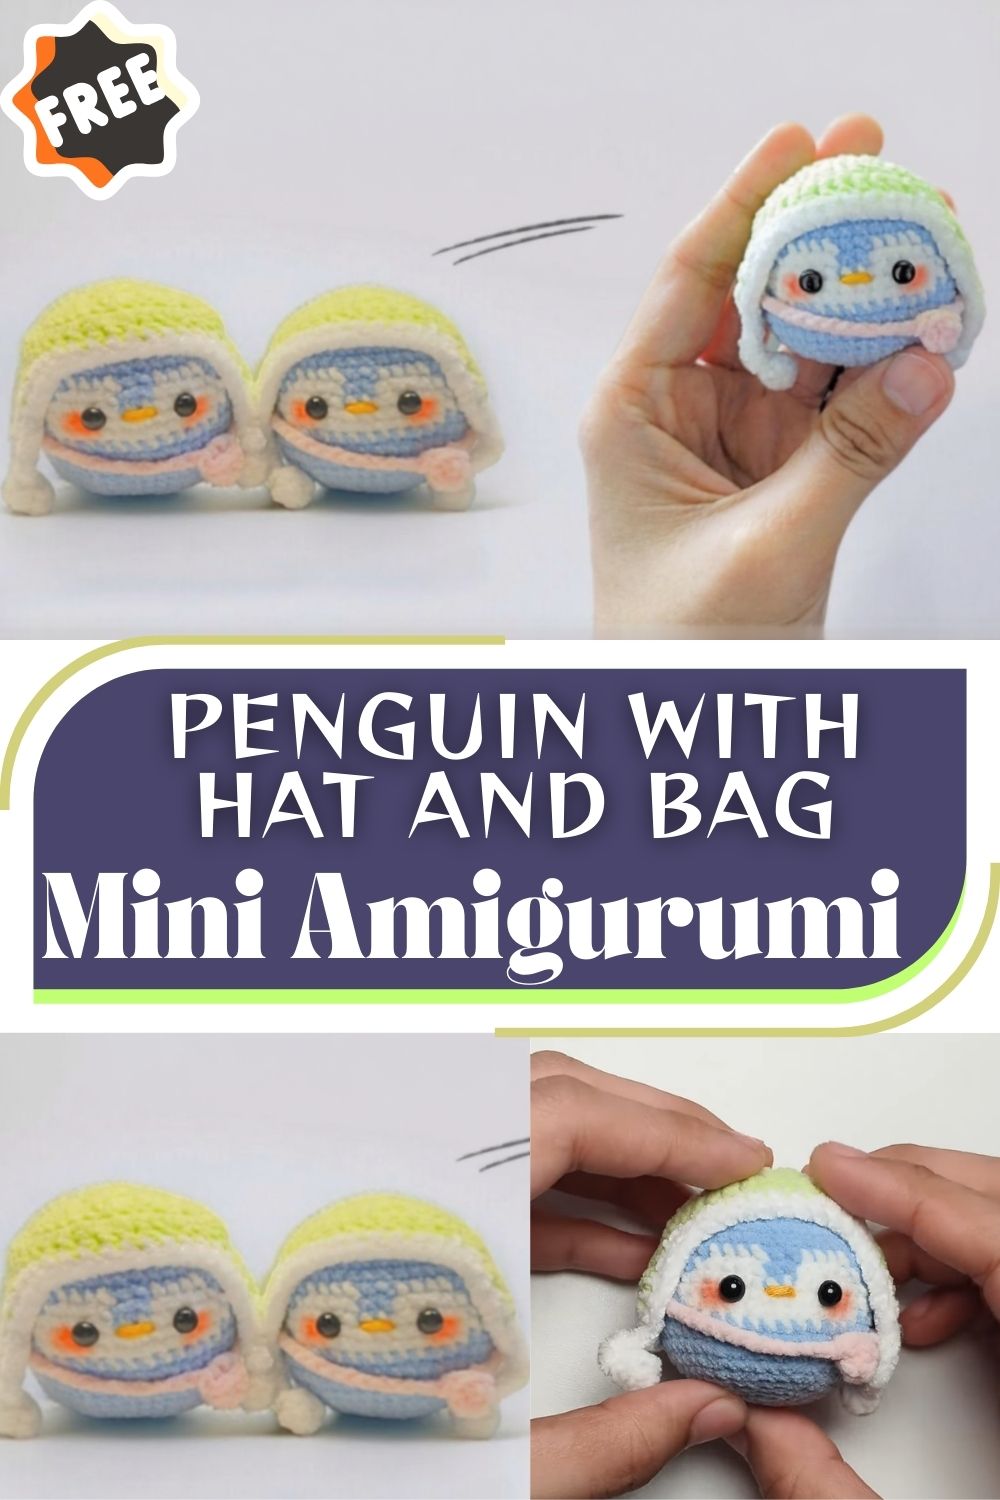
Crochet Mini Penguin with Hat and Bag Amigurumi Pattern for Beginners
If you love tiny, squishy crochet animals, you’re going to adore this crochet mini penguin. It’s a small, palm-sized plush with a round body, soft pastel colors (light blue, white belly, and a yellow beak), and the cutest winter accessories: a crochet penguin with hat and a tiny crochet bag for extra charm. This project is designed as a beginner amigurumi pattern with simple shaping, easy counting, and straightforward assembly.
This mini crochet penguin pattern is perfect as a desk buddy, stocking stuffer, nursery decor, or a handmade crochet gift for winter birthdays and holidays. It also works beautifully as a quick winter crochet project when you want something satisfying but not complicated.
Below you’ll find a full crochet penguin pattern written in US terms with step-by-step instructions and an amigurumi penguin tutorial you can follow even if you’re newer to amigurumi. Let’s make a sweet pastel penguin you’ll be proud to show off.
Materials List
Yarn (soft pastel look)
Choose either cotton (crisp stitches) or chenille/velvet (extra plush). For a palm-size penguin, DK/light worsted cotton works great; plush chenille makes it cuddlier and slightly bigger.
Suggested colors:
- Light Blue (main body)
- White (belly/face patch)
- Pastel Yellow (beak)
- Hat color (soft pastel: blush pink, lavender, mint, cream, or gray)
- Bag color (match hat or choose a contrasting pastel)
Crochet hook
- 2.75–3.5 mm for DK cotton (pick a size that makes tight stitches)
- 4.0–4.5 mm for chenille (tight but not stiff)
Tip: Amigurumi looks best when stitches are tight enough that stuffing doesn’t show. If you see gaps, go down a hook size.
Notions
- Polyester fiberfill stuffing
- Safety eyes: 6 mm (small) or 8 mm (slightly larger), depending on yarn and desired look
- Yarn needle (tapestry needle)
- Stitch marker (or scrap yarn)
- Scissors
- Optional: embroidery floss/black yarn for eyebrow lines or tiny mouth stitch
- Optional: small piece of felt (white belly alternative), fabric glue (if you prefer)
Skill Level
Beginner to Easy Intermediate
This easy crochet stuffed animal is approachable for beginners who can:
- Crochet in the round
- Make single crochet stitches consistently
- Increase and decrease
- Count stitches (or use a stitch marker)
If you’re brand-new, go slowly and take advantage of the “Common Mistakes and Fixes” section—amigurumi is very forgiving.
Abbreviations (US Crochet Terms)
- MR = magic ring (magic circle)
- ch = chain
- sc = single crochet
- inc = increase (2 sc in same stitch)
- dec = invisible decrease (sc2tog through front loops)
- sl st = slip stitch
- st(s) = stitch(es)
- rnd = round
- FLO = front loop only
- BLO = back loop only
- ( … ) xN = repeat instruction N times
Notes:
- Work in continuous rounds unless stated otherwise.
- Use a stitch marker to mark the first stitch of each round.
- Stuff firmly but gently—avoid stretching stitches.
Step-by-Step Pattern Instructions (Mini Amigurumi Penguin)
H2: Body (Round, Palm-Size Plush)
Color: Light Blue
The body and head are made as one piece for a classic round amigurumi shape.
Rnd 1: MR, 6 sc (6)
Rnd 2: inc x6 (12)
Rnd 3: (sc, inc) x6 (18)
Rnd 4: (2 sc, inc) x6 (24)
Rnd 5: (3 sc, inc) x6 (30)
Rnd 6: (4 sc, inc) x6 (36)
Now we build height for the round body:
Rnd 7–11: sc around (36) for 5 rounds
Shape into head area:
Rnd 12: (4 sc, dec) x6 (30)
Rnd 13: sc around (30)
Rnd 14: (3 sc, dec) x6 (24)
Rnd 15: sc around (24)
Rnd 16: (2 sc, dec) x6 (18)
Start stuffing:
Rnd 17: (sc, dec) x6 (12)
Stuff firmly, shaping a smooth round body.
Rnd 18: dec x6 (6)
Fasten off, close the hole, weave in end.
If you want a slightly taller penguin, add 1–2 extra plain rounds (sc around) between Rnd 7–11.H2: Face Details (White Belly/Face Patch)
You have two beginner-friendly options: crochet an oval patch or embroider/needle-felt a patch. Crocheting gives the cleanest amigurumi look.
H3: Crochet White Belly Patch (simple oval)
Color: White
Ch 7
Work around the chain:
Rnd 1: Starting in 2nd ch from hook: 5 sc, 3 sc in last ch.
Working on opposite side of chain: 4 sc, 2 sc in last ch (at start). (14)
Rnd 2: inc, 4 sc, inc x3, 4 sc, inc x2 (20)
Rnd 3: sc, inc, 4 sc, (sc, inc) x3, 4 sc, (sc, inc) x2 (26)
Fasten off leaving a long tail for sewing.
Placement: Center it on the front of the body so it sits like a belly/face area (more on exact placement below).
Want it smaller? Stop after Rnd 2.
H2: Beak (Small Yellow Triangle)
Color: Pastel Yellow
Rnd 1: MR, 4 sc (4)
Rnd 2: (sc, inc) x2 (6)
Rnd 3: sc around (6)
Fasten off leaving a tail for sewing. Lightly stuff or leave unstuffed for a flatter beak.
If you prefer a more “beak-like” point: pinch the piece slightly while sewing so it forms a tiny wedge.
H2: Hat (Cute Winter Hat for Penguins)
This tiny hat is simple, stretchy, and beginner-friendly. Make it in any soft pastel.
Color: Hat color
Rnd 1: MR, 6 sc (6)
Rnd 2: inc x6 (12)
Rnd 3: (sc, inc) x6 (18)
Rnd 4: (2 sc, inc) x6 (24)
Rnd 5: sc around (24)
Rnd 6: sc around (24)
Now add a brim:
Rnd 7 (brim): (inc, 3 sc) x6 (30)
Rnd 8: sl st around or sc around (30) for a thicker brim
Fasten off, weave in ends.
Optional: Tiny Pom-Pom
- Make a mini pom-pom with yarn (wrap yarn around two fingers, tie, trim).
- Or crochet a pom: MR 6 sc, fasten off, sew to top.
H2: Small Bag (Mini Crochet Bag Accessory)
This little bag makes your DIY crochet toy extra special and turns it into a gift-worthy character.
Color: Bag color
H3: Bag Base
Rnd 1: MR, 6 sc (6)
Rnd 2: inc x6 (12)
Rnd 3: (sc, inc) x6 (18)
Rnd 4: sc around (18)
Rnd 5: sc around (18)
H3: Bag “Lip” (optional shaping)
Rnd 6: BLO sc around (18)
Rnd 7: sc around (18)
Sl st, fasten off, weave in.
H3: Strap
Attach yarn at bag side.
- Ch 25–35 (depending on how you want it to hang)
- Sl st back into the same area or stitch to the opposite side.
Fasten off leaving a tail to reinforce with a few sewing stitches.
For a hand-held tote look: chain 12–16 instead.
H2: Wings (Optional, but Very Cute)
Wings are optional; the penguin will still look adorable without them. If you add them, they make the silhouette extra “penguin.”
Color: Light Blue
Make 2:
Rnd 1: MR, 6 sc (6)
Rnd 2: (sc, inc) x3 (9)
Rnd 3: sc around (9)
Rnd 4: (2 sc, inc) x3 (12)
Rnd 5: sc around (12)
Flatten the wing and sc through both layers across the top to close (6 sc across), or simply leave it open and sew flat.
Fasten off with a long tail for sewing.
Assembly Instructions
Assembly is where your cute crochet animal comes to life. Pin pieces first (or use stitch markers) before sewing.
- Sew on the white belly patch
- Center it on the front of the body.
- Stitch neatly around the edges using a whip stitch.
- Add a tiny bit of stuffing behind the patch before closing if you want a “puffy belly” look.
- Attach safety eyes
- Insert eyes through the body (and through the belly patch if desired) before fully finalizing placement.
- Secure washers inside the body.
- Sew on the beak
- Place beak between the eyes, slightly lower than eye level.
- Stitch firmly around edges.
- Sew wings (optional)
- Position at the sides, slightly forward so they’re visible from the front.
- Sew flat with small stitches.
- Add hat
- Put the hat on and angle it slightly for personality.
- Tack it with a few stitches so it stays in place.
- Add the bag
- Place strap across the body (crossbody style) or hang it from one side.
- Tack the strap at 1–2 points so it doesn’t slide around.
Placement Guide for Eyes and Accessories
Good placement is the secret to a professional-looking small crochet plush.
Eyes
- Recommended: 6 mm safety eyes for DK cotton; 8 mm for plush yarn.
- Place between Rnd 12 and Rnd 14 of the body (approx. mid-face area).
- Space them about 5–7 stitches apart (adjust for your preference).
- Before locking the washers, test with pins and check symmetry.
Beak
- Place centered between eyes, about 1–2 rounds below the eye line.
- If your penguin looks “surprised,” move the beak slightly higher.
- If it looks “sad,” move it slightly lower or narrow the eye spacing.
Belly Patch
- Align top of the patch just below the eye area so it reads as a penguin front.
- If you want more “classic penguin,” lower it so it’s more belly than face.
Hat
- Start the hat brim around the top head area (roughly above eyes by 3–5 rounds).
- Slightly tilted hats look extra cute in photos (great for SEO images and listings).
Bag
- Crossbody placement: strap goes from one shoulder area down across the belly.
- Tote placement: strap sits near the side, under a wing.
Size Adjustments
You can easily resize this crochet penguin pattern without changing the design.
Make it smaller
- Use thinner yarn (sport or fingering cotton) and a smaller hook (2.0–2.5 mm).
- Stop body increases earlier:
- End at Rnd 5 (30 sts) instead of expanding to 36.
- Work fewer straight rounds.
Make it bigger
- Use plush chenille and a bigger hook (4.5–5.0 mm, if your stitches stay tight).
- Add one more increase round:
- After Rnd 6 (36), do Rnd 7: (5 sc, inc) x6 (42), then add straight rounds.
- Increase safety eye size (8–10 mm) to match.
Keep proportions correct
If you resize the body:
- Scale belly patch up/down by adding/removing oval rounds.
- Make hat match the head circumference (increase rounds until it fits snugly).
Yarn Substitution Guide
This penguin amigurumi free pattern (pattern-style blog post) works with many yarns. Here’s how to choose.
Cotton yarn (DK / light worsted)
Pros: clean stitches, easy counting, great for beginners
Cons: less “squishy,” can feel firmer
Hook: 2.75–3.5 mm
Result: neat, classic amigurumi look
Chenille/velvet yarn
Pros: ultra soft, plushy, perfect for a cuddly DIY crochet toy
Cons: stitches can be harder to see; magic ring may need extra care
Hook: 4.0–4.5 mm (or smaller for tighter fabric)
Result: very soft, slightly larger penguin
Acrylic yarn
Pros: budget-friendly, widely available
Cons: can pill; may not look as “premium”
Tip: choose a soft acrylic and keep stitches tight
Best beginner combo: DK cotton in pastel blue/white + a matching pastel hat color.
Coziest combo: chenille pastel blue + chenille white belly (bigger plush effect).
Common Mistakes and Fixes
1) Gaps showing stuffing
Cause: hook too large or loose tension
Fix: go down a hook size, tighten tension, stuff more gently
2) Lopsided or bumpy shape
Cause: uneven stuffing or missed stitch counts
Fix: count each round, stuff in small pieces, roll the plush in your hands to shape
3) Belly patch looks crooked
Cause: sewing without pinning
Fix: pin/clip in 4 points first (top, bottom, left, right), then sew around
4) Hat keeps sliding off
Cause: hat too large or not secured
Fix: add 2–4 small tack stitches around brim; reduce brim increase round if needed
5) Safety eyes placed too high/low
Fix: before attaching washers, step back and look from different angles. If already locked, you can:
- Add embroidered eyelids/eyebrows to adjust expression
- Slightly reposition beak to balance the face
6) Chenille yarn magic ring loosens
Fix: make MR, then knot the tail discreetly and weave in extra securely; or chain 2 and work into first chain as an alternative start
Care Instructions
Because this is a small amigurumi plush with safety eyes and accessories, gentle care is best.
- Spot clean recommended using mild soap and a damp cloth.
- If you must wash: place in a mesh laundry bag, cold gentle cycle, air dry.
- No high heat (especially chenille—it can get misshapen).
- For gifts to small children: consider embroidered eyes instead of safety eyes for extra safety.
Customization Ideas
This amigurumi penguin tutorial is a wonderful base pattern you can personalize in dozens of ways—great for craft fairs, gift baskets, or seasonal collections.
Color variations
- Classic penguin: black/dark navy body + white belly + orange beak
- Pastel theme: mint body + cream belly + peach beak
- Holiday penguin: red hat + green bag
- Icy winter look: pale gray-blue body + white belly + silver/white hat
Make it a keychain version
Turn your crochet mini penguin into a bag charm:
- Crochet with cotton for durability
- Add a small loop at the top (chain 10, sl st to form loop)
- Attach a keyring
- Skip the bag or keep it tiny so it doesn’t snag
Gift idea upgrades
- Add a tiny embroidered initial on the bag
- Add a scarf instead of (or with) the hat
- Put a small fabric heart inside before closing (a sweet “wish” gift)
- Pair with a mug of hot cocoa mix for a winter-themed handmade crochet gift
Expression tweaks
- Add small embroidered eyebrows for extra personality
- Add rosy cheeks with a tiny bit of pink embroidery or blush (test lightly)
Conclusion
This mini crochet penguin pattern is a cozy, beginner-friendly way to make a lovable small crochet plush with lots of character especially with the winter hat and mini bag. Whether you’re crocheting for yourself, making a thoughtful handmade crochet gift, or building a collection of cute crochet animal amigurumi, this project is designed to be relaxing, quick, and adorable.
If you make this crochet mini penguin, try experimenting with different pastel hats and bag colors and consider making a whole “penguin winter wardrobe” set. Save this post for later, share it with a crochet friend who loves amigurumi, and let me know what color combination you choose for your penguin.