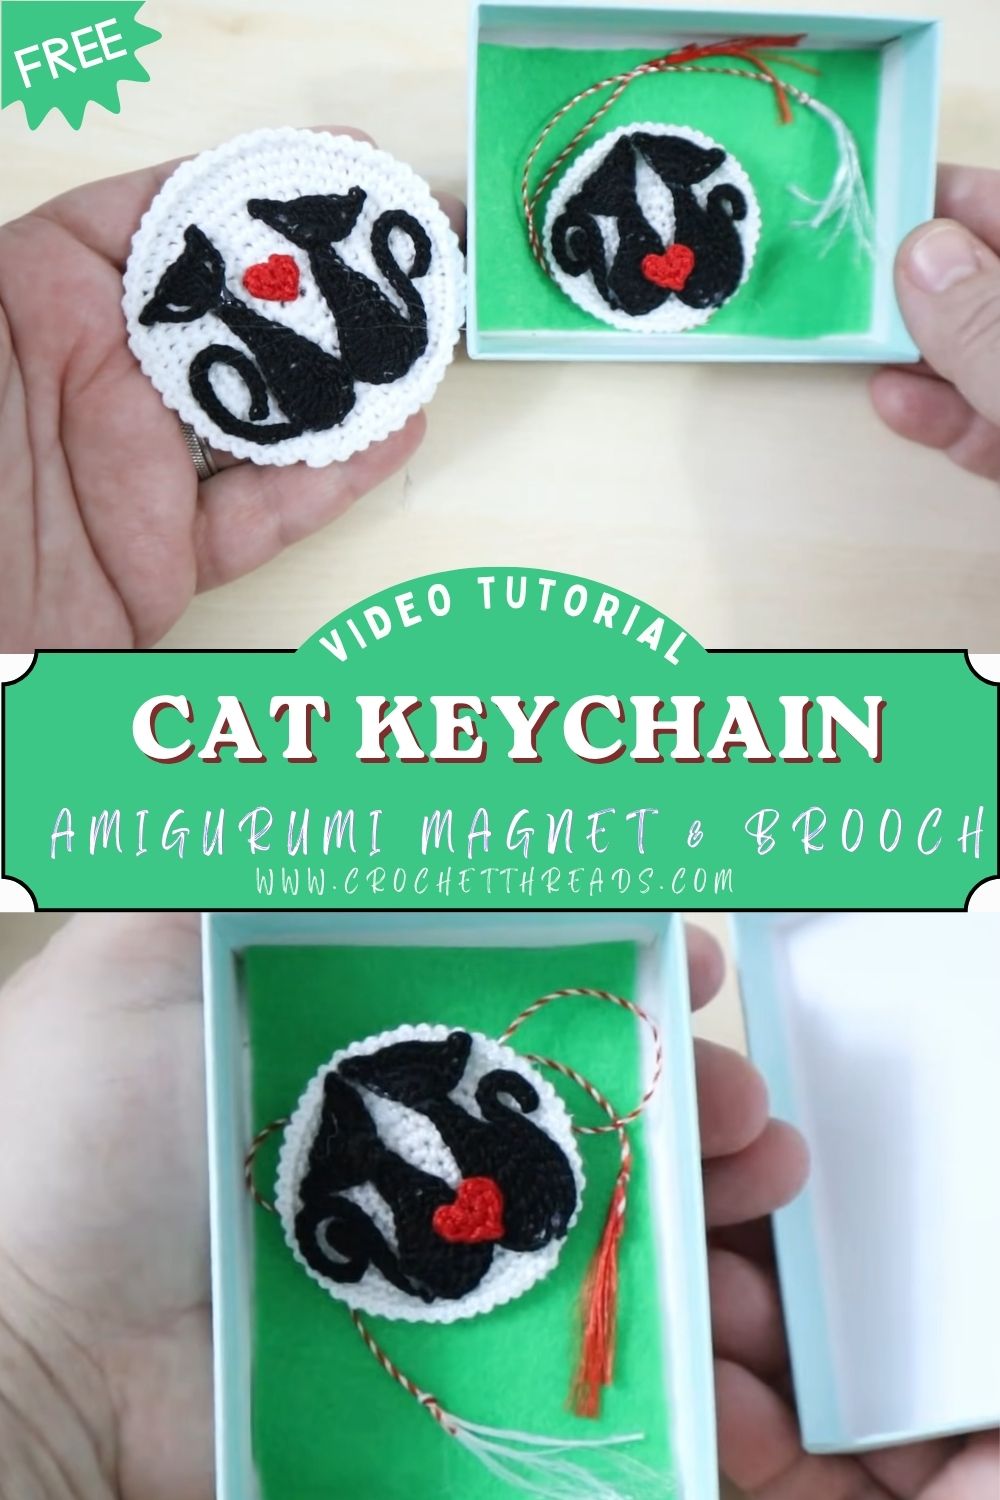
Passionate Crochet Cat Keychain Amigurumi Magnet & Brooch Pattern
A bold black cat on a bright round background makes a statement right away. Add a red heart in the center, and the whole piece turns into a clean, cute crochet cat keychain that looks finished without extra fuss.
Fast to crochet and easy to assemble, this flat amigurumi cat pattern is a smart crochet keychain idea for anyone wanting a quick beginner crochet project. The same design also works as a neat handmade cat accessory for a bag charm, magnet, or brooch.
Flat crochet keychains are trending because they are lightweight, fast to make, and easy to personalize. No heavy stuffing, no complicated shaping, and no wobbling limbs. Just a neat circle, a bold silhouette, and a small detail that makes the design feel finished. Flat projects also travel well, so crocheting one during a short break feels totally doable.
Versatility makes a design like this extra popular. The same crochet piece can become a keychain for house keys, a brooch for a denim jacket, or a magnet for the fridge. The minimal cat-and-heart style works for cat lovers of any age, and the simple construction makes it ideal for quick gifts, craft fairs, party favors, and small handmade surprises.
Materials Needed
- White yarn (base circle): 10 g
- Black yarn (cat appliqué): 6 g
- Red yarn (heart detail): 2 g
- Crochet hook: 2.75 mm to 3.5 mm (choose for tight, tidy stitches)
- Needle: tapestry needle for sewing and weaving ends
- Stitch marker
- Scissors
- Optional hardware
- Keychain ring: 25 mm to 30 mm
- Brooch pin back: 25 mm to 30 mm
- Small magnet: 15 mm to 20 mm flat magnet
- Glue (for magnet backing): a small drop of strong craft glue
- Stuffing: none, or a pinch only (flat design)
Abbreviations
- MR = magic ring
- sc = single crochet
- inc = increase (2 sc in one stitch)
- dec = decrease (sc 2 together)
- sl st = slip stitch
- ch = chain
- hdc = half double crochet
Skill Level
Beginner / Easy Beginner
Basic stitches, simple counting, and flat shaping. The cat is an appliqué, so mistakes are easy to adjust before attaching.
Estimated Time
- Total time: 45 to 90 minutes
- Base circle: 10 to 20 minutes
- Cat appliqué: 20 to 40 minutes
- Heart + assembly: 15 to 30 minutes
Important Notes Before Starting
- Keep stitches even so the circle stays smooth.
- Work carefully in rounds and count stitches each round.
- Maintain a flat circle by using the right increase rhythm.
- Secure the appliqué with steady, small sewing stitches.
- Secure the hardware firmly so the piece can withstand daily use.
Step-by-Step Pattern
Finished size: about 6-7 cm wide, depending on the yarn and hook.
Tip: For a crisp, minimal look, keep tension firm and stitches tight.
Base Circle
- Start the circle
- Round 1: MR, 6 sc (6)
- Round 2: inc around (12)
- Round 3: (sc, inc) around (18)
- Round 4: (2 sc, inc) around (24)
- Round 5: (3 sc, inc) around (30)
- Optional final round for a slightly larger base
- Round 6: (4 sc, inc) around (36)
- Finish
- Sl st to the next stitch to even the edge.
- Fasten off and weave in the end.
Circle tip:
- A wavy edge usually means too many increases.
- A bowl shape usually means too few increases or too much tension.
- Blocking gently with fingers often fixes small imperfections.
Cat Appliqué (Flat Sitting Cat Silhouette)
The appliqué is made in parts: body, head with ears, and tail. Keeping it in pieces makes shaping easier and keeps the look clean.
Body (oval base)
- Ch 7
- Row 1: sc in 2nd ch from hook, sc 4, 3 sc in last ch. Continue on the opposite side of the chain: sc 4, 2 sc in last ch (14)
- Round 2: inc, sc 4, inc x3, sc 4, inc x2 (20)
- Round 3: sc around (20)
- Fasten off, leave a tail for sewing.
Body shape note: a slightly oval body reads like a sitting cat when the head is placed on top.
Head + Ears
- Round 1: MR, 6 sc (6)
- Round 2: inc around (12)
- Round 3: (sc, inc) around (18)
- Round 4: sc around (18)
Create the ears (worked as small points on the top edge):
5. Sl st in next stitch, ch 2, sc in same stitch (first ear point made)
- Sl st in next 2 stitches
- Sl st in next stitch, ch 2, sc in same stitch (second ear point made)
- Sl st in next 2 stitches
- Continue with sl st around until the top looks neat and slightly cat-like.
- Fasten off, leave a tail for sewing.
Ear tip: Ears look best when placed about 3-4 stitches apart. Adjust by adding or removing a slip stitch between them.
Tail (simple curved tail)
- Ch 10
- Starting in the second ch from the hook: sc 6, then hdc 2, then sc 1 (creates a gentle curve)
- Fasten off, leave a tail for sewing.
Heart Detail
Choose either a tiny crochet heart or a simple embroidered one.
Option A: Tiny crochet heart
- MR
- Into the ring: ch 2, 2 hdc, ch 1, 1 sc, ch 1, 2 hdc, ch 2, sl st
- Tighten the ring, fasten off, leave a tail for sewing.
Option B: Embroidered heart (minimal and clean)
- Use red yarn to stitch a small heart directly onto the center of the base circle.
Assembly
- Arrange pieces first
- Place the black cat’s body centered on the white circle, slightly below the middle.
- Place the head on top of the body, with the head slightly overlapping.
- Place the tail along the side of the body, curving inward.
- Attach the cat appliqué
- Sew the body first using small whip stitches around the edge.
- Next, sew the head in place.
- After that, attach the tail securely at the base and a few spots along the curve.
- Attach the heart
- Sew the red heart at the center of the cat’s body, or centered on the white circle just under the face area.
- Keep placement intentional and simple for that minimalist look.
Alignment tip:
- Step back and check the silhouette before sewing. A few millimeters can change the expression of the whole design.
Attachment Options
Keychain ring
- Add a small yarn loop at the top of the white circle:
- Join white yarn at the top edge, ch 10-14, sl st back into the same spot.
- Pull the keychain ring through the loop.
- Reinforce the loop with a second pass of yarn if the piece will be used daily.
Brooch pin
- Place the pin back horizontally on the back of the circle.
- Sew through the pin holes multiple times with strong thread or yarn.
- Add extra stitches around the pin bar for stability.
Magnet backing
- Glue a flat magnet to the back center.
- Let dry fully.
- Optional: Crochet a second white circle and sew it on as a backing cover for a cleaner finish.
Facial or Decorative Details (Optional Minimal Style)
- Leave the cat as a pure silhouette for a modern look.
- Add tiny whiskers with 2 short black stitches.
- Add a tiny red stitch near the heart for a “shine” detail, but keep it subtle.
Finishing Touches
- Weave in all ends neatly on the back.
- Shape the circle with fingers and flatten it gently.
- Check the appliqué edges and add a few extra stitches where it lifts.
- Test the hardware strength with a gentle tug.
Tips for Beginners
- Work slowly to keep curves smooth and edges clean.
- Use a stitch marker on the circle rounds to avoid losing count.
- Keep tension consistent to prevent a wonky circle.
- Pin the cat pieces in place before sewing for perfect placement.
Common Mistakes
- Uneven circle: increases placed incorrectly. Fix by recounting and spacing increases evenly.
- Loose appliqué: not enough sewing points. Fix by adding small stitches around the edge and a few in the center.
- Weak attachment: keychain loop or pin not reinforced. Fix by stitching twice and using a strong thread.
- Wrong placement: cat silhouette off-center. Fix by laying pieces on the circle and checking before sewing.
Customization Ideas
- Try different cat colors: gray, calico-inspired patches, or a white cat on a colored background.
- Add names or initials with simple embroidery along the edge of the circle.
- Switch background colors: cream, blush, mint, or sky blue.
- Make a matching set of gifts: 3 to 5 cats in different colors, each with tiny heart variations.
- Turn a batch into fridge magnets for a cute, handmade kitchen touch.
Conclusion
Minimal yarn shapes can feel surprisingly cozy, especially with a bold cat silhouette and a tiny red heart. A Crochet Cat Keychain Amigurumi like this works up quickly, stays lightweight, and fits neatly into everyday life as a keychain, magnet, or brooch.
Personal color choices, a monogram, or a slight change in tail curve instantly change the personality. Enjoy making a whole little collection of handmade cat accessories, and let each one feel like its own tiny signature piece.