Charming Crochet Donkey and Unicorn Toys Amigurumi Easy Pattern Step-by-Step
Inspiring Amigurumi Toys lovers Soft yarn, tiny stitches, and a pocket-sized smile can turn into the sweetest little friend. A crochet donkey amigurumi with long ears and a round body brings cozy farm charm to any shelf or gift bag.
Add a horn and a colorful mane, and that same shape becomes a magical mini crochet animal. Both versions are beginner-level amigurumi toy sizes, quick to finish, and perfect as cute crochet plushies for hands that love small projects.
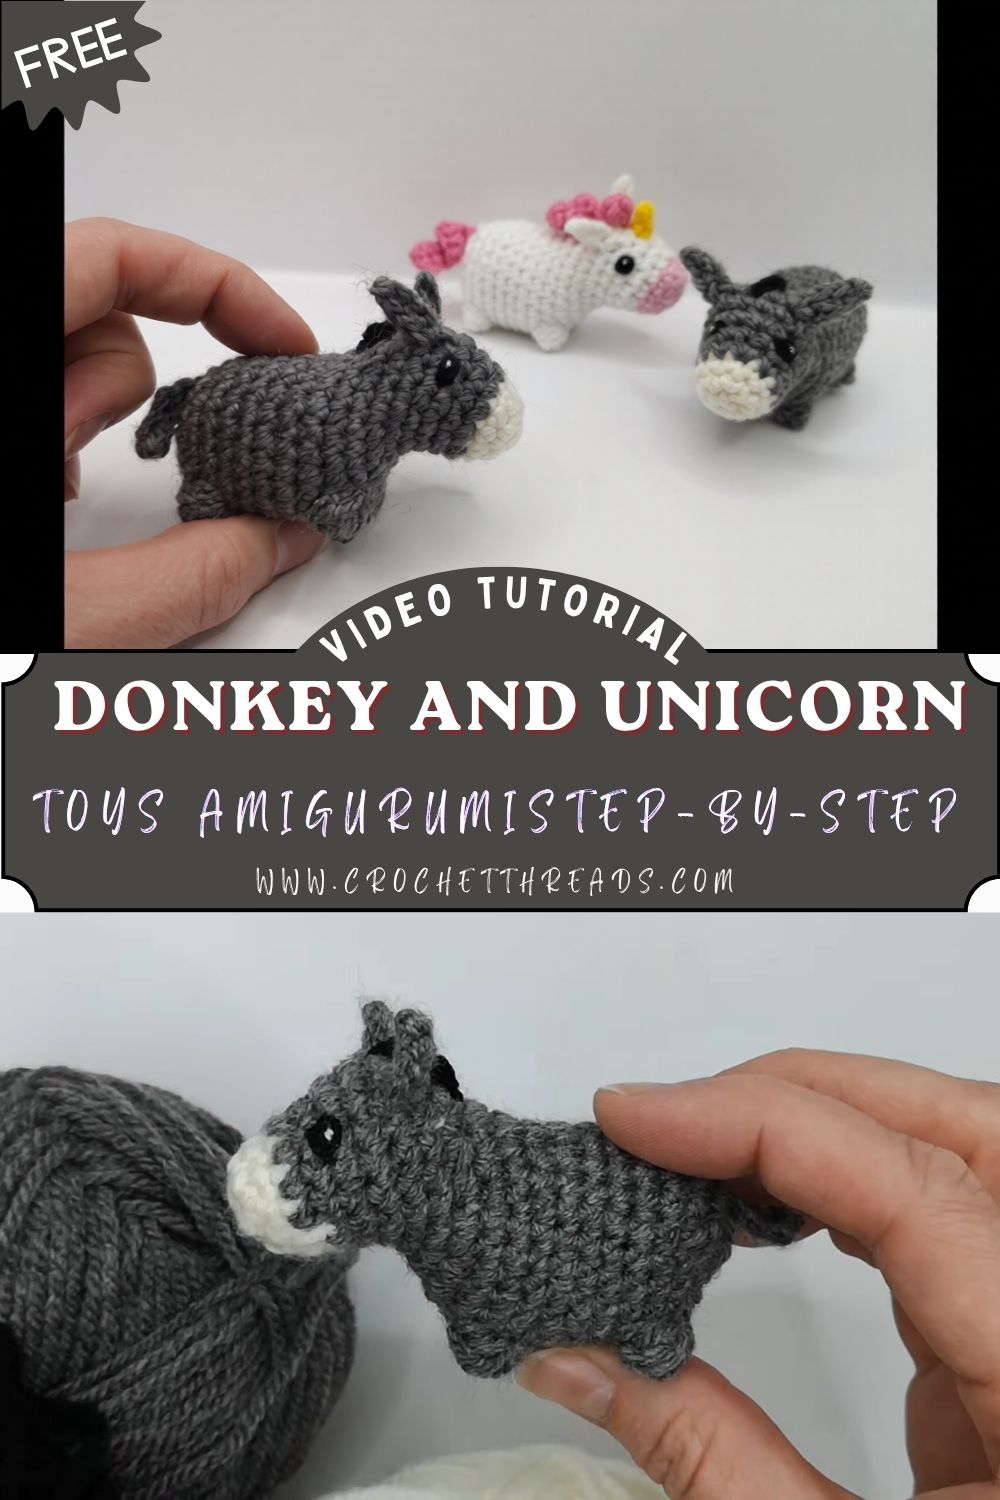
Farm animals never go out of style in amigurumi because the shapes are simple and friendly. Donkeys are especially cute in mini form, with gentle faces, sturdy little legs, and those signature long ears. On the other side, unicorn amigurumi stays popular because it is cheerful, customizable, and instantly recognizable with just a horn and a pop of color.
One of the best parts of this crochet donkey-and-unicorn amigurumi idea is that a single base pattern can create two characters. The same head and body can be dressed up with different ears, tail, and details. These minis work beautifully as gifts, kids’ toys, nursery decor, desk buddies, or even keychains with a small loop added on top.
Materials Needed
- Yarn
- Gray yarn: 15 to 20 g (donkey base)
- White yarn: 10 to 15 g (unicorn base or muzzle accent)
- Black yarn: 1 to 2 g (eyes, nose, details)
- Pastel colors for unicorn mane (pink, blue, purple, mint): 2 to 5 g each
- Small amount of pink and yellow: 1 to 2 g each (cheeks, horn accent, optional details)
- Crochet hook: 2.5 mm (or 3.0 mm for a slightly softer plush)
- Safety eyes: 6 mm (or embroider eyes with black yarn)
- Stuffing: 10 to 15 g polyester fiberfill
- Tools: yarn needle, stitch marker, scissors
- Optional: blush powder, tiny bow, mini scarf, keychain clasp
Abbreviations
- MR: magic ring
- sc: single crochet
- inc: increase (2 sc in one stitch)
- dec: decrease (invisible decrease recommended)
- sl st: slip stitch
- ch: chain
- BLO: back loop only
- FLO: front loop only
Skill Level
Beginner / Easy Beginner
Simple single crochet, basic increases and decreases, and small pieces that sew on quickly.
Estimated Time
- Total time: 1.5 to 2.5 hours
- Body (base oval): 20 to 30 minutes
- Head + muzzle: 30 to 45 minutes
- Ears (pair): 15 to 25 minutes
- Legs (4): 20 to 30 minutes
- Horn + mane (unicorn only): 20 to 35 minutes
- Assembly + face: 20 to 30 minutes
Important Notes Before Starting
- Use tight stitches so stuffing does not show through.
- Work in continuous rounds unless noted, using a stitch marker.
- Add stuffing in small amounts, shaping as you go.
- Keep parts symmetrical, especially ears and legs.
- Count stitches every round to avoid a lopsided head or body.
Step-by-Step Pattern
Base Body (Used for Both Donkey and Unicorn)
This base makes a small oval, rounded body with a soft plush feel.
1) Start the oval
- ch 5
- Round 1: starting in 2nd ch from hook, sc 3, 3 sc in last ch, continue on other side of chain, sc 2, inc (10)
- Round 2: inc, sc 2, inc x3, sc 2, inc x2 (16)
- Round 3: sc, inc, sc 4, (sc, inc) x3, sc 4, (sc, inc) x2 (22)
2) Build the belly
5. Round 4: sc 22
- Round 5: sc 22
- Round 6: sc 22
3) Shape and close
8. Round 7: (sc 9, dec) x2 (20)
- Round 8: (sc 8, dec) x2 (18)
Add stuffing now, then keep topping up as closing continues. - Round 9: (sc 7, dec) x2 (16)
- Round 10: (sc 6, dec) x2 (14)
- Round 11: (sc 5, dec) x2 (12)
- Round 12: (sc 4, dec) x2 (10)
- Round 13: (sc 3, dec) x2 (8)
Finish stuffing firmly but not rock-hard. - Round 14: dec x4 (4)
Fasten off and close the hole.
Head + Muzzle
A round head with a gentle snout makes both characters read clearly.
1) Head
- Round 1: MR 6 (6)
- Round 2: inc x6 (12)
- Round 3: (sc, inc) x6 (18)
- Round 4: (sc 2, inc) x6 (24)
- Round 5: sc 24
- Round 6: (sc 3, inc) x6 (30)
- Round 7: sc 30
- Round 8: sc 30
- Round 9: (sc 3, dec) x6 (24)
- Round 10: (sc 2, dec) x6 (18)
2) Place eyes
11. Add 6 mm safety eyes between Rounds 7 and 8, about 6 to 7 stitches apart.
For embroidery, stitch small oval eyes later using black yarn.
3) Finish the head
12. Round 11: (sc, dec) x6 (12)
Stuff the head now and shape it round.
13. Round 12: dec x6 (6)
Fasten off, close.
4) Muzzle (snout)
Use white, light gray, or a slightly lighter shade than the head.
- Round 1: MR 6 (6)
- Round 2: inc x6 (12)
- Round 3: sc 12
- Round 4: (sc 2, dec) x3 (9)
Lightly stuff and flatten slightly. - Fasten off, leave a long tail for sewing.
Smooth transition tip: Sew the muzzle centered under the eyes. Angle it slightly upward so the face looks sweet, not droopy.
Ears (Donkey)
Long, slightly pointed ears give the donkey its personality.
Make 2 in gray.
- Round 1: MR 6 (6)
- Round 2: (sc, inc) x3 (9)
- Rounds 3 to 6: sc 9
- Round 7: (sc, dec) x3 (6)
- Round 8: sc 6
- Flatten the ear and sc 3 through both layers to close the bottom.
Fasten off, leave a tail for sewing.
Attach evenly on top of the head, about 1 to 2 rows above the eyes, with a slight outward tilt.
Ears (Unicorn)
Smaller, rounded ears help the horn stand out.
Make 2 in white (or matching body color).
- Round 1: MR 6 (6)
- Round 2: inc x6 (12)
- Round 3: sc 12
- Round 4: (sc 2, dec) x3 (9)
- Round 5: sc 9
- Flatten and sc 4 through both layers to close.
Fasten off, leave tail.
Attach slightly lower than the horn position, about level with the top of the eyes.
Legs
Short, stubby legs keep the body stable and extra cute.
Make 4 in matching body color.
- Round 1: MR 6 (6)
- Round 2: inc x6 (12)
- Rounds 3 to 4: sc 12
- Round 5: (sc 2, dec) x3 (9)
- Round 6: sc 9
- Lightly stuff the bottom only for shape.
- Flatten the top and sc 4 through both layers to close.
Fasten off, leave tail.
Tail
Donkey tail (short and simple)
- Attach gray yarn to the back of the body.
- ch 6, sl st back down the chain.
- Optional tuft: add 2 or 3 small strands of black yarn at the end, trimmed short.
Unicorn tail (decorative option)
- Attach a pastel-colored item to the back.
- ch 8 to 12, sl st back down.
- Repeat with 2 to 4 more pastel strands beside it for a fuller look.
Unicorn Horn
A tiny cone shape, quick and beginner-friendly.
Use yellow or gold.
- Round 1: MR 4 (4)
- Round 2: sc 4
- Round 3: (sc, inc) x2 (6)
- Round 4: sc 6
- Round 5: (sc 2, inc) x2 (8)
- Round 6: sc 8
- Lightly stuff just the base so it stands nicely.
- Fasten off, leave a long tail.
Attach centered on top of the head.
Mane (Unicorn)
Choose the easiest option.
Option A: Simple yarn strands
- Cut 10 to 14 strands, each 10 to 12 cm long, in pastel colors.
- Latch or knot strands along the top back of the head, starting behind the horn and moving toward the neck.
- Trim to a neat curve.
Option B: Stitched texture
- Using a pastel yarn, surface-slip-stitch a small line from behind the horn down the back of the head.
- Repeat in 2 more colors beside it for a layered look.
Facial Details
Keep it sweet and minimal.
- Add a small nose on the muzzle using black yarn: stitch two tiny vertical lines or a small triangle.
- Add a short curved smile right under the nose.
- Optional cheeks: dab a tiny amount of blush, or stitch small pink dots.
Assembly
Use pins or stitch markers to hold pieces before sewing.
1) Join head to body
- Center the head on the smaller end of the body.
- Sew around with small, tight stitches.
- Add a little extra stuffing at the neck area before closing for support.
2) Attach legs
- Place two front legs evenly on the underside, slightly forward.
- Place two back legs evenly on the underside, slightly back.
- Set the body on a table to check that it sits flat, then sew securely.
3) Add ears and extras
- Sew ears in position, checking symmetry from the front.
- For unicorn: sew the horn first, then place the ears slightly lower, then add the mane.
4) Tail
Sew or knot the tail at the back center of the body.
Finishing Touches
- Shape the plush by gently squeezing the body into a smooth oval.
- Adjust ears so they match height and angle.
- Hide yarn tails inside the body for a neat finish.
- Add a tiny bow, mini scarf, or keychain loop for extra charm.
Tips for Beginners
- Keep stitches tight by using a slightly smaller hook than the yarn label suggests.
- Use a stitch marker every round to stay on track.
- Sew slowly and check placement before fully tightening stitches.
- Stuff in small amounts and shape as progress is made.
Common Mistakes to Avoid
- Loose stitches that show stuffing through the fabric.
- Uneven face from placing eyes too high or too far apart. Improper placement of ears or legs can create a crooked look.
- Overstuffing that stretches stitches and makes the body bumpy.
Customization Ideas for ( Crochet Donkey and Unicorn)
- Try a brown donkey, a white unicorn, or even a rainbow donkey for fun.
- Add a small chain loop on top to make mini keychains.
- Swap the mane colors to match a nursery theme.
- Create a tiny animal set collection with the same base body: cow, pony, or lamb.
Conclusion
This Crochet Donkey and Unicorn Amigurumi pattern keeps things simple, sweet, and beginner-friendly while still giving each one a totally different personality. The mini donkey brings cozy farm vibes, and the unicorn version adds instant magic with a horn and a colorful mane.
Try both variations and enjoy how quickly the same base shape transforms into a whole new, cute crochet plush. Each little mini crochet animal is small enough for gifting, decorating, or turning into a cheerful keychain companion.