Crochet Pink Mini Dolls Amigurumi Pattern Step by Step
If you’re looking for a crochet doll pattern that’s sweet, quick, and giftable, these tiny amigurumi dolls are the perfect project. Inspired by a soft pastel look, pink dress/body, blonde hair, and smiling embroidered faces, they’re easy to customize and fun to make in pairs.
Amigurumi dolls are small crocheted characters made with tight stitches, simple shaping, and a bit of embroidery to bring the face to life. Unlike flat crochet projects, amigurumi teaches you how to build 3D forms (head, body, hair, and tiny limbs) using increases and decreases skills you can reuse for almost any plush or doll design.
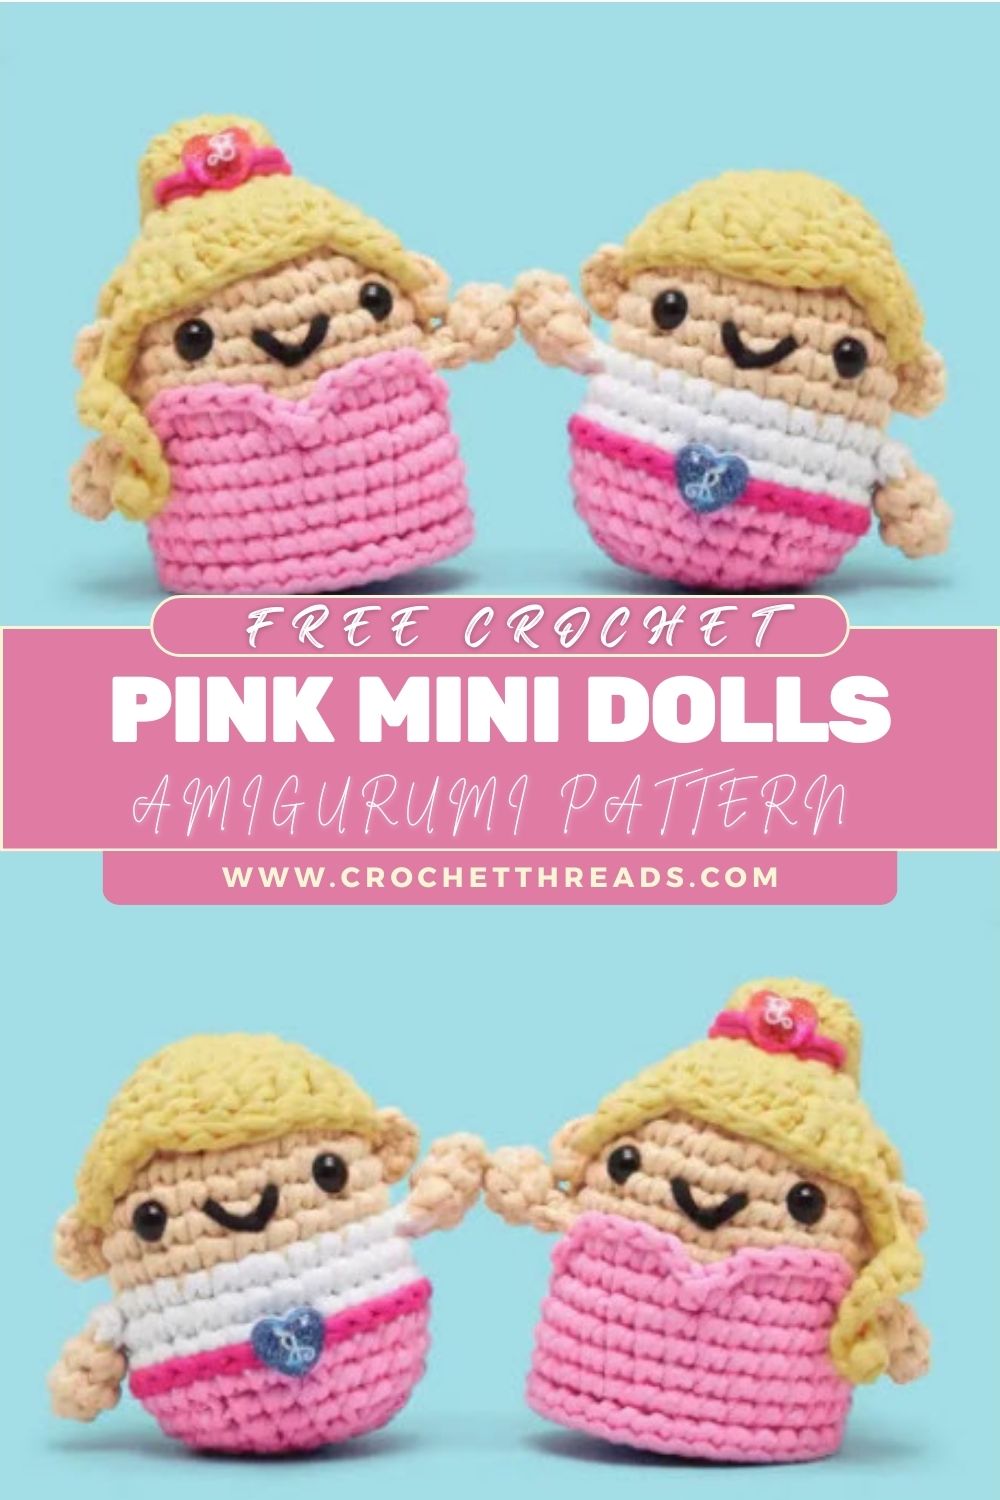
The design in this tutorial is inspired by a cute image concept: two small dolls with round faces, blonde/yellow hair, and pink body/dress sections. They have smiling embroidered expressions, tiny arms, and simple decorative details that give them a charming “handmade keepsake” vibe. The overall style is minimal and pastel, which makes the dolls look clean, modern, and very giftable.
This amigurumi doll pattern is intentionally beginner-friendly: it is worked in small, manageable pieces with straightforward rounds and consistent stitch counts. Advanced beginners and intermediates will also enjoy it because you can easily add upgrades, hair buns, bows, collars, stripes, or tiny accessories without changing the base structure.
These mini dolls are perfect for:
- Easter basket fillers, baby shower favours, and birthday gifts
- Nursery decor or desk buddies
- Keychains and bag charms (with a small modification)
- Matching “best friends” or “couple dolls” in different colours
Materials Needed
Use smooth yarn for clean stitches and easier counting.
Yarn (suggested colours)
- Skin tone yarn (peach, beige, or light tan)
- Pink yarn (dress/body)
- White yarn (optional collar, or small accents)
- Yellow/blonde yarn (hair)
- Black yarn or black embroidery floss (eyes and smile)
- Pink embroidery floss (tiny nose and/or blush)
Tools & Notions
- Crochet hook: 2.5–3.5 mm (choose smaller than yarn label suggests for tight stitches)
- DK yarn: 2.5–3.0 mm
- Worsted yarn: 3.0–3.5 mm
- Fiberfill stuffing
- Dollneedle/yarn needle
- Scissors
- Stitch marker
- Safety eyes (optional) 6–8 mm or embroidery for a child-friendly finish
- Optional accessories: mini ribbon bow, tiny buttons, keychain hardware (jump ring + swivel clasp)
Skill Level
Beginner / Advanced Beginner (Easy Amigurumi)
You should be comfortable with single crochet, counting stitches, and basic increases/decreases. The pattern includes step-by-step guidance for hair and face placement.
Crochet Abbreviations (US Terms)
- MR = Magic Ring
- sc = single crochet
- inc = increase (2 sc in same st)
- dec = decrease (sc2tog; invisible decrease recommended)
- sl st = slip stitch
- ch = chain
- st = stitch
- FO = fasten off
Finished Size
Approx. 4–6 in (10–15 cm) tall depending on yarn, hook size, and tension.
Tip: Smaller yarn + smaller hook = a more delicate mini doll.
Design Overview
This crochet doll is built in simple sections:
- Head: round, lightly shaped sphere
- Body: small to Torsohat transitions into the dress
- Dress (pink bottom section): slightly flared hem for a “cute doll” silhouette
- Hair: a simple hair cap plus strands (or loops) for a blonde look
- Arms: tiny tubes sewn to the sides
- Face details: embroidered eyes and smile (or safety eyes)
- Accessories: optional bow, collar, or flower detail
Step-by-Step Crochet Pattern (Round-by-Round)
Notes Before You Start
- Work in continuous rounds unless noted.
- Use a stitch marker in the first stitch of each round.
- For the best amigurumi fabric, keep stitches tight and even.
- Stitch counts are in parentheses at the end of each round.
A) Head Pattern (Skin Tone)
Rnd 1: MR, 6 sc (6)
Rnd 2: inc around (12)
Rnd 3: (sc, inc) around (18)
Rnd 4: (2 sc, inc) around (24)
Rnd 5: (3 sc, inc) around (30)
Rnd 6: (4 sc, inc) around (36)
Rnd 7–10: sc around (36)
Eye placement (if using safety eyes)
Insert safety eyes between Rnd 8 and Rnd 9, about 6–7 stitches apart.
If embroidering eyes, wait until after stuffing.
Rnd 11: (4 sc, dec) around (30)
Rnd 12: (3 sc, dec) around (24)
Rnd 13: (2 sc, dec) around (18)
Start stuffing the head firmly but smoothly.
Rnd 14: (sc, dec) around (12)
Rnd 15: dec around (6)
Do not FO yet if you’re continuing into the body as one piece. If you prefer a separate body, FO and leave a long tail to sew.
Continue directly into the body (recommended)
The next section continues from the head.
B) Body Pattern (Neck + Torso)
Switch the dress/body to pink. For a clean colour change: finish the last sc of the previous round by pulling through the new colour on the final yarn-over.
Rnd 16 (neck): With pink, sc around (6)
Rnd 17: inc around (12)
Rnd 18: (sc, inc) around (18)
Rnd 19: sc around (18)
Rnd 20: sc around (18)
Stuff the upper body lightly (you don’t want a stiff “peg” shape).
C) Dress / Pink Bottom Section (Slight Flare)
To create a simple dress flare, we’ll increase and add a trim around it.
Rnd 21: (2 sc, inc) around (24)
Rnd 22: sc around (24)
Rnd 23: (3 sc, inc) around (30)
Rnd 24: sc around (30)
Stuff the dress area lightly so the doll stands/keeps shape, but don’t overfill—mini dolls look best with a soft finish.
Optional hem detail (cute and simple)
Choose one:
- Simple hem: Rnd 25: sc around (30)
- Picot-style edge (easy version): Rnd 25: (sl st, ch 2, sl st in same st), sl st in next s,t repeat around
If you used the picot edge, keep it loose so it doesn’t curl too much.
FO, close neatly, weave in ends.
Optional flat base: If you want the doll to sit/stand more easily, skip the picot and do one more plain sc round, then slightly flatten the base while stuffing.
D) Hair Pattern (Blonde/Yellow)
Hair can be done as a cap + strands for a clean doll look.
Hair Cap (Yellow)
Work in rounds; you’ll sew this onto the head.
Rnd 1: MR, 6 sc (6)
Rnd 2: inc around (12)
Rnd 3: (sc, inc) around (18)
Rnd 4: (2 sc, inc) around (24)
Rnd 5: (3 sc, inc) around (30)
Rnd 6: sc around (30)
Rnd 7: sc around (30)
FO, leave a long tail for sewing.
Hair Strands (Yellow)
Attach yarn to the edge of the hair cap and create strands with chains.
Strand method (simple, beginner-friendly):
- Attach yarn with sl st at the back of the cap.
- Ch 10–14 (adjust length), sl st into next st on cap
Repeat around the lower half of the cap (back and sides).
For bangs/fringe at the front, make shorter strands (ch–6 or ch–9).
FO and weave in.
Styling tip: After attaching, trim strands slightly so both dolls match. You can also twist two strands together for a “rope curl” look.
E) Arms (Make 2, Skin Tone or Pink)
For the pictured aesthetic, simple, tiny arms are enough.
Rnd 1: MR, 6 sc (6)
Rnd 2–4: sc around (6)
Lightly stuff just the bottom tip (optional).
Flatten and close with 3 sc through both layers.
FO, leave a tail for sewing.
If you want pink sleeves: make arms in skin tone and stitch a small pink cuff at the top, or crochet the last round in pink before closing.
F) Face Details (Embroidered: Eyes + Smile + Nose)
Embroidered faces look soft and are great for small dolls (and kid-friendly).
Eyes (black yarn/floss)
- Place eyes around the Rnd 8–9 area of the head.
- Make each eye with 1–2 small horizontal stitches (or tiny vertical stitches).
- Space them about 6 stitches apart.
Smile
- Use black floss to stitch a small curved smile centred beneath the eyes.
- Keep it subtle, about 2–3 stitches wide.
Nose (pink)
- Add a tiny pink stitch (a small “V” or a mini triangle) between the eyes and smile.
Optional blush
- With pink floss, make one small stitch on each cheek.
- Keep it light so it doesn’t overpower the face.
G) Accessories / Decorative Elements (Optional but Adorable)
Choose one quick add-on:
Bow (mini ribbon or crocheted)
Crochet bow (pink or white):
- Ch 8, sc in 2nd ch from hook and across (7)
- Ch 1, turn, sc across (7) for 2 more rows
FO: wrap yarn around the centre several times, then tie off.
Sew onto hair or dress.
Tiny Heart Appliqué
- MR, ch 2, 3 tr into ring, 3 tr, ch 2, sl st into ring
FO, sew to the dress front.
Simple ColCollarhite)
Join white yarn at the neckline:
- sl st around the neck and add tiny ch-2 picots every few stitches for a scalloped collar.
Assembly Instructions
1) Attach Hair Cap
- Pin the hair cap to the head so it sits slightly forward (so you can add bangs).
- Sew around the edge using small whip stitches.
- Make sure the cap is centred (check from the front and sides).
2) Arrange and Secure Hair Strands
- Pull strands gently into place.
- Tack a few strands with tiny stitches near the sides to prevent shifting (especially if making a keychain).
3) Attach Arms
- Sew arms to the sides of the body just below the neck.
- Keep them symmetrical: attach one arm, then match the second at the same round.
4) Add Accessories
- Bow in hair or dress
- Heart/flower on the front
- Collar at the neckline
5) Final Face Check
Before weaving in ends completely, look at the doll from the front:
- Eyes level?
- Smile centred?
- Hair balanced?
Small adjustments make a big difference.
Stuffing Tips (For Smooth, Cute Results)
- Use small pieces of fiberfill, not one big lump.
- Stuff the head firmly enough to hold shape, but don’t stretch stitches.
- Keep the body lightly stuffed so the doll stays soft and squeezable.
- If you notice bumps, gently massage the stuffing and redistribute it.
Beginner Tips (Make It Easier and Neater)
- Use a stitch marker every round, especially for the head.
- Count at the end of each round; most shaping issues come from missed inc/dec.
- Use invisible decreases for a smoother face and head.
- For colour changes, pull the new colour through on the last yarn-over of the final stitch.
- When embroidering the face, insert your needle, come out where needed, and keep the thread tension even; too tight can pucker the face.
Customization Ideas
- Different dress colours: lavender, mint, baby blue, peach.
- Keychain version: use sport/DK yarn + 2.25–2.75 mm hook; add a keyring loop stitched into the top of the head (under the hair cap).
- A couple of dolls: make two dolls with different hair (brown/blonde) and different outfits.
- Seasonal styles:
- Holiday: red dress + white trim
- Spring: floral appliqué
- Halloween: black dress + orange bow
- Personalized details: initials on the dress, a tiny bag, or a mini scarf.
Common Mistakes to Avoid
- Loose tension: creates gaps and shows stuffing. Size down your hook if needed.
- Wrong stitch count: results in lopsided head count every round.
- Overstuffing the head can distort eye placement and stretch stitches.
- Misplaced eyes: too high looks surprised; too low looks sleepy p, in or mark placement first.
- Uneven hair: distribute strands evenly; tack down a few strands so they stay styled.
Care Instructions
- Spot clean with a damp cloth for small marks.
- For deeper cleaning: hand wash gently in cool water with mild soap, then towel-press and reshape.
- Air-dry completely; avoid tumble-drying.
- Store dolls away from direct sunlight to prevent colour fading, especially with pastel yarns.
Who Is This Pattern For?
This crochet doll pattern is ideal for:
- Beginners who want a manageable amigurumi doll project
- Advanced beginners/intermediates who love customising hair and outfits
- Gift makers (birthdays, baby showers, holidays, party favours)
- Decor lovers (nursery shelves, craft room displays)
- Small business sellers who want a cute, repeatable doll base (use original photos and avoid trademarked branding in listings)
Conclusion
These tiny pastel dolls are the kind of project that feels instantly rewarding: quick to finish, easy to personalize, and adorable in pairs. If you’ve been wanting a beginner-friendly amigurumi doll with a sweet smile, blonde hair, and a pink dress, this crochet doll pattern is a perfect place to start making one for yourself, then make the second as a gift.