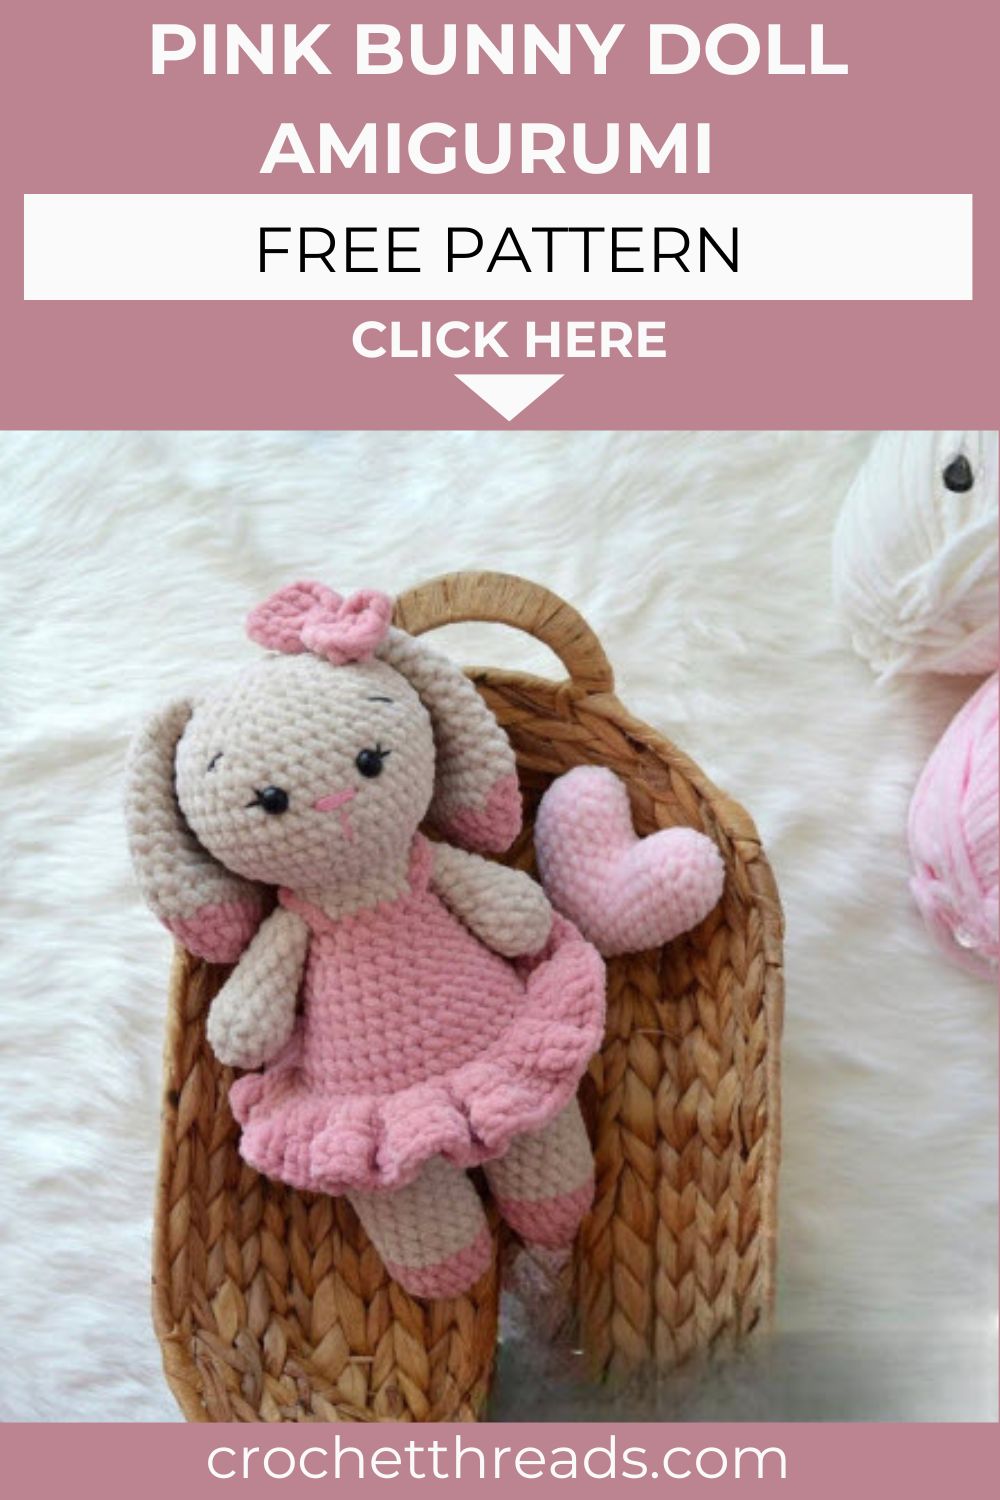
Free Crochet Pink Bunny Doll Amigurumi Pattern
This Free Crochet Pink Bunny Doll might become your new favorite amigurumi make. She stitches up soft, cuddly, and ready for hugs. With her cute dress and tiny bow, she suits nurseries, gifts, or shelves. Her gentle pink shades feel calm and sweet. Let’s hook this sweet bunny together right now.
Get ready to crochet a pink bunny doll from her paws all the way up to her ears. You will make the arms, legs, body, head, ears, a little bow, and a frilly dress. Each part joins smoothly into one adorable doll. The free crochet pink bunny doll amigurumi pattern keeps every step beginner-friendly. Low-key, she makes a heartfelt handmade gift. So clear your hooks and follow along below with me.

Skill Level
Confident beginners moving toward intermediate work will feel right at home. You should know magic rings, increases, decreases, and color changes. Joining legs and weaving arms takes some patience.
What You’ll Need
- Himalaya Dolphin Baby yarn, color 80342
- Yarnart Dolce yarn, color 769
- Yarnart Jeans yarn, pink and black
- Hook size 4.0mm
- Eyes 8mm
- Scissors
- Stitch marker
- Needle with a wide eye
- Holofiber filler
Symbols Used
- pp: air loop (chain)
- sbn: single crochet
- szn: single crochet
- pr: increase
- ub: decrease
- zs: connecting column (slip stitch)
Pattern Overview
Take a quick peek at the road ahead before you cast on.
- You build seven separate pieces, then join them into one bunny doll.
- Work starts at the arms and legs, then climbs up through the body and head.
- Both legs connect first, so the body grows as one smooth tube.
- Safety eyes sit between rows 38 and 39 for a sweet little face.
- A ruffled dress and small bow finish her off with charm.
- Color changes land at set rows to add cute contrast across the doll.
- The whole doll works up in continuous rounds, so it stays seamless.
Special Techniques
These small moves give your bunny a neat, professional finish.
- The magic ring opens every piece with a closed, gap-free start.
- Joining the legs across the air loops shapes the body in one round.
- Weaving the arms into row 29 secures them without extra sewing.
- Working into the back loop on the skirt makes the dress flare out.
- Color changes mark the body, bow, and skirt for a layered look.
- Counting each round with your marker keeps every piece even and balanced.
Free Crochet Pink Bunny Doll Amigurumi Pattern
Arms (Handles)
Make 2.
1st row: 2 pp, in the second loop from the hook 6 sbn
2nd row: 6 pr (12)
3-4th row: 12 sbn (12)
5th row: (2 sbn, ub)*3 (9)
6-10th row: 9 sbn
Legs
Make 2.
1st row: 2 sl st, in the second loop from the hook 6 sl st
2nd: 6 tr (12)
3rd: (1 sl st, tr)*6 (18)
4th: 18 sl st
5th: 18 sl st, in this row we change the thread
6-11th p: 18 sl st. Make a sl st in the next loop and cut the thread. Knit the second leg, and without cutting the thread, collect 2 sl st and connect the legs. Hook the marker, this will be the first loop of the next row.
Body
Continue to knit in a circle.
12th p: 18 sl st on one leg, 2 sl st on the air loops, 18 sl st on the second leg, and 2 sl st on the air loops (40)
13-14th p: 40 sl st
15th p: 7 sc, tr, 20 sc, tr, 11 sc (42)
16-17r: 42 sc. In the 17th row we change the color.
18r: 42 sc
19r: (5 sc, dec)*6 (36)
20r: 36 sc
21r: (7 sc, dec)*4 (32)
22r: (6 sc, dec)*4 (28)
23r: 28 sc
24r: (5 sc, dec)*4 (24)
25r: 24 sc
26r: (4 sc, dec)*4 (20)
27-28r: 20 sc. In the 27th row, we change the color.
29r: Weave in the arm: (6 sbn, 4 sbn together with the arm)*2 (20)
30r: 20 sbn
31r: (8 sbn, ub)*2 (18)
Head
Continue knitting in a circle.
32r: 18 pr (36)
33r: (5 sbn, pr)*6 (42)
34-35r: 42 sbn
36r: (6 sbn, pr)*6 (48)
37-38r: 48 sbn
Insert the eyes between the 38th and 39th rows.
39r: (6 sbn, ub)*6 (42)
40r: 42 sbn
41r: (5 sbn, ub)*6 (36)
42r: 36 sbn
43r: (4 sc, dec)*6 (30)
44r: (3 sc, dec)*6 (24)
45r: (2 sc, dec)*6 (18)
46r: (1 sc, dec)*6 (12)
47r: sl st and tighten the ring.
Ears
Make 2.
1r: 2 sl st, in the second loop from the hook 6 sc
2r: 6 pr (12)
3-4r: 12 sc (12)
5r: (2 sc, dec)*3 (9)
6-10r: 9 sc
Bow
1r: 2 sl st, in the second loop from the hook 6 sc
2r: 6 pr (12)
3r: (1 sc, pr)*6 (18)
4r: 18 sc
5r: 18 sc, in this row we change the thread
6-11 p: 18 sc
Dress
1st: Knit the skirt in the 17th row, where there was a color change. For the back wall of the loop, knit 42 sc.
2nd: 42 pr szn (84)
3rd: (1 szn, pr)*42 (126)
Knit the straps with 8 sc on each side.
Mistakes To Watch For
Dodge these slips and your bunny stays smooth and even.
- Stuffing the head too late, which leaves it lumpy and hard to fix.
- Misplacing the eyes outside rows 38 and 39, shifting the whole face.
- Joining the legs unevenly, which twists the body to one side.
- Skipping the back loop on the skirt, so the dress sits flat.
- Losing your marker, which throws off the round counts fast.
- Rushing the color changes can leave loose, gappy stitches behind.
Putting It Together
Once the pieces are ready, bring your bunny to life with these steps.
- Stuff each piece firmly with holofiber as you close it up.
- Attach the ears to the head with even spacing on top.
- Fix the bow near one ear for that classic bunny look.
- Pull all decrease rounds tight so no filler peeks through.
- Weave in every tail with your wide eye needle for a clean finish.
- Sit her upright and adjust the dress so it falls evenly all around.
Important Remarks
Keep these key notes nearby as you work on each part.
- Keep your stitches snug so the stuffing never shows through gaps.
- Change colors exactly where the pattern marks each new shade.
- Place the safety eyes before you close the head fully.
- Use a 4.0mm hook and the listed yarns for the right size.
- Swap the pink tones freely if you want a different palette.
- Check your stitch count at the end of each round to stay on track.
Final Thoughts
And there she is, your very own pink bunny doll ready for cuddles. She takes a few cozy evenings, but the result feels so worth it. No joke, handmade dolls like this become keepsakes that families hold onto for years. Try gifting her at a baby shower or a birthday party. Play with yarn colors, add your own small touches, and make her truly yours. Enjoy every single stitch.