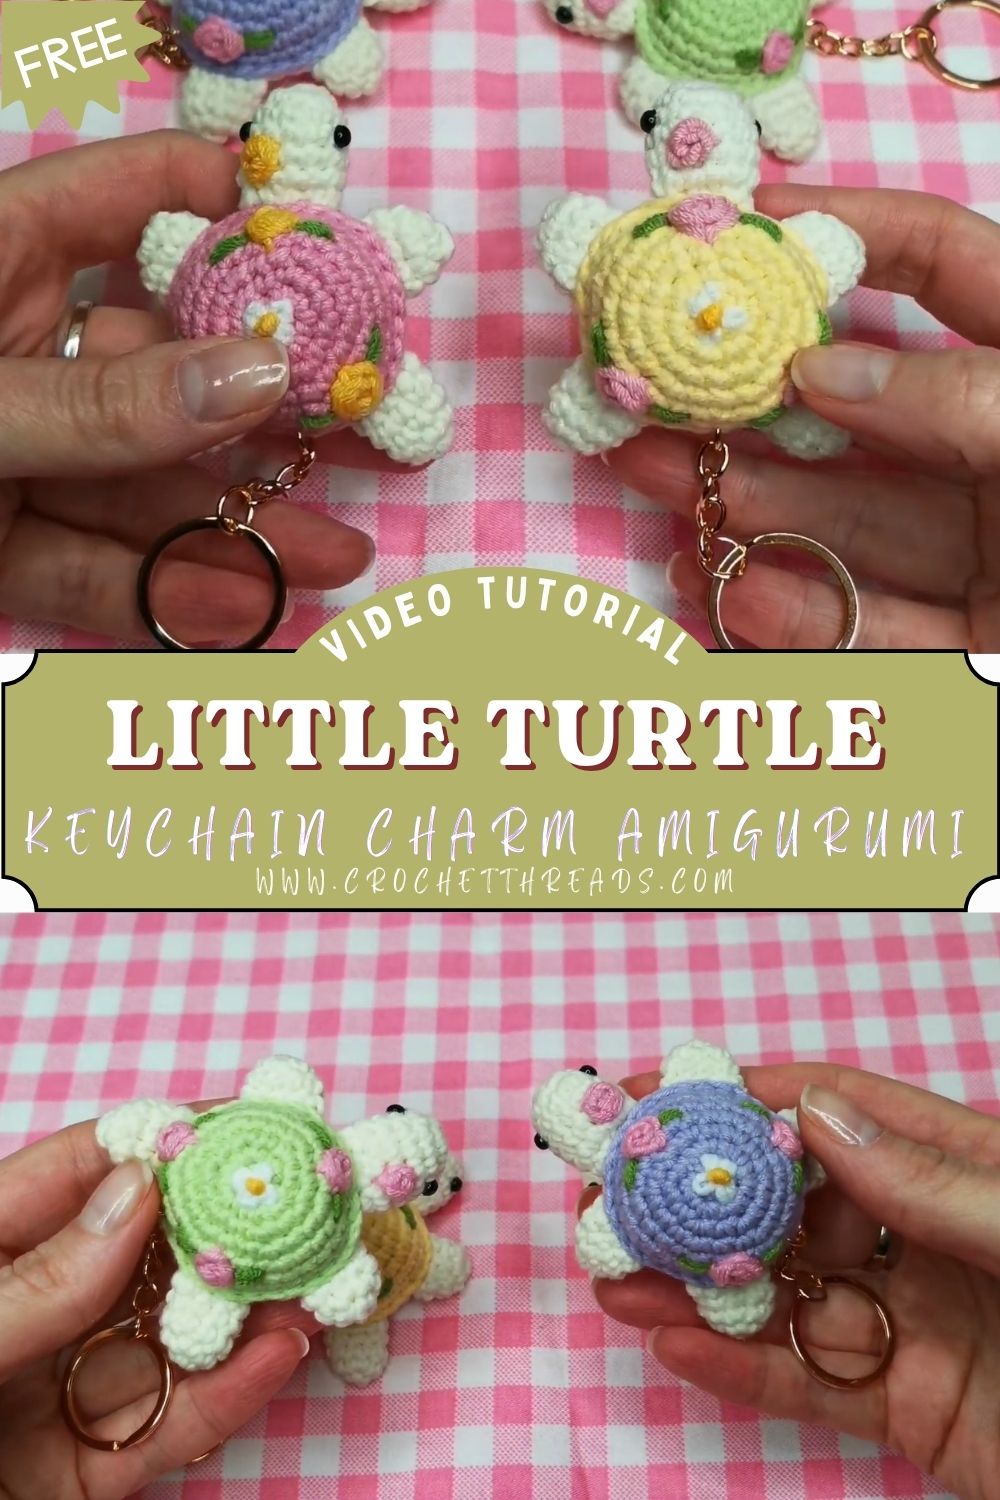
Fantastic Crochet Little Turtle Keychain Charm Amigurumi Soft & Colorful Pattern
Perfect as a turtle keychain crochet charm, this amigurumi turtle works up quickly and stays nicely palm-sized. Great for anyone who loves mini crochet animals, simple crochet keychain patterns, and soft, colorful handmade accessories.
Why This Crochet Turtle Is So Cute
Pastel yarn makes this turtle look calm and sweet, like a gentle spring color palette. The round spiral shell gives it a classic turtle feel, while the floral embroidery adds a delicate handmade detail. Because the body is compact, it also looks extra “chubby cute” on a keyring.
A Perfect Beginner-Friendly Keychain Project
This turtle is made from simple shapes, mostly worked in single crochet in the round. The pieces are small, so you can finish one in a short crafting session without feeling overwhelmed. Next, you only need basic sewing to attach the parts, and then it is ready to clip onto keys or a bag.
Materials Needed
- Yarn type and weight: Cotton or acrylic yarn, DK (Category 3) or Worsted (Category 4)
- Yarn amounts:
- Body color (mint, cream, light green): 25 g
- Shell color (pastel pink, lavender, sky blue): 15 g
- Embroidery colors (flower center + petals): 2 g total
- Hook size: 2.75 mm to 3.5 mm (use the smallest size that feels comfortable)
- Eyes: 6 mm safety eyes or black yarn for stitched eyes
- Fiberfill stuffing: 5 to 8 g
- Notions: tapestry needle, scissors, stitch marker
- Keychain ring: 20 to 25 mm ring (or lobster clasp + ring)
Abbreviations
MR (magic ring), ch (chain), sc (single crochet), inc (increase), dec (decrease), sl st (slip stitch), st (stitch), rep (repeat)
Skill Level
Beginner to Easy.
You will practice sc, inc, dec, and simple sewing. The small size makes it less intimidating.
Finished Size
Approx. 5 to 7 cm (2 to 2.75 in) long.
Size can change depending on yarn thickness, hook size, and stuffing.
Time Planning
Total time: 60 to 90 minutes
- Shell: 20 min
- Body base: 20 min
- Head + legs + tail: 15 to 25 min
- Assembly + embroidery + keychain: 15 to 25 min
Important Notes Before Starting (5 points)
- Use tight stitches so stuffing will not show through.
- Work in continuous rounds and move your stitch marker every round.
- Count stitches at the end of each round to stay on track.
- Stuff lightly for a neat, compact keychain shape.
- If using safety eyes, insert them before closing the head.
Step-by-Step Pattern
Pattern Setup (Read This First)
First, choose your body color and shell color.
Next, prepare a stitch marker and a needle for sewing later.
Then, keep yarn tails a little long so assembly is easier.
A) Top Shell (Work in Spiral)
Use shell color.
Round 1: MR, 6 sc (6)
Round 2: inc in each st (12)
Round 3: (sc, inc) rep 6 (18)
Round 4: (2 sc, inc) rep 6 (24)
Round 5: (3 sc, inc) rep 6 (30)
Next, add slight height for a dome shape.
Round 6: (4 sc, inc) rep 6 (36)
Round 7: sc around (36)
Round 8: sc around (36)
Round 9: (5 sc, dec) rep 6 (30)
Fasten off and leave a long tail for sewing. Do not stuff.
Shell Decoration (Spiral + Flowers)
First, use a slightly darker pastel yarn to surface-stitch a simple spiral from the center outward.
Next, embroider 2 to 4 tiny flowers around the outer shell area.
Then, keep them spaced out so they stay visible after assembly.
Tip: Place the shell on the body base to “test” where flowers will show.
B) Bottom Body (Slightly Curved Base)
Use body color.
Round 1: MR, 6 sc (6)
Round 2: inc in each st (12)
Round 3: (sc, inc) rep 6 (18)
Round 4: (2 sc, inc) rep 6 (24)
Round 5: (3 sc, inc) rep 6 (30)
Round 6: sc around (30)
Next, create a ridge to help the shell sit neatly.
Round 7: BLO sc around (30)
Fasten off and leave a long tail for sewing.
Stuffing Guide (Compact Keychain Look)
You will add stuffing during assembly, not immediately.
Use small pieces and press them gently into shape.
Stop early, because overstuffing can make the turtle look stretched.
C) Head (Small Rounded Shape)
Use body color.
Round 1: MR, 6 sc (6)
Round 2: inc in each st (12)
Round 3: (sc, inc) rep 6 (18)
Round 4: sc around (18)
Round 5: (sc, dec) rep 6 (12)
Next, add eyes before closing.
Insert safety eyes between Rounds 3 and 4, about 4 to 5 stitches apart.
Stuff lightly.
Round 6: dec rep 6 (6)
Fasten off, close the opening, and leave a tail for sewing.
D) Legs (Make 4)
Use body color.
Round 1: MR, 6 sc (6)
Round 2: sc around (6)
Round 3: sc around (6)
Fasten off, leave a sewing tail. Do not stuff.
E) Tail (Optional)
Use body color.
MR, 3 sc (3)
Fasten off and leave a short tail.
Assembly Instructions
1) Attach the Head
First, place the head at the front of the body base.
Next, sew it on with small tight stitches so it feels sturdy.
2) Attach the Legs and Tail
Then, sew two legs on each side, slightly toward the front for a cute pose.
Meanwhile, add the tail at the back if you made one.
Check symmetry before knotting and cutting yarn.
3) Stuff and Close Neatly
Next, add a small amount of stuffing to the body area and shape it round.
Then, position the shell on top and sew around the edge evenly.
Finally, weave in ends inside the body so the finish looks clean.
4) Add the Keychain Ring
Create a small yarn loop at the top center of the shell.
Pass the ring through the loop and knot very firmly.
For extra durability, stitch through the shell fabric once more.
Facial Details
Simple Eyes
Safety eyes look neat and quick.
If you prefer, stitch eyes using black yarn with two small horizontal stitches.
Optional Tiny Details
You can stitch a small smile with embroidery thread.
You can also add tiny blush dots using pink yarn or a light fabric blush touch.
Finishing Touches
Floral Embroidery
First, add small flower petals using simple loop stitches.
Next, add a tiny center knot or a few straight stitches to form the flower’s center.
Keep it minimal so the turtle stays clean and cute.
Final Shaping
Then, gently press the shell and body with your fingers to round them out.
Finally, trim any fuzzy ends and double-check that the keychain loop is secure.
Beginner Tips
- Use a stitch marker and move it every round.
- Count stitches often, especially after increase rounds.
- Keep sewing tails long so you can stitch securely.
- Stuff little by little and shape as you go.
- Practice surface stitching on a scrap piece before doing the shell spiral.
Common Mistakes to Avoid
- Using a hook that is too large, which creates gaps.
- Skipping stitch counts, then the shell and base do not match.
- Overstuffing, which makes the turtle look lumpy.
- Sewing legs unevenly, which makes it look tilted.
- Attaching the keychain ring to a weak loop instead of a reinforced one.
Variation Ideas
Color Changes
Try a pastel rainbow shell with a cream body.
Or make a bright green turtle with a soft yellow flower design.
Size Options
For a mini turtle, use thin yarn and a smaller hook.
For a plush version, use chunky yarn and bigger safety eyes.
Keychain or Plush
Skip the ring and make it a desk buddy instead.
Or add a longer strap to turn it into a bag charm.
Uses
Everyday and Gift Ideas
- Keychain for keys
- Bag charm for backpacks and purses
- Small handmade gift or party favor
- Craft fair item that is fast to restock
Conclusion
This Crochet Little Turtle Keychain Amigurumi is a simple project that still looks special because of the pastel shell and tiny floral details. It is quick, cute, and easy to personalize.
If you make one, try a second in a new color combo. Next, you can gift a pair as a matching set for friends or siblings.