
Free Crochet Miffy keychain Amigurumi Pattern
Customizing a Miffy keychain can be a delightful endeavor, adding personal flair through the use of different colors and accessories. Consider using pastel yarns for a softer look or vibrant hues for a playful touch. Adding little accessories, such as a small bow, a scarf, or miniature overalls, can give Miffy a unique personality. Moreover, different types of yarn can bring various textures, such as fluffy or smooth finishes, giving additional character to the keychain.
Solutions for Common Crochet Issues
Ensuring even tension can be challenging for both beginners and experienced crocheters. Maintaining consistent tension involves keeping a relaxed grip and practicing regularly. If tension varies, try using a yarn guide ring or holder to help maintain a steady flow of yarn. For those struggling with uneven tension, frequently checking the work and adjusting hand positioning can be helpful.
Incorrect stitch counts can be remedied by keeping a stitch marker at the beginning of each round to keep track of progress. Counting stitches repeatedly at the end of every row can also ensure accuracy. If the stitch count is off, reviewing the previous rows to identify and correct mistakes prevents further errors.
Making a Miffy Keychain: Simplified Instructions
For the basic construction, begin with the head:
- Create a magic ring and crochet 6 single crochets (SC) in the ring.
- For subsequent rounds, increase by specified increments as per the pattern until the head is formed.
Creating the body follows a similar pattern, with increases and decreases to shape it appropriately. Limbs and ears are made with simpler rows and rounds, then sewn onto the body.
Using safety eyes and embroidery thread can give Miffy her characteristic facial features. Finally, attach a keychain ring to the top, securing it firmly.
This results in a charming and customizable Miffy keychain that can be a cute accessory or gift.

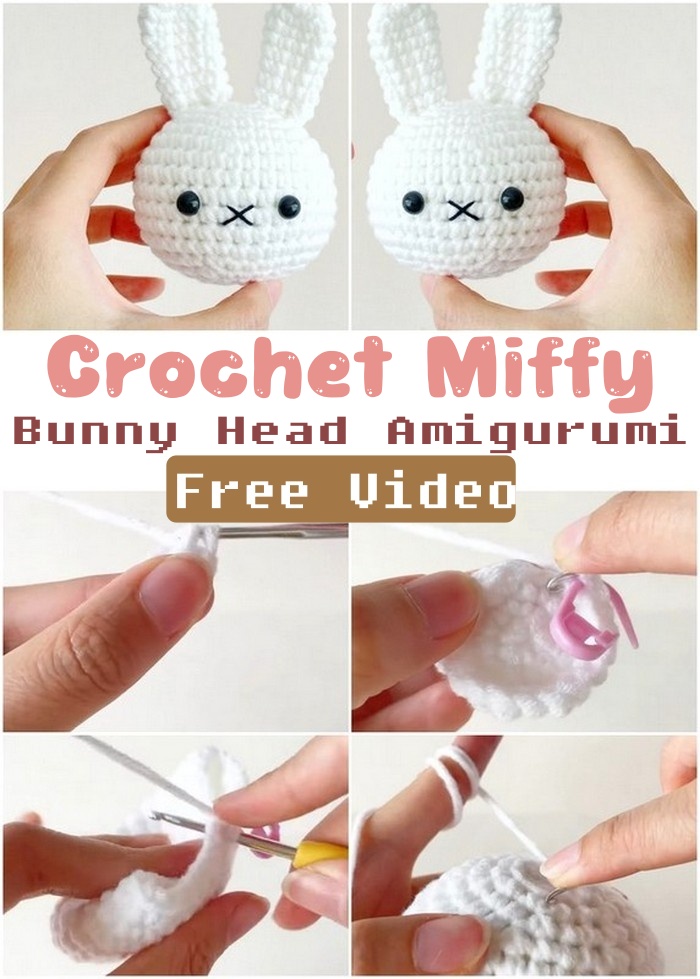
Crochet Miff Bunny Head Amigurumi
In recent years, there’s been a delightful resurgence of interest in handmade creations, with many discovering the charm of making something unique. Among these endeavors, crocheting a Miffy Bunny Head Amigurumi stands out as a particularly gratifying project. Not only does it result in an adorable and whimsical character, but the process itself is also utterly satisfying.
This article will guide through the creation of the Miffy Bunny Head, providing detailed steps and essential tips. Begin by forming a magic ring and crocheting six single crochets into it. Gradually increase the stitches in the subsequent rounds to shape the head. Once the desired size is reached, continue with even rounds. The ears are crafted by creating long tubes and attaching them seamlessly. Ensure to stuff the bunny’s head for a perfect cuddly feel, and carefully embroider the facial features to bring Miffy to life.
Crochet Miffy Scarf Simple Pattern
To crochet a simple Miffy Scarf, mastering a few basic stitches is essential. The chain stitch (chi) forms the foundation of many crochet projects. Start with a slip knot, then yarn over and pull through the loop on the hook. Repeat to form a chain.
The single crochet (sc) creates a dense, durable fabric. Insert the hook into the next stitch, yarn over, and pull up a loop. There should be two loops on the hook. Yarn over again and draw through both loops.
The slip stitch (sl st) is useful for joining or moving across stitches without adding height. Insert the hook into the desired stitch, yarn over, and pull through both the stitch and the loop on the hook in one motion.
For a neat finish, practice consistent tension and patience. Clear, step-by-step guidance ensures even beginners can create a charming crochet scarf.

Crochet Miffy Handmade Cute Pattern
This project brings the beloved character Miffy to life through crochet, perfect for both new learners and seasoned enthusiasts.
Materials Needed:
Gather soft, durable yarn in white and blue, a suitable-sized crochet hook, fiberfill stuffing, embroidery thread for facial features, and a yarn needle.
Step-by-Step Instructions:
Start by creating the foundation with a magic ring, followed by chaining and single crochet stitches to form Miffy’s body and limbs. Assemble individual parts meticulously.
Tips and Techniques for Beginners:
Maintain even tension while stitching to ensure uniformity. Practicing basic stitches like chain stitch, single crochet, and slip stitch will build a solid foundation for this project.
Finishing Touches and Assembly:
Use a yarn needle to securely attach the limbs and head to the body. Embroider the eyes and nose with black thread for a polished look.
Creative Ways to Customize Your Miffy:
Personalize Miffy with different colored outfits, accessories like hats or scarves, and variations in facial expressions.

Crochet Miffy Hat & Bag Pattern
Explore the fun and creative world of crochet with this Miffy Hat & Bag Pattern. This guide provides step-by-step instructions for crafting a cute and practical hat and bag set. Perfect for beginners and advanced crocheters alike, this pattern will help you create unique accessories that are both charming and functional.
To make the Miffy hat, start with a magic ring and work in continuous rounds to form the base of the hat. Use single crochet stitches to build the body and switch to white yarn to add Miff’s distinctive ears. For the bag, begin with a foundation chain, then crochet in rows to create a flat rectangle. Fold it in half and sew the sides together, leaving an opening at the top. Attach a handle made from a crocheted chain or a braided yarn strap. Finally, embellish the hat and bag with embroidered facial features using black and red yarn for an extra touch of character.

Crochet Cute Bunny in Overalls
To crochet the bunny’s overalls, begin with a slip knot and make 29 chains. Check the fit around the body; adjust by adding or removing chains as needed, maintaining an even count. For Row 1, start with the second chain from the hook and create a single crochet in each chain, resulting in 28 stitches. Join the row with a slip stitch to form a round. In Rows 2 and 3, chain one and single crochet in every stitch, joining each round with a slip stitch.
For the legs, divide the stitches evenly. Crochet 14 single crochets, create four chains, and join with a slip stitch to form the first leg’s round. Follow with single crochets for subsequent rounds, ensuring the leg length is adequate. Repeat for the second leg.
To add a bib, mark six central stitches on the front, then crochet three rows of six single stitches. Add straps with chain stitches, securing them by crocheting back along each strap. Optionally, attach small crocheted squares as decorative pockets.

Crochet Miffy Bunny Magic Ring Pillow
Learn how to crochet a cute and cuddly Miffy Bunny Magic Ring Pillow with this comprehensive pattern. This guide is perfect for beginners and experienced crocheters alike, offering detailed instructions to help you create a charming and comfortable addition to your home.
To crochet the distinct features of the Miffy Bunny, begin by making two circles. Start with a slip knot, then make seven chains. Insert the hook into the second chain from the hook and crochet one single crochet. Mark this stitch with a stitch marker. Make another single crochet in the same chain for an increase. Continue with one single crochet in each of the next four chains. In the last chain, make four single crochets.

Crochet Miffy Hat Charm Bag
Achieving the correct tension in crochet is crucial for a neat finish. When starting, use a slip knot and avoid overly tight stitches by keeping a consistent tension. For a seamless finish, use the technique of making increases: crochet two single crochets in the same stitch to ensure even growth. To avoid common issues like uneven stitches or incorrect shaping, mark the first stitch in each round with a stitch marker.
When connecting parts, such as ears, crochet a single crochet to attach each piece. Additionally, stuffing and shaping can help in achieving the desired form. For instance, after making single crochets around the base, add stuffing gradually to maintain shape. When closing openings, like the top of a hat, use a long tail to sew the hole neatly and hide the yarn end inside the body for a clean look. These techniques ensure a polished result for accessories.

Crochet Muffy’s Outfit & Accessories Pattern
To crochet Muffy’s outfits, start with the creation of a foundation chain for each piece. For tops and dresses, begin with 30 chain stitches and join them into a circle. Work single crochets around, introducing increases in selected rounds to shape the garment gently. For sleeves, chain one and make single crochets, skipping stitches as needed to form armholes. Continue crocheting, ensuring to mark the beginning of each round for consistency.
For bottoms, start similarly, adjusting the foundation chain to fit around the waist. Use rounds of single crochet, incorporating increases to shape and fit as necessary. For a bag accessory, begin with a shorter foundation chain, working single crochets around to form the pouch, ending with a strap made from chain stitches.
To join different pieces, use slip stitches or yarn needles for seamless integration, leaving long tails for secure attachment. The finishing touch involves securing loose ends and ensuring each piece is neatly completed.


