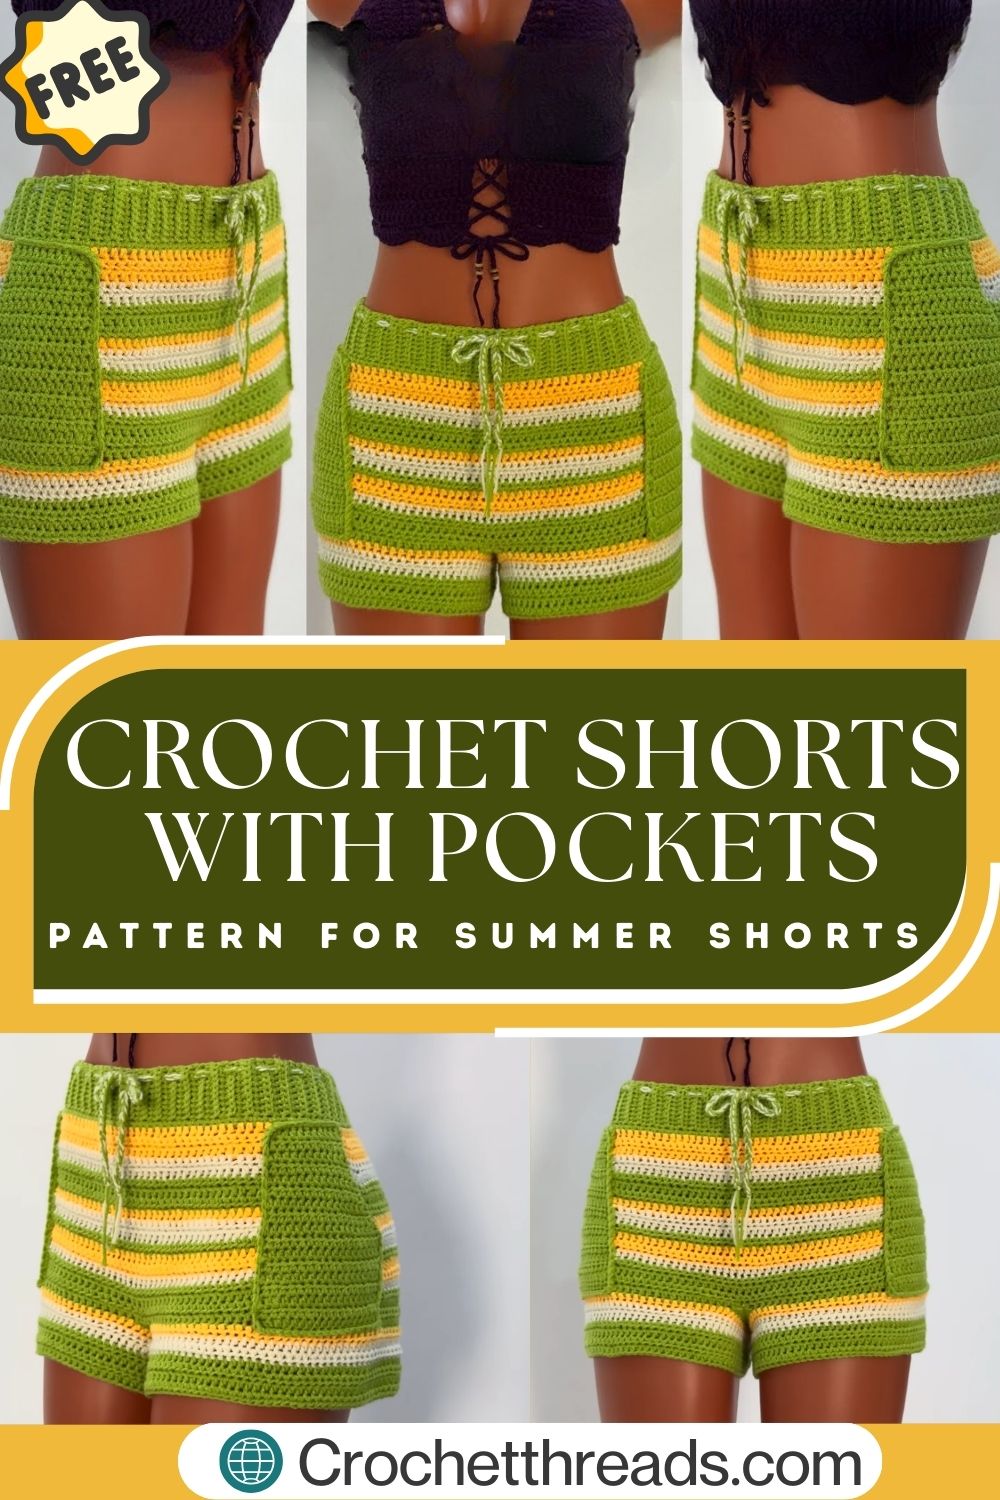
Free Crochet Shorts With Pockets Pattern for Summer Shorts
Crocheting your own summer wardrobe is one of the most satisfying (and practical) ways to learn new skills, especially when the project is wearable and useful. These crochet shorts with pockets are designed to be beginner-friendly, comfy, and cute, with an easy striped effect that looks impressive without being complicated.
Because they’re handmade, you can customize everything: the fit, the length, the waistband style, and of course, the colors. The best part? Pockets. Nothing upgrades your handmade shorts like real, functional pockets that can actually hold your phone.
Benefits of handmade crochet shorts
- Custom fit: adjust waist, hips, and length as you go
- Budget-friendly: one project can use a few affordable yarn colors
- Creative control: stripe combos, pocket size, and finishing style are up to you
- Great skill builder: learn working in the round, shaping, and simple seaming
Materials Needed (H2)
Here’s what you’ll need to make these striped crochet shorts:
- Medium-weight yarn (worsted / #4) in green, yellow, and white (for a striped effect)
- Crochet hook: 4.5mm or 5mm (choose based on your tension and yarn label)
- Stitch markers (very helpful for counting rounds and marking leg divisions)
- Scissors
- Yarn needle (for sewing pockets and weaving ends)
- Measuring tape
- Elastic (optional for waistband stability, especially if you prefer a snug fit)
Abbreviations Used (H2)
- ch – chain
- sc – single crochet
- dc – double crochet
- sl st – slip stitch
- st – stitch
- inc – increase
Step-By-Step Crochet Shorts Pattern (Main Section)
This pattern is written for beginners, using mostly double crochet and simple shaping. You’ll crochet from the waist down, then split into two legs, then add pockets.
Before you start: quick fit notes
- These shorts are intended to have a comfortable, slightly relaxed fit.
- Try them on as you go if possible.
- Stitch counts don’t need to be “perfectly standardized” as long as your shorts fit your body and both legs match.
Step 1: Waistband (H3)
The waistband is worked in the round with ribbing using front post and back post double crochet. This gives you stretch and structure.
1) Chain according to waist measurement
- Measure your waist where you want the shorts to sit.
- Create a starting chain that fits around that measurement without stretching.
Beginner tip: Keep the chain from twisting before joining.
2) Join to form a circle
- Bring the first and last chains together.
- sl st into the first ch to form a ring.
Place a stitch marker in the first stitch of the round so you always know where your round begins.
3) Work the ribbed waistband (front post/back post dc)
- ch 2 (counts as first dc in many patterns—if you prefer, ch 2 and make a dc in the same stitch for stability).
- WorkDCc around once to create a base round.
- For ribbing rounds: alternate front post dc and back post dc around.
- Front post dc (FPdc): yarn over, insert hook around the post of the dc from the previous round (front to back to front), pull up loop, complete dc.
- Back post dc (BPdc): yarn over, insert hook around the post from the back (back to front to back), pull up loop, complete dc.
Repeat ribbing rounds until waistband is your desired height (typically 1.5–2.5 inches / 4–6 cm).
4) Add drawstring instructions
You can add a drawstring in two easy ways:
Option A (simple):
- Crochet a long chain (about 50–80 inches / 125–200 cm, depending on your waist and bow preference).
- Weave it through the waistband using a yarn needle, going in and out every few stitches.
Option B (cleaner):
- Create a “drawstring round”: work dc, then ch 1, skip 1 st repeatedly to create eyelets.
- Next round: dc in each dc and dc in each ch-1 space.
Step 2: Body of Shorts (H3)
Now you’ll work downward in rounds to form the body. This section uses dc stitches and gradual increases to shape over the hips.
1) Start working in rounds
After the waistband, continue crocheting dc in each st around.
If needed, place stitch markers at the sides (halfway points) to help you position increases evenly.
2) Create the striped pattern
Use this stripe repeat for the main body:
- Green: 4 rows
- Yellow: 2 rows
- White: 2 rows
Repeat as desired until you reach the point where you want to split for the legs (usually around the upper thigh/crotch depth).
Color change tip: On the last yarn over of the last dc of the round, pull through with the new color to make the transition clean.
3) Increase gradually for hip shaping
To fit comfortably over the hips, add a few increases near the beginning of the body.
A simple beginner-friendly method:
- On increasing rounds, add 4 inc evenly spaced around the shorts (each inc = 2 dc in the same stitch).
- Work 1–3 plain rounds between increase rounds, depending on how much room you need.
Example shaping idea (adjust as needed):
- Round A: dc all around
- Round B: 4 inc evenly spaced
- Round C: dc all around
- Round D: 4 in evenly spaced
- Then continue without increases once it fits comfortably.
Fit check: The widest part should slide over the hips without strain and without gaping.
Step 3: Dividing for Legs (H3)
Once the body reaches your crotch depth, you’ll split the tube into two leg openings.
1) Separate front and back
- Lay the shorts flat and find the halfway point (front) and the other halfway point (back).
- Place stitch markers to mark:
- start of round
- midpoint (half your stitches)
You’ll crochet one leg first, then reattach the yarn for the second leg.
2) Work each leg individually
Leg 1:
- From the start marker, crochet across half the stitches to the midpoint marker.
- Join with sl st to the first stitch of this leg section to work in the round (or you can work in continuous rounds if you prefer—just keep track).
Work DC in each st around for the leg.
Leg length: Crochet 8–12 rows, depending on desired length:
- 8 rows = short shorties
- 10 rows = classic summer shorts
- 12 rows = slightly longer fit
Fasten off Leg 1.
Leg 2:
- Attach yarn at the other side and repeat the same number of rows as Leg 1.
Important: Count your rows so both legs match.
Step 4: Adding Pockets (H3)
You’ll crochet 2 rectangle panels and sew them securely to the sides/front area of the shorts.
1) Create a rectangle pocket panel using single crochet
For each pocket:
- Decide pocket width (a good beginner size is 6–7 inches / 15–18 cm).
- ch to match that width.
- sc in 2nd ch from hook and sc across.
- ch 1, turn and sc across each row until pocket depth is reached.
Pocket depth tip: Make pockets deep enough for a phone: about 7–8 inches / 18–20 cm.
Fasten off, leaving a long tail for sewing.
2) Attach to the sides securely
- Position the pocket on the front/side area of the shorts where your hand naturally rests.
- Use stitch markers to pin the pocket in place.
3) Sew neatly using a yarn needle
With a yarn needle and matching yarn:
- Sew along the sides and bottom of the pocket rectangle.
- Leave the top edge open.
For extra durability, you can use a simple whip stitch or mattress stitch, and reinforce the top corners with a few extra stitches.
Step 5: Finishing Touches (H3)
This step makes your shorts look polished and feel comfortable.
1) Add the drawstring
If you haven’t already:
- Weave the drawstring through the waistband.
- Tie a bow at the center front.
2) Weave in ends
Use a yarn needle to weave in all yarn tails:
- Weave through multiple stitches
- Change direction once to lock the tail in place
3) Block lightly if needed
If your stitches look a little wavy:
- Lightly steam block (do not press hard)
- Or wet the block gently and lay it flat to dry
Blocking helps the waistband and pocket edges sit neatly.
Sizing Guide (H2)
These are general sizing references. The best approach is to crochet based on your measurements (waist, hips, and desired length).
| Size | Waist (approx.) | Hips (approx.) |
|---|---|---|
| Small | 26–28 in (66–71 cm) | 34–36 in (86–91 cm) |
| Medium | 29–31 in (74–79 cm) | 37–39 in (94–99 cm) |
| Large | 32–35 in (81–89 cm) | 40–43 in (102–109 cm) |
How to adjust the stitch count for different sizes
- Waistband: chain to match your waist measurement (you can subtract 1 inch / 2–3 cm for a snug fit if your ribbing is stretchy).
- Hips: add more increase rounds (or more increases per round) until the shorts fit comfortably over your hips.
- Length: simply add or subtract rounds in the leg section (Step 3).
Tips for Beginners (H2)
- Check gauge: Even a small difference in tension changes the fit in wearables.
- Measure as you go: Try on the shorts or compare them to a pair you already own.
- Keep tension even: Consistent tension makes stripes and seams look cleaner.
- Count stitches: Especially after increases and when splitting for legs.
- Use stitch markers: Mark the start of rounds, sides, and the leg split points.
Common Mistakes to Avoid (H2)
Skipping increases
If you forget to increase, the shorts may feel tight at the hips or ride up. Add increases early, and check fit before continuing.
Uneven stripes
Changing colors mid-round can create “jogs.” For a beginner-friendly fix:
- Change color at the end of the round consistently.
- Keep stripe row counts the same on both legs.
Tight waistband
If the waistband is too tight, it won’t be comfortable. Use a larger hook for the waistband or add a bit more chain length.
Shallow pockets
Tiny pockets look cute but aren’t functional. Aim for a depth that can hold a phone (around 7–8 inches / 18–20 cm).
FAQs Section (H2)
How long does it take to crochet shorts?
Most beginners can finish crochet shorts in 6–12 hours, depending on speed, sizing, and how often you stop to measure or try them on. Pockets and waistband details add a bit of time but are worth it.
Are crochet shorts good for summer?
Yes, especially when made with breathable yarn and a comfortable fit. DIY crochet summer shorts work great for warm weather because you can customize the drape and length,h and choose lighter fibers.
What yarn is best for crochet shorts?
For summer wear, look for yarn that’s soft and breathable with good stitch definition:
- cotton or cotton blends (great for warm weather)
- bamboo blends (soft with beautiful drape)
Worsted (#4) is beginner-friendly, but you canuse lighter-weightt yarn for a more airy fabric (just expect to adjust stitch count and gauge).
Can beginners make crochet shorts?
Absolutely. This pattern uses basic stitches (sc, dc, sl st, ch) and simple shaping. The most “advanced” part is the waistband ribbing with front post/back post dc, and even that becomes easy after a few rounds.
How do I adjust the size?
Adjust size by:
- Chaining the waistband to match your waist
- Adding increases for hip shaping until it fits comfortably
- changing the number of rounds for body and leg length
Always measure as you go for the best fit.
Conclusion
These crochet shorts with pockets are a practical, beginner-friendly project that gives you a wearable result you’ll actually reach for all summer. With simple double crochet rounds, an easy striped pattern, and secure sewn-on pockets, you’ll build skills while making something fun and functional.
Try this beginner crochet shorts pattern, experiment with different color stripes, and customize the pocket size to fit your essentials. Once you make one pair, you’ll probably want another because nothing beats the comfort and creativity of DIY crochet summer shorts.