Crochet Sweety Swifty Space Buddy Keychain Monster Amigurumi Pattern
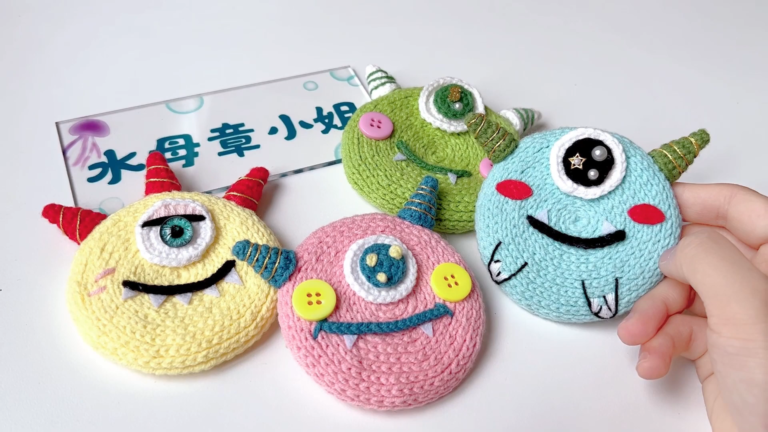
Blast off with the Sweety Swifty Space Buddy keychain monster, an irresistibly cute, quick crochet pattern featuring simple stitches, stash-friendly yarn, step-by-step instructions, and bold, cosmic personality.
For makers who love fast wins, this Sweety Swifty Space Buddy keychain monster is delightfully efficient yet impressively polished. Start with a dense, tidy fabric; then, shape the adorable silhouette with straightforward increases and smooth decreases. Next, add a secure loop, lively eyebrows, and a smile that sparks joy. Moreover, clear cues and helpful checkpoints reduce frogging and boost confidence.

Therefore, whether you’re practicing fundamentals or batch-making gifts, this pattern keeps momentum high and stress low.
Uses:
- Donate to charity drives or community craft boxes
- Match school or team colors for spirited gifts
- Create friendship charms to swap and collect
Crochet Sweety Swifty Space Buddy Keychain Monster Amigurumi Pattern
Additionally, every step flows into the next with clear counts, tidy shaping, and gentle guidance. Furthermore, you will finish fast while still achieving a polished, gift-ready result. Consequently, this buddy becomes the perfect clip-on charm for keys, backpacks, and gift bags. Likewise, you can customize colors, eyes, and accents to match any vibe. Ultimately, you will enjoy a confident, frustration-free make from the first loop to the final clip.
Finished Size, Skill Level, and Total Time
Firstly, the finished height measures approximately 5.5–7 cm (2.2–2.75 in) excluding antennae and hardware. Secondly, the skill level ranges from true beginner to confident beginner using US crochet terms. Thirdly, the average total time spans about 60–90 minutes, depending on pace and embellishments. Additionally, the construction uses continuous spiral rounds for smooth shaping. Finally, the texture aims for dense stitches that hide stuffing and hold form.
Materials
Firstly, choose Category 4 medium yarn for the body, 12–18 g (about 25–40 m / 27–44 yds) in your main color. Secondly, select contrast yarn or embroidery floss, 1–2 g (about 2–5 m / 2–5 yds) for the eye accent. Thirdly, use a 4.25 mm crochet hook (or 4.0–4.5 mm to match your tension). Additionally, prepare one 10 mm safety eye (or two 6–8 mm for a two-eye look) or felt/embroidered alternatives. Moreover, keep fiberfill ready in the 5–8 g range for a firm yet squeezable body.
Abbreviations (US Terms)
Firstly, MR = magic ring (adjustable loop). Secondly, ch = chain. Thirdly, sc = single crochet. Additionally, inc = increase (2 sc in one stitch). Moreover, dec = invisible decrease (front-loop-only decrease). Furthermore, sl st = slip stitch. Likewise, FLO/BLO = front loop only/back loop only. Finally, st(s) = stitch(es) and FO = fasten off.
Gauge and Working Notes
Firstly, gauge is flexible; however, tight stitches work best to prevent gaps. Secondly, drop the hook size if stuffing peeks through, because dense fabric supports a crisp silhouette. Thirdly, work in a continuous spiral and move your marker each round to maintain accuracy. Additionally, count at the end of every round so small errors do not compound. Finally, read the construction overview once, then follow the steps for smooth momentum.
Construction Overview
Firstly, you will crochet a crown-to-base tube that widens to 24 stitches and holds that diameter for height. Secondly, you will create and attach a heart or circle eye accent, optionally using a 10 mm safety eye through it. Thirdly, you will add a playful front-loop-only frill that preserves the back loops for finishing. Additionally, you will taper the base in back loops, then stuff and close neatly. Finally, you will braid short antennae and attach keychain hardware for daily use.
Step-by-Step Pattern with Time Estimates
Step 1: Start the Crown (Time: 3–5 minutes)
Firstly, form a magic ring (MR) and chain 1 to anchor without counting the chain as a stitch. Secondly, work Round 1 as 8 sc into the ring and pull the tail to snug the loop evenly (8). Thirdly, place a marker after the eighth stitch so the spiral is easy to track. Additionally, check that the crown lies flat to prevent wobbles later.
Step 2: Increase the Working Diameter (Time: 4–6 minutes)
Firstly, crochet Round 2 as inc in each stitch around to reach 16 (16). Secondly, complete Round 3 as (sc, inc) repeated around to reach 24 (24). Thirdly, flatten the circle gently between your fingers so increases settle neatly. Additionally, recount before moving on to lock in accuracy.
Step 3: Build Straight Height (Rounds 4–11) (Time: 18–25 minutes)
Firstly, work Rounds 4–11 as sc in each stitch around, keeping 24 per round for eight rounds total. Secondly, keep your marker aligned at the back, so features stay centered on the front. Thirdly, pause after Round 6 or 7 to preview eye placement and symmetry. Additionally, rotate the piece occasionally if you notice slanting due to tension or twist.
Step 4: Crochet the Feature Eye (Heart or Circle) (Time: 10–14 minutes)
Firstly, create the Heart Eye in a separate MR as follows:
- Firstly, begin with a slightly roomy MR, then ch 1 to organize the loop. Secondly, work 3 dc followed by 3 hdc to shape the first curve. Thirdly, ch 1, then work 1 dc for the point, followed by ch 1 for the top dip. Additionally, mirror the other side with 3 hdc and 3 dc to complete the heart. Finally, ch 1, sl st into the ring, snug the MR gently, and FO with a long sewing tail.
Secondly, create the Circle Eye in the round as follows:
- Firstly, work Round A as MR, 8 sc, then close the loop snugly (8). Secondly, work Round B as instructed in each stitch around to form a neat disc (16). Thirdly, FO with a sewing tail and gently press flat between your fingers. Additionally, pick whichever shape matches your color plan and personality.
Step 5: Position and Attach the Eye (Time: 6–9 minutes)
Firstly, mark the eye area between Rounds 6 and 7 at the center front. Secondly, insert a 10 mm safety eye through the heart or circle and then through the body, securing the washer inside. Thirdly, if sewing the applique instead, pin it in place and whipstitch with tiny, even stitches near the edge. Additionally, avoid catching internal strands or stuffing so the lining remains smooth.
Step 6: Add a FLO Frill (Round 12) (Time: 6–8 minutes)
Firstly, crochet Round 12 in FLO as a gentle frill using the sequence [sc, ch 1, sc in same stitch], then 2 sl st; repeat around. Secondly, keep all stitches in the front loops so the back loops remain untouched for the base close. Thirdly, nudge the frill into a uniform wave with your fingertips. Additionally, relax the slip-stitch tension if the ruffle tightens too much.
Step 7: Taper the Base in BLO (Round 13) (Time: 5–7 minutes)
Firstly, work Round 13 in BLO as (sc, dec) repeated around to narrow the base (16). Secondly, locate each BLO by tracing directly behind the frill’s FLO so you do not skip strands. Thirdly, use invisible decreases to keep shaping smooth and discreet. Additionally, confirm the final count to maintain symmetry.
Step 8: Stuff and Shape (Time: 4–6 minutes)
Firstly, add small tufts of fiberfill to the crown and press them gently into the face area. Secondly, push the fiber toward each side to suggest soft cheeks that frame the eye. Thirdly, tuck a bit into the lower edges created by the FLO/BLO split to support a flat base. Additionally, stop when the body feels firm yet compressible to avoid distortion.
Step 9: Close the Opening (Round 14) (Time: 4–6 minutes)
Firstly, crochet Round 14 as a series of even decreases until only a small hole remains. Secondly, make one sl st to anchor, FO, and thread the tail on a needle. Thirdly, weave the tail through the front loops of the remaining stitches and cinch closed without ripples. Additionally, bury the yarn tail through the center and out a discreet exit, then trim.
Step 10: Braid Short Antennae (Time: 7–10 minutes)
Firstly, cut three strands of yarn at approximately 30 cm/12 in each for one antenna, and repeat for the second. Secondly, thread one strand through the head between Rounds 2 and 3, pulling the ends even. Thirdly, add the other two strands through nearby points to build a sturdy bundle. Additionally, split the six tails into three groups of two and braid to 2.5–3 cm/1–1.25 in, then tie an overhand knot. Finally, trim just above the knot and mirror the process on the opposite side.
Step 11: Attach Keychain Hardware (Optional) (Time: 3–5 minutes)
Firstly, thread a strong loop of yarn or waxed cord through the crown and double-knot inside. Secondly, connect an 8 mm jump ring to the loop, then add a 25 mm split ring and a small lobster clasp. Thirdly, dab a tiny amount of fabric glue on the internal knot if tugging is expected. Additionally, allow the glue to cure fully before clipping the charm onto items.
Estimated Timeline Recap
Firstly, foundation and increases (Rounds 1–3): 7–11 minutes total. Secondly, height rounds (Rounds 4–11): 18–25 minutes total. Thirdly, eye construction and attachment: 16–23 minutes depending onthe method. Additionally, frill, taper, stuffing, and close (Rounds 12–14): 15–21 minutes total. Finally, antennae and hardware: 10–15 minutes.
Face and Expression Ideas
Firstly, tilt a single eye slightly off-center for a cheeky, curious expression. Secondly, embroider a tiny smile, fang, or smirk using short backstitches with black floss. Thirdly, add blush with pink thread dots or felt circles near the cheeks. Additionally, stitch a mini sparkle with white floss to suggest a starry gleam.
Basic Tips for Smooth Results
Firstly, keep your hook angle consistent so loops sit cleanly and do not split. Secondly, move your marker each round and verify counts to prevent drift. Thirdly, prefer invisible decreases so shaping looks sleek and professional. Additionally, stuff in small pinches and mold the silhouette with your fingers as you go. Moreover, pause every few rounds to relax your hands and maintain even tension. Furthermore, check symmetry before trimming antennae or attaching hardware. Finally, weave ends in opposite directions and tug gently to test the lock.
Common Mistakes and Quick Fixes
Firstly, overstuffing near the close can push stitches outward; remove a pinch and redistribute upward. Secondly, skipping BLO in Round 13 can skew the base; trace directly behind the FLO ridge. Thirdly, large whipstitches on the eye can show; take tiny, close bites around the edge. Additionally, overtightening the heart’s MR can pucker, tighten gradually, and pinch-shape the curves. Moreover, trimming antennae too close to the knot may fray; leave a small fringe for security. Finally, off-center hanging loops can tilt; test-hang with a pin before crimping the jump ring.
Variations and Customizations
Firstly, switch color themes to neon, pastel, or speckled galaxy to change the mood instantly. Secondly, alter size by moving to a 3.75 mm hook for micro or a 5.0 mm hook for a chunkier charm. Thirdly, swap eye accents for a star, bolt, felt circle, or embroidered X for personality. Additionally, add stripes using surface slip stitches in a contrasting color. Moreover, accessorize with a tiny scarf, micro cape, or bead “planet” on the hardware. Furthermore, create themed sets using school or team colors for gifts and markets. Finally, embroider initials or add metallic thread highlights for sparkle.
Safety Notes and Kid-Friendly Options
Firstly, avoid safety eyes and small beads for children under three and use embroidery or felt features. Secondly, double-knot and bury tails deeply so curious fingers cannot pull them free. Thirdly, consider cotton yarn for washability and a matte finish that resists snags. Additionally, choose a simple split ring instead of a lobster clasp for fewer moving parts. Finally, shorten antennae and, if desired, reinforce knots with a tiny dab of fabric glue.
Care and Maintenance
Firstly, spot clean with a damp cloth and mild soap, then air-dry completely. Secondly, roll the piece gently between your palms to reshapethe heeks and base. Thirdly, remove fuzz with a light pass of a sweater comb, avoiding the eye area. Additionally, store away from sharp keys or use a soft pouch to protect the face. Finally, smooth the frill clockwise with your fingertips to retrain the ruffle.
Troubleshooting Shape and Counts
Firstly, counter leaning by rotating the work a quarter turn every few rounds. Secondly, reduce frill intensity by loosening slip-stitch tension or dropping a repeat. Thirdly, fix a dimpling base by adding a pinch of stuffing to the lower edges. Additionally, pre-mark every fourth BLO before Round 13 if you lose track easily. Finally, re-center the closing gather by weaving the tail once more in the opposite direction.
Round-by-Round Quick Reference
Firstly, R1: MR, 8 sc (8). Secondly, R2: inc around (16). Thirdly, R3: (sc, inc) around (24). Additionally, R4–R11: sc around (24 each round). Moreover, Eye: position between R6–R7; attach heart/circle with a 10 mm safety eye or sew/embroider. Furthermore, R12 (FLO): [sc, ch 1, sc in same st], then 2 sl st; repeat around. Likewise, R13 (BLO): (sc, dec) around (16). Also, Stuff: firm but compressible for a stable base. Next, R14: dec evenly to close; sl st and FO; cinch and bury tail. Finally, Antennae: braid two short plaits anchored between R2–R3; trim and add hardware.
SEO Mini-FAQ
Firstly, what is the Sweety Swifty Space Buddy Keychain Monster? Secondly, it is a quick, beginner-safe amigurumi with a compact body, cute frill, and braided antennae designed for keychains. Thirdly, which yarn and hook should I use? Additionally, a Category 4 yarn with a 4.25 mm hook provides dense stitches that hide stuffing. Moreover, how long does it take to make? Furthermore, most crafters finish in 60–90 minutes, including face, frill, antennae, and hardware. Also, can absolute beginners follow this? Likewise, yes—clear transitions, counts, and checkpoints make each step approachable. Finally, where can I see a visual aid? Consequently, the linked video offers a helpful walkthrough that complements this pattern.
Closing Encouragement
Firstly, celebrate your Space Buddy with a quick photo and share your color choices proudly. Secondly, make a second buddy in reversed colors because batching feels fast and fun. Thirdly, gift a few as party favors or backpack charms,s and watch smiles multiply. Additionally, revisit this pattern anytime you need a satisfying, low-stress win. Finally, enjoy the journey stitch by stitch, because your tiny monster brings out-of-this-world joy wherever it hangs.