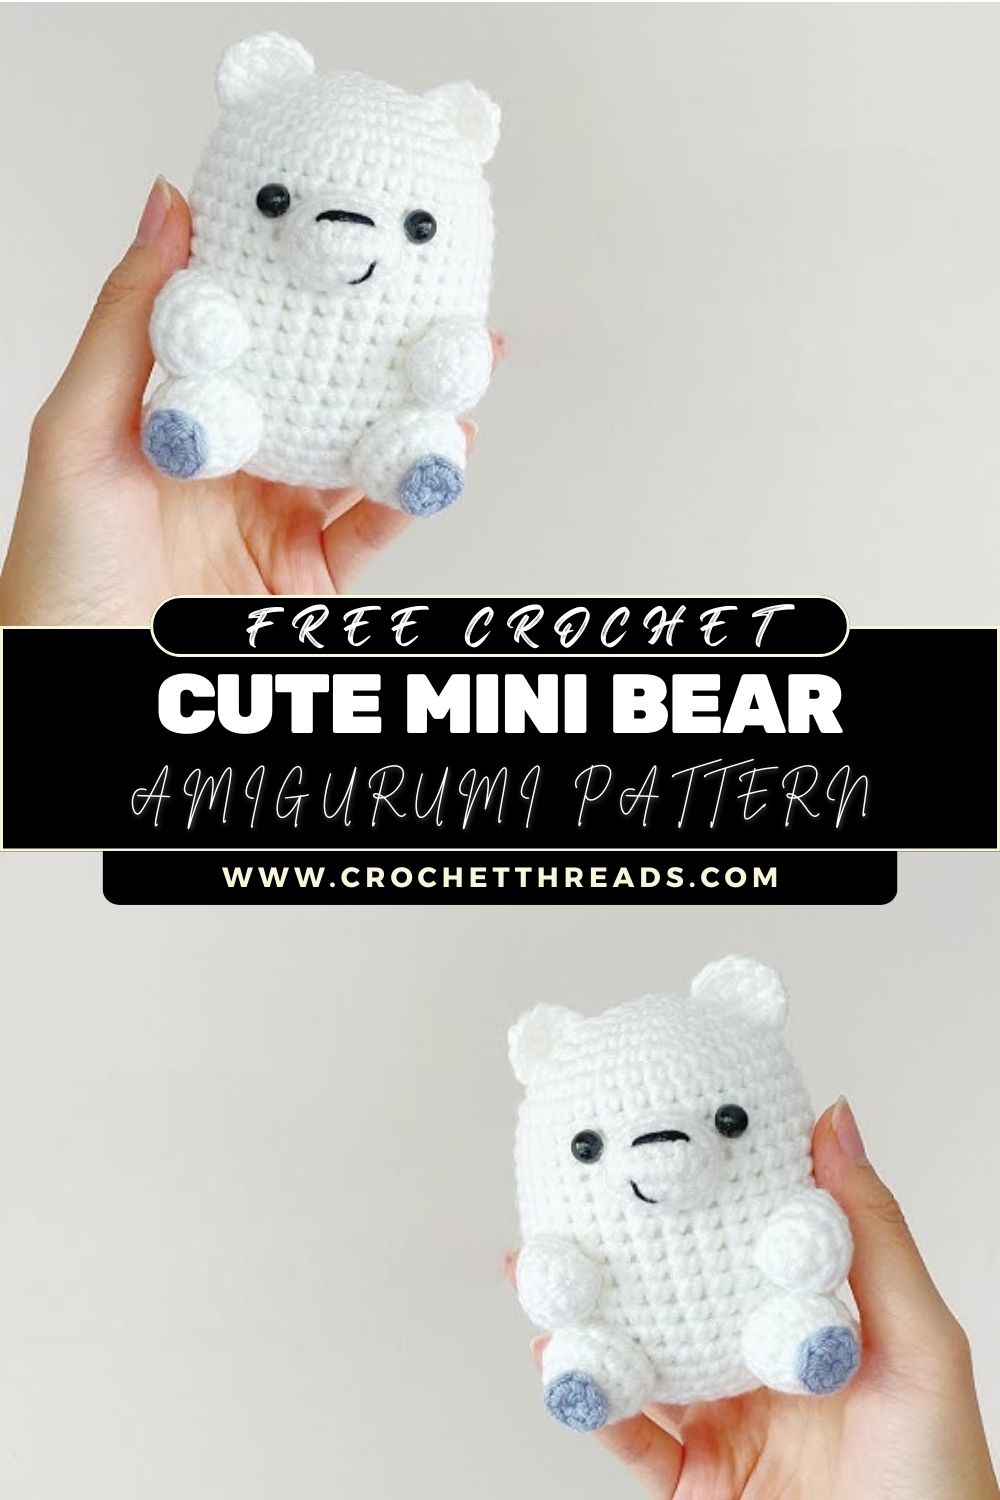
Crochet Cute Mini Bear Plush Amigurumi Pattern
Amigurumi crochet toys are small, squishy, and overflowing with charm, especially when they’re tiny plush animals you can finish in an afternoon. A little crochet bear is a classic because it’s simple to shape, easy to customize, and always gift-worthy. In this tutorial, you’ll learn how to crochet a cute mini amigurumi bear plush with sweet, rounded ears, tiny paws, and a friendly embroidered face. If you’re new to amigurumi, this is a comforting, confidence-building project.
A Crochet Amigurumi Bear is a small stuffed bear made using tight crochet stitches worked in the round to create a smooth, plush fabric. Amigurumi (the art of crocheting small stuffed toys) is popular because it transforms basic stitches into adorable characters, and you don’t need complicated techniques to get a professional-looking result.
Handmade crochet animals are loved for their “made-with-care” feel. Each one is unique, which makes them extra special as keepsakes. They’re also fantastic stash busters: a mini bear uses small amounts of yarn, so it’s perfect for practising and experimenting.
This easy, step-by-step crochet amigurumi bear tutorial is designed with beginners in mind. The main shape is a simple, rounded head-and-body piece (one of the easiest amigurumi forms), and the limbs are small and forgiving. You’ll also learn where to place eyes and how to embroider a cute smile without overthinking it. Once finished, your mini bear can be used as a sweet handmade gift, nursery décor (use embroidered eyes for baby safety), desk buddy, stocking stuffer, party favour, or even a keychain if you add a sturdy hanging loop.
Materials Needed
- White yarn (main colour; cream also looks lovely)
- Grey yarn (paws/feet accents)
- Black yarn or black embroidery thread (for face details) or safety eyes (6–8 mm)
- Crochet hook: 3.0–4.0 mm (choose a smaller size for tighter stitches)
- Fiberfill stuffing
- Yarn needle (tapestry needle)
- Stitch marker (or a scrap of yarn)
- Scissors
- Optional: pink thread or blush for cheeks, keychain ring + jump ring, ribbon for a bow
Crochet Abbreviations (Beginner-Friendly)
- MR = Magic Ring (adjustable loop to start)
- sc = single crochet
- inc = increase (2 sc in the same stitch)
- dec = decrease (single crochet 2 stitches together; invisible dec recommended)
- ch = chain
- sl st = slip stitch
- st = stitch
- rnd = round
- FO = fasten off (cut yarn and secure)
Design Overview (What You’ll Crochet)
This mini bear is made from a few simple parts:
- Head/Body: one rounded piece for a plush look
- Ears: two small circles sewn on top
- Arms: tiny paws on the sides
- Feet: small, rounded feet greyy accents) attached at the bottom front
- Face details: eyes + nose + smile (embroidered for the cutest soft look)
Step-by-Step Crochet Pattern
Pattern Notes (Read First)
- Work in continuous rounds unless stated.
- Use a stitch marker to track the first stitch of each round.
- Keep tension snug to avoid gaps.
- This is a realistic sample pattern for a small round amigurumi bear. Adjust the hook size to change firmness and final size.
Finished size (approx.): 4–5 in (10–13 cm) tall with DK/light worsted yarn and a 3.5 mm hook.
A) Head & Body (One Piece, White)
This creates the “classic plush” shape: a wider head, a gentle neck, and a rounded body.
Rnd 1: 6 sc in MR (6)
Rnd 2: inc around (12)
Rnd 3: (1 sc, inc) rep around (18)
Rnd 4: (2 sc, inc) rep around (24)
Rnd 5: (3 sc, inc) rep around (30)
Rnd 6–8: sc around (30) for 3 rnds
Place eyes (if using safety eyes)
Insert eyes between Rnd 7 and Rnd 8, about 6–7 stitches apart.
If you’re embroidering the eyes, you can do it later. Many beginners find embroidery easier after stuffing.
Begin shaping into the body
Rnd 9: (3 sc, dec) rep around (24)
Rnd 10: (2 sc, dec) rep around (18)
Rnd 11: sc around (18)
Rnd 12: (2 sc, inc) rep around (24)
Rnd 13: (3 sc, inc) rep around (30)
Rnd 14–16: sc around (30) for 3 rnds
Rnd 17: (3 sc, dec) rep around (24)
Rnd 18: (2 sc, dec) rep around (18)
Stuffing instructions
Start stuffing firmly now. Add the stuffing in small pieces and shape as you go: a rounded head, slightly wider tummy.
Rnd 19: (1 sc, dec) rep around (12)
Add a final pinch of stuffing. The bear should feel plush but not stretched.
Rnd 20: dec around (6)
FO, close the opening with a needle, weave in ends.
Beginner shaping tip:
If the body looks lumpy, gently roll the plush between your palms to smooth the stuffing before the final closure.
B) Ears (Make 2, White)
Small, rounded ears keep the bear extra cute.
Rnd 1: 6 sc in MR (6)
Rnd 2: inc around (12)
Rnd 3: sc around (12)
FO, leave a long tail for sewing.
Flatten each ear into a semicircle.
Where to attach:
Sew on the top of the head around Rnd 3–5 area (near the crown), spaced evenly.
C) Arms (Make 2, White withGreyy “Paw” option)
These are tiny and simple, perfect for beginners.
In white:
Rnd 1: 6 sc in MR (6)
Rnd 2: sc around (6)
Rnd 3: (1 sc, dec) rep around (4)
FO, leave tail.
Optional grey paw accent:
Before FO, switch to grey for the last round (or embroider two tiny grey toe lines later).
Lightly stuff the very end (optional), flatten, and sew to the sides of the body around the “neck/body transition” area (roughly Rnd 12–14).
D) Feet (Make 2, Grey)
Tiny, rounded feet that peek out from the bottom front.
Rnd 1: 6 sc in MR (6)
Rnd 2: inc around (12)
Rnd 3: sc around (12)
FO, leave long tail. Do not stuff. Flatten into an oval.
Where to attach:
Sew to the lower front of the body so they stick out slightly.
E) Face Embroidery (Black + optional pink cheeks)
Even simple stitches create a sweet expression. The full step-by-step is in Section 9.
F) Assembly
Sew ears, arms, feet; embroider face; add optional loop/accessory.
Face Details (Eyes, Smile, Blush Cheeks)
Option 1: Safety Eyes
- Place between Rnd 7 and Rnd 8.
- Space about 6–7 sts apart.
- Make sure they’re straight before locking backs.
Option 2: Embroidered Eyes (Soft, Baby-Friendly Look)
Use black embroidery thread or thin black yarn.
- Mark eye placement: about the same level as the Rnd 7–8 area.
- Stitch each eye as a small vertical satin stitch (3–5 passes).
- For a sleepy look, embroider small curved lines instead of dots.
Nose + Smile (Simple and Cute)
- Nose: embroider a tiny triangle or oval centred between the eyes, slightly lower (black or dark brown looks classic).
- Smile: stitch a short line down from the nose, then a small “Y” split or two tiny curves.
Optional Blush Cheeks
- Add two tiny pink stitches under the outer corners of the eyes, or dab blush lightly and build colours slowly.
Assembly Instructions (Step by Step)
- Sew ears symmetrically
- Pin ears first, check from the front.
- Sew around the base of each ear with small whip stitches.
- Attach arms
- Position arms on the sides, slightly forward (so they show from the front).
- See securely; these get handled a lot.
- Attach feet
- Place feet at the bottom front, evenly spaced.
- Sew the back half of each foot so the front edge protrudes.
- Face placement check
- If the embroidery isn’t done yet, do it now: eyes first, then nose, then smile.
- Stuffing and closing (already done in body rounds)
- If you need to adjust firmness, you can add a tiny bit of stuffing before the last decrease round next time.
- Optional keychain loop
- Add a loop at the top of the head: attach yarn, ch 12–16, sl st back into the same spot.
- Reinforce with extra stitches and customisation. Attach the keychain ring.
Customization Ideas
- Pastel bears: baby pink, mint, lavender, or sky blue with matching paw accents
- Rainbow yarn bear: Use self-striping yarn for an instant, cute effect
- Accessories: tiny bow, mini scarf, or a small crochet heart held by the arms
- Bear keychain: add a strong top loop + hardware and keep stuffing slightly firmer
- Bigger plush: use thicker yarn (bulky/chenille) and a larger hook; keep the same stitch counts for a larger bear
Beginner Tips
- Use a stitch marker and count stitches. Amigurumii is all about staying on track.
- Keep stitches tight so stuffing doesn’t peek through.
- Maintain even tension: consistent tension gives a smooth, professional fabric.
- Do not overst. Overstuffing stretches stitches and makes seams harder to sew.
- Pin pieces before sewing to check symmetry (especially ears).
Common Mistakes to Avoid
- Uneven stuffing: causes bumps, stuff gradually, and shape often.
- Incorrect stitch counts: one missed inc/dec can create a lopsided bear count every round.
- Loose stitches: Use a smaller hook or tighten the tension.
- Misaligned ears: always pin and view from the front before stitching.
- Face placed too high/low: eyes too high look surprised; too low can look sad, aim for mid-upper face.
Why This Pattern Is Special
Crochet bears are timeless,s soft, comforting, and universally adorable. This mini amigurumi bear pattern is beginner-friendly because it relies on simple rounds and small pieces, yet it still creates a polished plush you’ll be proud to gift. It also invites creativity: switch colours, add outfits, or make a whole set of tiny bears for a truly handmade collection.
Conclusion
If you’ve been wanting a simple, satisfying amigurumi project, this Crochet Amigurumi Bear – Easy Step-by-Step Tutorial is a perfect place to start. Take it one round at a time, keep your stitches snug, and enjoy adding those sweet little details that bring your bear to life. Once you finish one, you’ll likely want to make a whole bear family in different colours and styles.