Crochet Bunny Ear Hat for Cats Hat Amigurumi Pattern
Looking for a crochet cat hat pattern that’s equal parts cute, cosy, and photo-ready? This bunny-ear hat for cats features a snug beanie base, soft upright ears, and gentle chin ties for a secure but comfortable fit.
Whether you’re crocheting for an Easter photoshoot, a gift, or your pet’s social media debut, this beginner-friendly guide walks you through every step. Crochet pet hats are small, wearable accessories designed specifically for animals,s usually made with soft yarn and stretchy stitches so they sit comfortably without restricting movement. The best ones are simple in construction (like a round beanie) but thoughtfully shaped to fit a pet’s head securely.
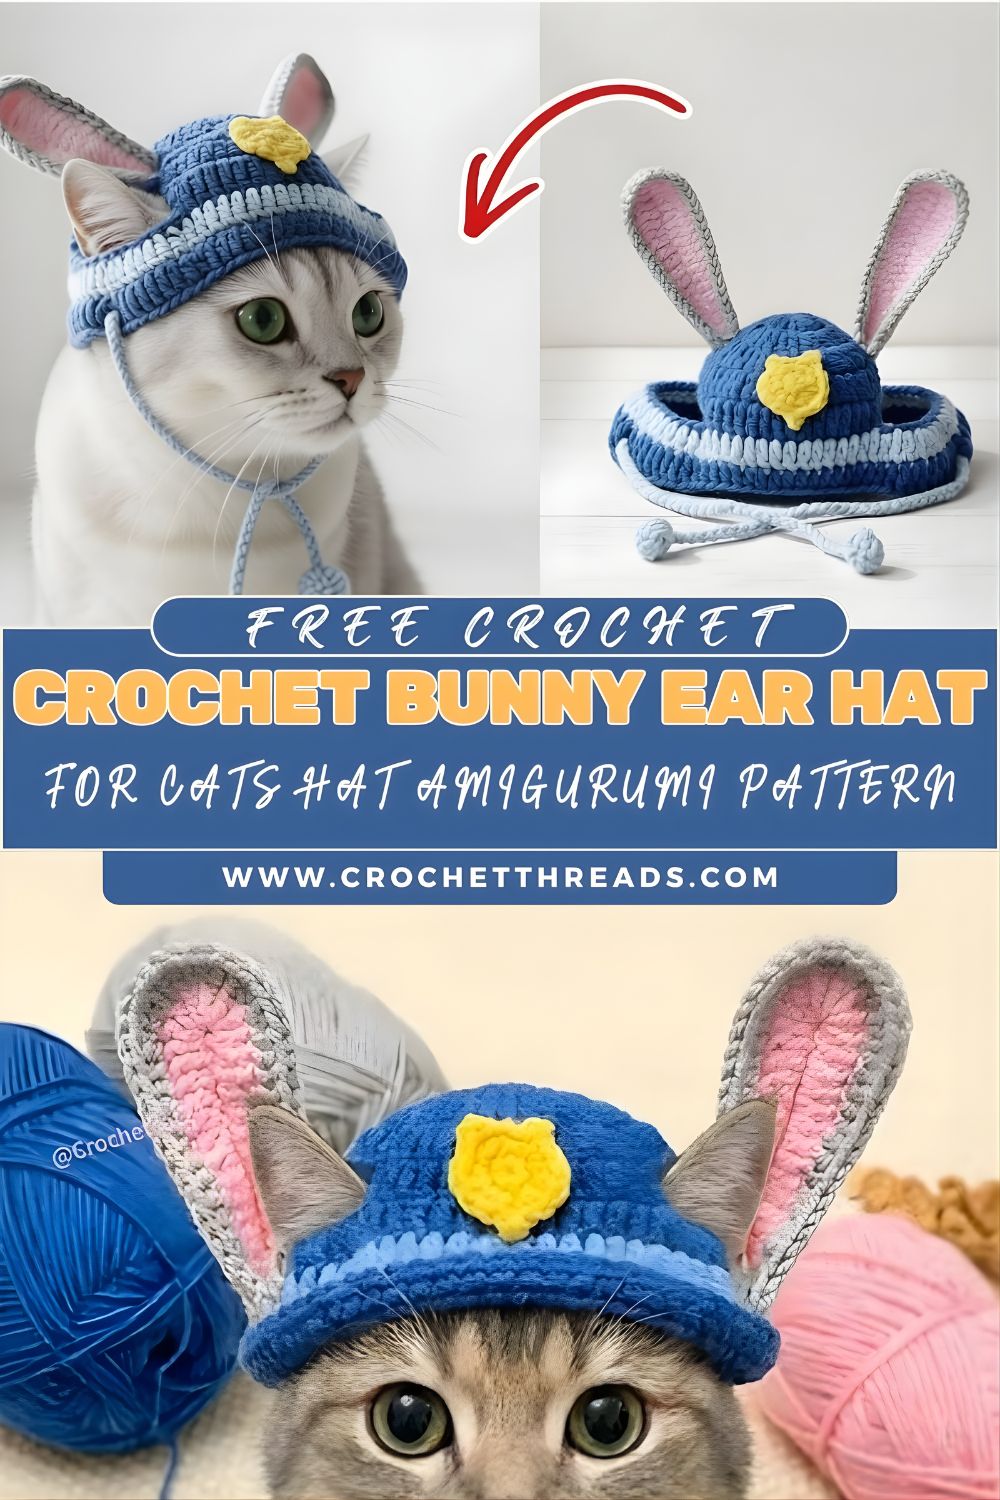
And right now, bunny ear cat hats are trending for a reason: the silhouette is adorable, the ears frame a cat’s face beautifully in photos, and the design is customizable (pastels, bolcolours, flowers, bows, patches, etc.). This version includes a snug round beanie base, two soft bunny-style ears, tie strings under the chin, and a decorative top detail, such as a flower or small patch, for extra charm.
Materials Needed
Choose cute materials and pet-friendly:
- Soft cotton or acrylic yarn (blue + white, like the tutorial look, or any colour)
Note: Choose smooth, non-scratchy yarn. - Crochet hook: 3–5 mm (match to your yarn label; use the smaller end for a snug beanie)
- Tapestry needle (for sewing ears and weaving ends)
- Stitch marker (or a scrap of yarn)
- Scissors
- Measuring tape
- Optional decorative yarn, felt patch, or buttons (only if securely stitched and pet-safe)
Basic Skills Required
You’ll use classic beginner stitches, plus a few shaping tricks:
- Chain stitch (ch): for starting and for tie straps
- Single crochet (sc): firm, tidy fabric for the hat base
- Half double crochet (hdc): adds softness and a little stretch (great for comfort)
- Increase (inc) and decrease (dec): shaping the crown and ear tips
- Working in rounds: building a circular beanie base
- Sewing pieces: attaching ears, decoration, and straps securely
Pet Safety & Comfort Tips (IMPORTANT SECTION)
A cat hat should be cu, te but comfort and safety always come first. Here are my non-negotiables as a pet accessory designer:
Use soft, non-irritating yarn
- Pick soft cotton or a smooth acrylic that won’t itch.
- Avoid scratchy wool, stiff metallic threads, or highly fuzzy novelty yarns that can shed.
Don’t crochet overly tight fabric
- Super-tight stitches can create a stiff hat that presses on the head.
- Aim for a fabric that’s smooth and flexible, with no hard ridges around the forehead or ears.
Ensure proper fit (snug, not squeezing)
- The hat should sit securely without leaving deep marks in fur or skin.
- If the hat shifts into the eyes, it’s either too big, too tall, or the straps are pulling incorrectly.
Never force a cat to wear it
- Some cats tolerate hats for a few minutes; others hate them immediately.
- Keep sessions short, supervise the entire time, and reward with treats.
Avoid small loose parts.
- If you add a flower centre, buttons, or a patch, stitch it down extremely securely.
- For maximum safety, use embroidered details instead of buttons.
Chin ties: safe, gentle, and supervised
- Chin ties should be lightweight and not tight.
- Always supervise—remove immediately if your cat paws at it or seems stressed.
General Construction Overview
Here’s how this bunny ear cat hat comes together:
- Measure your cat’s head (and estimate ear placement area).
- Crochet a round beanie base from the crown down:
- Start with a magic ring (or chain alternative)
- Increase to the correct diameter
- Then work in even rounds to build height
- Optionally add a simple edge round for a clean finish.
- Make two bunny ears separately:
- Shape with increases/decreases
- Add inner ear contrast if desired
- Add chin straps/ties (either crocheted separately and sewn on, or worked directly onto the hat).
- Attach a decorative top detail (e.g., a flower or patch).
- Final fit check: adjust strap length and ear placement.
Step-by-Step Hat Base Pattern
Sizing Notes (Read This First)
Cats vary widely in head size and tolerance, so use this as a flexible pattern:
How to measure:
- Measure around your cat’s head in front of the ears (like a headband line).
Typical range: 20–28 cm (8–11 in). - Measure from between the ears down toward the chin area (optional, helps with height).
Target hat circumference:
Aim for about 10–15% smaller than the head measurement for a gentle-stretch fit (especially if using cotton).
Example: 24 cm head → hat circumference about 21–22 cm.
Stitch Abbreviations
- ch = chain
- sc = single crochet
- hdc = half double crochet
- inc = increase (2 stitches in the same stitch)
- dec = decrease (use sc2tog or hdc2tog)
- sl st = slip stitch
Hat Base (worked in rounds)
You can work the base in hdc for softness. If you prefer a firmer, more structured beanie, use sc for the whole hat. Below is a soft, comfortable blend: hdc body with a neat sc edge.
Crown Start
Round 1: Magic ring, 8 hdc into ring. Pull tight. (8)
Alternative: ch 3, join with sl st to form a ring, work 8 hdc into the ring.
Round 2: inc in each stitch around. (16)
Round 3: (hdc, inc) repeat around. (24)
Round 4: (2 hdc, inc) repeat around. (32)
Round 5: (3 hdc, inc) repeat around. (40)
At this point, you have a flat circle. The exact round where you stop increasing depends on your cat’s size and your yarn/hook.
Crown Diameter Check (Most Important Fit Test)
Lay the circle flat and measure across the centre.
- For many adult cats, the crown circle diameter is typically 6.5–8.5 cm (2.5–3.25 in).
- If your circle is smaller, work another increase round:
- Round 6: (4 hdc, inc) repeat (48)
Stop increasing when the circle is the right diameter for a beanie crown.
Build the Sides (Height)
Now crochet even rounds (no increases) to create the beanie “walls.”
Next Rounds: hdc in each stitch around for 3–6 rounds, depending on desired height.
Try the hat on (gently) or hold it against your cat’s head to ensure coverage.
Shape the Edge (optional but polished)
To reduce flare and keep it snug, add a round of sc:
Edge Round: sc in each stitch around, sl st to join (or keep continuous).
Fasten off, leaving a tail if you plan to sew straps onto the Edge.
Comfort tip: Avoid tight edging. If your edge round feels tight, switch to a larger hook for the last round.
Bunny Ear Pattern (IMPORTANT)
These bunny ears are designed to be soft, lightly structured, and easy to attach. Make two.
Outer Ear (make 2)
Work in rows for a flatter ear (classic bunny look). You’ll crochet an oval-ish ear shape using increases and decreases.
Row 1: ch 2, 6 sc in 2nd ch from hook (6)
Row 2: ch 1, turn, inc, sc 4, inc (8)
Row 3: ch 1, turn, inc, sc 6, inc (10)
Row 4: ch 1, turn, sc across (10)
Row 5: ch 1, turn, inc, sc 8, inc (12)
Rows 6–9: ch 1, turn, sc across (12) for 4 rows (still 12)
Now taper the top (rounded bunny tip):
Row 10: ch 1, turn, dec, sc 8, dec (10)
Row 11: ch 1, turn, dec, sc 6, dec (8)
Row 12: ch 1, turn, dec, sc 4, dec (6)
Row 13: ch 1, turn, sc across (6)
Fasten off, leaving a tail for sewing.
Inner Ear Contrast (optional but adorable)
Make a smaller inner ear in white (or pink):
Row 1: ch 2, 4 sc in 2nd ch (4)
Row 2: ch 1, turn, inc, sc 2, inc (6)
Row 3: ch 1, turn, sc across (6)
Row 4: ch 1, turn, inc, sc 4, inc (8)
Rows 5–7: ch 1, turn, sc across (8)
Row 8: ch 1, turn, dec, sc 4, dec (6)
Fasten off.
Assemble Each Ear (outerEarinner)
- Centre the Ear on the outer Ear.
- Sew around the inner Ear with small, neat stitches.
- To create that gentle bunny-ear curve, lightly pinch the ear base and stitch a few tacking stitches so the ear “cups” slightly instead of lying totally flat.
Ear Structure Options (choose based on your cat)
- Soft droop: leave ears flat and flexible (most comfortable, least intrusive).
- Slightly upright: tack a small fold at the base and sew firmly to the hat.
- More Earight: use hdc for the outer Ear and add a discreet slip-stitch border—but keep it soft, not stiff.
Chin Strap / Tie Pattern
Chin ties keep the hat from sliding backwards. For cats, I prefer soft ties (not elastic) and always supervised wear.
Simple Tie Straps (make 2)
Attach yarn at one side of the hat edge (near where the cheek would be):
- Join yarn with sl st.
- ch 35–45 (length depends on cat size and if you want a bow).
- Starting in the 2nd ch from hook, sl st back down the chain (or sc back for thicker ties).
- Fasten off and weave in.
Repeat on the opposite side.
Reinforcing the Ends
For durability and a neat finish:
- Tie a tiny knot at the strap end and weave it back in, or
- Add 2–3 sc into the last chain space to create a rounded end.
Adjustable Tie Idea (gentler)
Instead of a bow, you can:
- Make slightly longer ties and do a single loose knot under the chin.
- Or tie behind the head/neck area for cats that dislike under-chin pressure.
Safety reminder: ties should be snug enough to hold the hat, but never tight. You should be able to slide a finger underneath easily.
Take your time and pin pieces first.
- Place the hat on a table with the back seam area (if any) centred.
- Position ears symmetrically on top, slightly forward of centre, so they show in photos.
- For most cats, ears look best placed about 1–2 cm apart (depending on hat size).
- Use a tapestry needle and matching yarn.
- Sew the ear base to the hat using whip stitch or mattress stitch.
- Make multiple passes around the base—ears get tugged when cats shake their heads.
- Place decoration between or slightly in front of the ears (like the tutorial look).
- Sew with tight, small stitches.
- If using a button: stitch it down extremely firmly and consider skipping it entirely for cats who chew.
- If you crocheted the straps separately, sew them onto the hat’s “cheek” points.
- Try “he hat on briefly:
- The hat should sit above the eyes
- Straps should sit comfortably without pulling the hat down
Hold the hat up: do the ears sit evenly? If one ear earns, add a few extra anchor stitches at the base.
Design & Customisation Ideas
Make this bunny ear cat hat truly yours:
- Color variations: pastel blue + white, pink + cream, lavender + white, classic gray + white, or neutral oatmeal
- Add flowers, bows, or patches: crochet a small flower appliqué, embroider a carrot patch, or add a tiny heart
- Seasonal themes:
- Easter bunny: pastel colours, little flower, carrot patch
- Winter hat: add a soft ribbed band (front-post/back-post crochet) and a pom (embroidered pom is safest)
- Spring: floral accents and lighter cotton yarn
- Matching owner & pet sets: make a human ear-warmer headband with matching bunny ears for adorable photos
Tips for Beginners
- Measure carefully: head circumference is everything for comfort.
- Use a stitch marker — especially when working in rounds; it’s easy to lose track.
- Keep tension even: inconsistent tension creates wobble in the hat edge.
- Try a sample first: crochet the crown circle and test size before building height.
- Choose forgiving yarn: soft acrylic or cotton blends are easier than splitty cotton.
Common Mistakes to Avoid
- Hat too tight: causes stress and may slip into the eyes
Fix: use a larger hook, add one more increase round, or switch to hdc for more stretch. - Hat too loose: slides backwards, and ears flop oddly
Fix: reduce a round of increases or add a sc edge round to snEarit up. - Uneven ears: one ear is higher or more forward than the other
Fix: pin first, measure from the centre, and sew securely with multiple passes. - Weak stitching at the ear base: ears can detach or twist
Fix: Reinforce with extra stitches and weave ends well. - Uncomfortable materials: scratchy yarn or stiff edging
Fix: choose softer yarn and avoid tight slip-stitch edging around the face.
Uses of Crochet Cat Hat
This bunny ear hat isn’t a craft, it’s a story-maker:
- Photoshoots: Easter, birthdays, adoption anniversaries
- Social media content: reels, seasonal posts, pet influencer props
- Gifts: for cat parents, rescue volunteers, or pet lovers
- Pet fashion (short supervised wear): a cute accessory for special moments
- Handmade selling: small, fast projects that customers love (offer multiple sizes)
FAQ Section
1) Is it safe for cats?
It can be safe for short, supervised wear when made with soft yarn, a gentle fit, and securely attached details. Never leave a hat on an unsupervised cat.
2) What yarn is best?
Soft cotton or smooth acrylic is best. Avoid itchy wool and shedding novelty yarns. If your cat has sensitive skin, choose hypoallergenic acrylic or soft cotton.
3) Can beginners make it?
Yes. If you can crochet a chain, single crochet, half double crochet, and do simple increases, you can make this. The ears are just easy rows with shaping.
4) How do I resize the hat?
Resize by adjusting:
- Crown diameter (add or remove, increase rounds)
- Height (add or remove even rounds)
- Strap length (more chains for bigger cats or bows)
5) Can I sell finished hats?
In most cases, yes,s finished handmade items are fine to sell. If you’re online or at markets, use your own photos and writing, and don’t distribute someone else’s text as your own.
Conclusion
A crochet cat hat pattern should be as practical as it is adorable, and this bunny-ear hat for cats checks every box: a snug, comfy beanie base, soft, sculpted ears, secure chin ties, and a sweet decorative detail for picture-perfect charm. With beginner-friendly stitches and a focus on fit and safety, you’ll be able to make a stylish little hat your cat can tolerate for quick, supervised photo moments, and you’ll have a handmade accessory worth showing off.