Sparkling Crochet Globe Keychain Amigurumi Ball Pattern for Beginners
Handmade accessories bring instant joy, especially when they’re squishy and smiley. This Crochet Globe Keychain Amigurumi turns soft yarn into a pocket-sized planet you can take anywhere.
A cozy crochet globe keychain pattern like this works up fast and feels relaxing to stitch. Expect an amigurumi ball keychain shape, simple parts, and a friendly look, perfect as a beginner crochet keychain project and a cute globe crochet tutorial for everyday use.
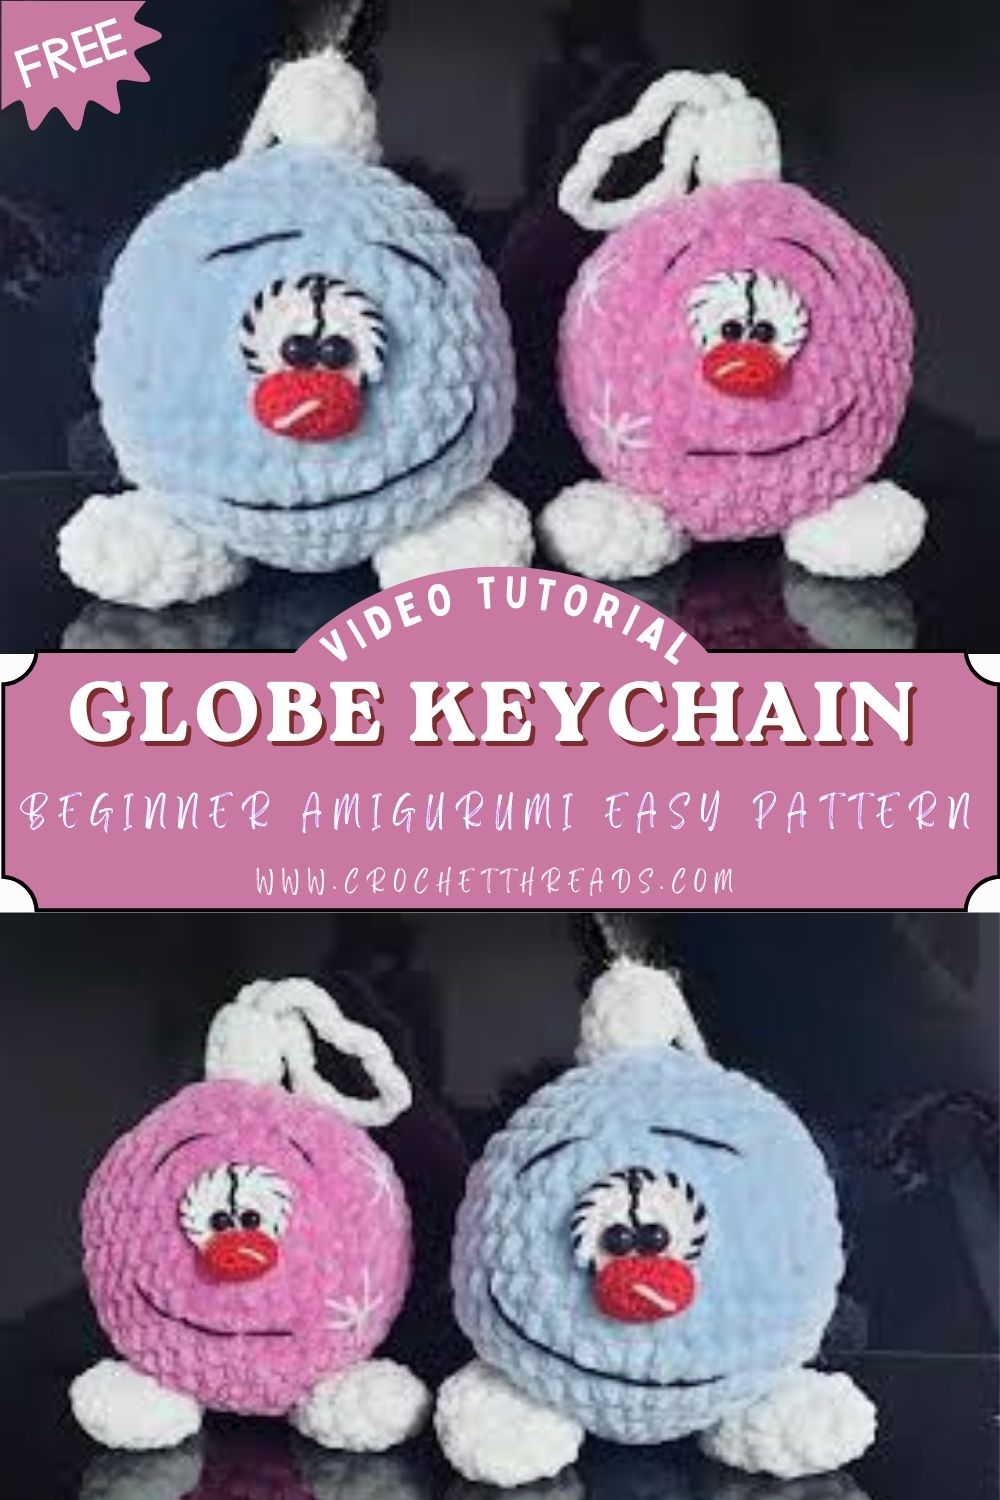
Globe- and planet-style amigurumi are satisfying because the shape is simple: a round ball that grows quickly and looks “right” even with basic stitches. Add a tiny face and little feet, and suddenly the project has personality. That’s the magic of a small amigurumi ball keychain; it’s cute without being complicated.
This design is also practical. Clip it to keys, a zipper pull, a backpack, or a pencil pouch. It makes a sweet handmade gift for classmates, travel lovers, teachers, or anyone who enjoys charming mini decor. The plush spherical body is beginner-friendly, the pieces are small, and the hanging loop keeps it useful for daily life.
Skill Level
Beginner / Easy
Materials Needed
- Plush/chenille yarn (bulky or super bulky) in globe colors
- Example: teal/blue-green for the main body (about 15–20 g, approx. 20–30 m)
- Optional accent: small scraps of light green (continents vibe)
- White yarn (smooth worsted or DK works well) for feet + hanging loop (about 3–5 g)
- Black yarn or embroidery floss for eyes and small lines (tiny amount)
- Red or pink yarn/felt for mouth or blush (optional)
- Crochet hook:
- For plush yarn: 4.5 mm–5.5 mm (choose a size that gives tight stitches)
- For worsted details (feet/loop): 3.0 mm–3.5 mm (optional, helps keep details neat)
- Stuffing: polyester fiberfill (a small handful)
- Yarn needle (blunt tip)
- Stitch marker (or a scrap of yarn)
- Scissors
- Keychain hardware: split ring or lobster clasp (20–25 mm ring is a nice size)
- Optional: fabric glue (for felt parts), safety eyes (not recommended for very small items used by kids)
Abbreviations
- MR = magic ring
- sc = single crochet
- inc = increase (2 sc in the same stitch)
- dec = decrease (single crochet 2 stitches together)
- sl st = slip stitch
- ch = chain
- rep = repeat
Time Planning at a Glance
- Body (globe ball): 20–30 minutes
- Facial details: 10–15 minutes
- Feet (2 small): 10–15 minutes
- Hanging loop: 5–10 minutes
- Assembly + finishing: 15–20 minutes
Total time: about 1–1.5 hours, depending on comfort level and yarn type
Step-by-Step Pattern Instructions
Size Notes
Using plush yarn and a 5 mm hook, the globe usually ends up around 5–6 cm (2–2.5 in) wide. Tension and yarn choice will change the final size, and that’s totally fine for a keychain.
Stitch Tip for Plush Yarn
Plush/chenille stitches can be harder to “see.” Count stitches each round, and use a marker at the first stitch of each round.
Body / Globe Base (Plush Ball)
Work in continuous rounds (no joining). Place a stitch marker in the first stitch of each round.
- R1: MR, 6 sc into the ring (6)
- R2: inc in each stitch around (12)
- R3: (sc, inc) rep around (18)
- R4: (2 sc, inc) rep around (24)
- R5: (3 sc, inc) rep around (30)
- R6: (4 sc, inc) rep around (36)
- R7–R10: sc around (36 each round)
- R11: (4 sc, dec) rep around (30)
- R12: (3 sc, dec) rep around (24)
Stuffing and Shaping
- Add stuffing now. Aim for firm but springy; the globe, the feel should be plush, not stretched. Shape it with your fingers into a smooth ball as you go.
- R13: (2 sc, dec) rep around (18)
- Add a little more stuffing if needed, especially around the sides.
- R14: (sc, dec) rep around (12)
- R15: dec around (6)
- Cut yarn, leaving a tail. Thread through a needle, weave through the last 6 stitches, pull tight to close. Hide the tail inside the globe.
Optional “continent” accents:
Add small stitched patches using light green yarn (simple surface embroidery blobs) or sew on tiny felt shapes. Keep it subtle so the face stays the focus.
Feet (Make 2, White Yarn)
These feet are simple little “tabs” that help the globe sit cutely, even though it’s a keychain.
- MR, 6 sc (6)
- R2: (sc, inc) rep around (9)
- R3: sc around (9)
- Sl st to the next stitch and fasten off, leaving a long tail for sewing.
Feel free to pinch each foot slightly into a flatter oval before sewing. This looks extra cute.
Hanging Loop (White Yarn)
Choose one of these beginner-friendly options.
Option A: Chain Loop (Quick and Simple)
- Make a slip knot, ch 18–25 (adjust for your preferred loop size).
- Sl st back into the first chain to form a ring.
- Fasten off, leaving a long tail for sewing.
Option B: Sturdy Strap Loop (More Durable)
- Ch 10–12.
- Starting in the second chain from the hook: sc across.
- Ch 1, turn, sc across again (makes a thicker strap).
- Fasten off with a long tail.
Face Details (Cute and Beginner-Friendly)
A simple expression looks best on a tiny keychain. Embroidery is beginner-friendly and more secure than glued pieces.
Eye Placement Guide
- Find the “front” of your globe.
- Place eyes between R7 and R9 (around the middle of the ball).
- Leave about 5–7 stitches between the eyes, depending on size.
- Eyes: Using black yarn/floss, embroider two small vertical stitches or tiny circles. (Vertical stitches are easiest and look sweet on plush yarn.)
- Mouth (optional): With red or pink yarn, stitch a small smile centered below the eyes (about 1–2 rounds lower).
- Cheeks (optional): Add tiny blush dots with pink yarn, or use a small bit of pink felt secured with a few stitches (glue alone can loosen on keychains).
Assembly (Placement That Looks Balanced)
- Feet position: Turn the globe so the face is centered. On the bottom, place the two feet slightly forward (so it looks like the globe is “standing”).
- Loop position: The loop sits at the top center, directly above the face.
Assembly Instructions
- Sew feet on firmly: Use the long tails. Stitch through the foot and into the globe several times, catching multiple stitches on the globe each pass. Tie a small knot inside the body if possible, then hide the yarn end.
- Attach the hanging loop securely: Don’t just sew it at one point. Stitch the loop base down across 2–4 stitches on the top of the globe, going back and forth to create a reinforced anchor.
- Add keychain hardware: Slip the ring/clasp through the loop. If the loop is yarn-only, make it snug so it won’t stretch out quickly.
Beginner Tips for a Neat, Round Globe
- Keep stitches tight: Plush yarn can look gappy if tension is loose. A slightly smaller hook helps.
- Count every round: The ball shape depends on correct stitch counts.
- Stuff slowly: Add small tufts and spread them around. This avoids lumps.
- Firm stuffing sweet spot: Full enough to hold a sphere, soft enough to squish. Over-firm stuffing can stretch stitches.
- Center the face: Fold the globe gently in half to find the midline, then place the eyes evenly on both sides.
- Reinforce the loop: Keychains get tugged. Extra stitches at the base of the loop make a big difference.
Common Mistakes to Avoid
- Overstuffing: Can create a bumpy shape and show gaps between stitches.
- Skipping stitch counts: One missed increase can make the globe look uneven.
- Feet too far apart: The bottom looks awkward if they’re placed on the sides. Keep them closer to the front.
- Off-center face: Embroider lightly at first; adjust before tightening stitches.
- Weak loop attachment: A single knot isn’t enough; use multiple passes of sewing.
Simple Customization Ideas
- Pastel planet theme: Lavender, mint, and baby pink for a dreamy look.
- Different expressions: Sleepy eyes, a tiny “o” mouth, or a big smile.
- Loop styles: Replace the yarn loop with a short ribbon of fabric or a sturdy cord.
- Mini blush cheeks: Two small pink stitches add instant charm.
- Bag charm upgrade: Make the loop slightly longer and use a lobster clasp for easy clipping.
Finishing Touches for ( Crochet Globe Keychain Amigurumi)
- Shape it gently: Roll the globe lightly between your palms to smooth out lumps and keep it nicely round.
- Check stuffing balance: Press around the sides and bottom; add or remove a tiny bit of stuffing if one area feels flat or too firm.
- Neaten the surface: For plush yarn, fluff the fibers with your fingers so the stitches look soft and even.
- Hide yarn ends securely: Weave each tail through several stitches inside the globe, then trim close so nothing pops out later.
- Reinforce stress points: Add a few extra stitches where the loop and feet are attached (keychains get tugged a lot).
- Test durability: Gently pull on the loop and wiggle the feet to ensure everything feels secure.
- Final face check: Make sure the eyes and mouth are centered; adjust the embroidery slightly before fully tightening or knotting off.
- Polish for gifting: Trim any fuzzy bits, wipe off lint, and clip it to the keyring/clasp so it’s ready to gift or use right away.
Conclusion
A tiny globe with a sweet face feels like a little dose of happiness on a keyring, and this Crochet Globe Keychain Amigurumi is a friendly project for beginners who want something quick and adorable. Stitch one in your favorite colors, add a cheerful expression, and enjoy carrying a handmade mini planet wherever the day goes.