Peaceful Crochet Demogorgon Monster Plush Amigurumi Stranger Things Pattern
Spooky-cute crochet is always a crowd-pleaser, and this Crochet Demogorgon Monster Amigurumi is a perfect example. It is soft and small like a classic plush, but it still captures that eerie fantasy-creature vibe.
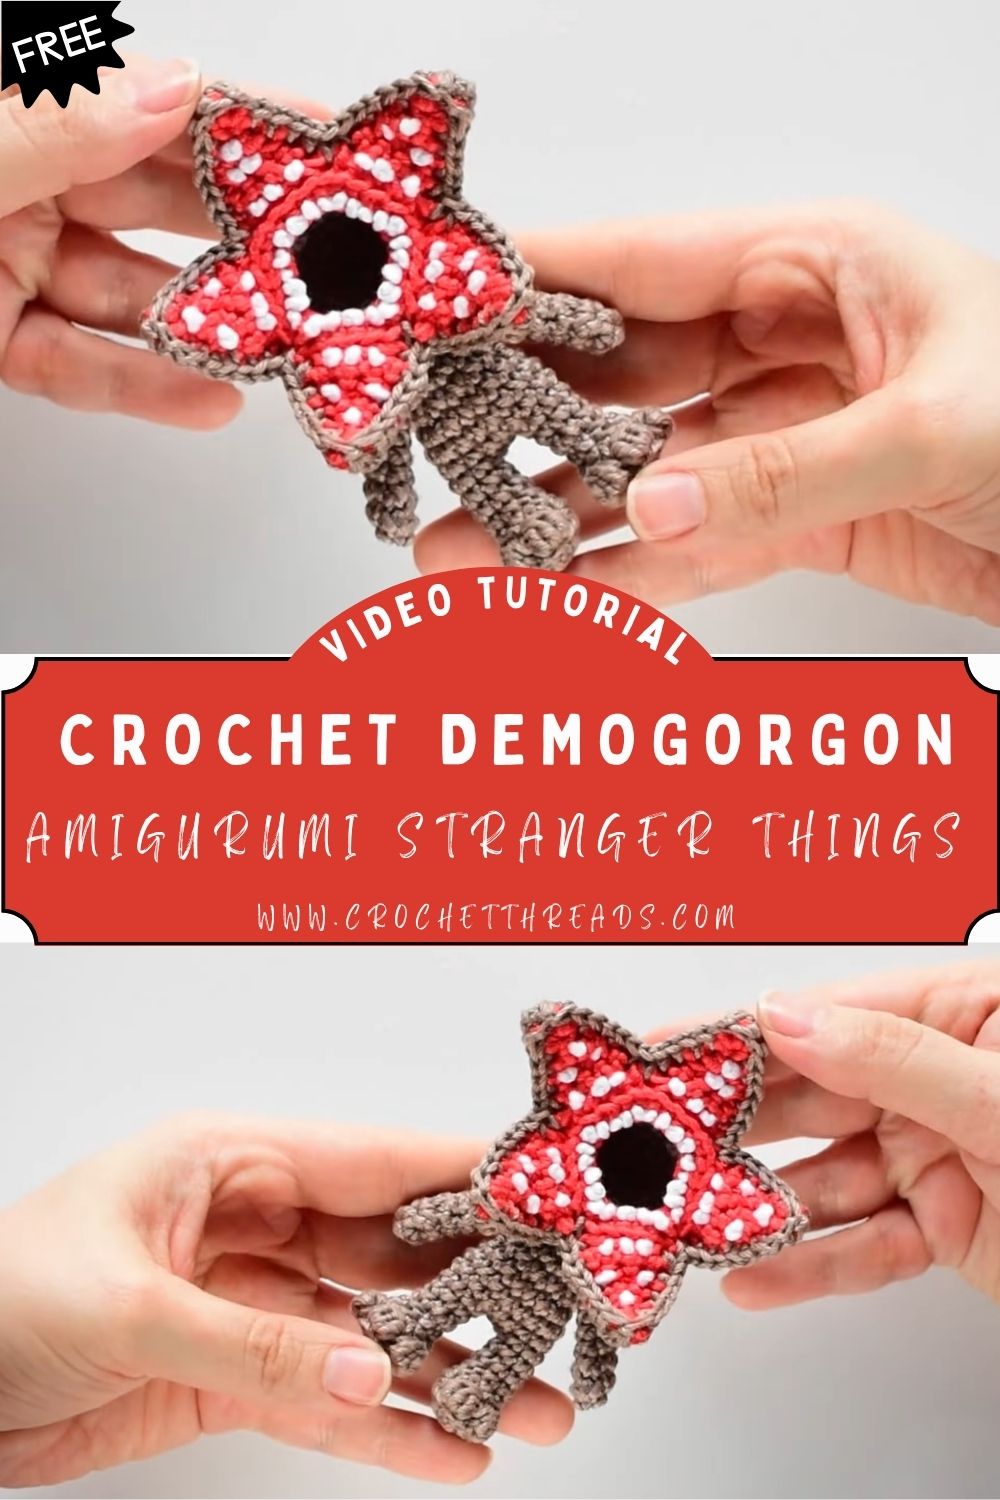
Because the body is slim and the head is oversized, the finished piece looks like a collectible. The signature feature is the flower-shaped open mouth with red inner petals, white texture lines, and a dark center that adds depth.
Why I Love This Mini Crochet Cactus
This mini cactus is a small decorative amigurumi made from a few simple crocheted pieces stitched together to create that classic “cactus cluster” look. Mine turns out palm-sized (around 8 cm tall depending on yarn and hook), and it’s sturdy enough to sit on a desk or shelf like a tiny potted plant. It’s basically the cutest no-maintenance greenery you can crochet.
Who This Project Is Perfect For
This project is wonderful for beginners because it uses easy stitches and repeatable rounds, plus it’s small enough to finish in an evening. If you love cozy home touches, it also works as charming DIY crochet décor, especially when popped into a little pot. And if you’re a gift maker, a handmade crochet cactus is the kind of present that feels thoughtful without being complicated. Overall, it’s a satisfying little amigurumi plant that comes together fast and looks adorable right away.
Materials Needed
- Cotton yarn (or smooth DK cotton blend)
- Gray or brown (main body and outer head): 40 g
- Red (inner mouth petals): 12 g
- White (textured petal lines): 4 g
- Black (dark center and small accents): 6 g
- Crochet hook: 2.5 mm to 3.5 mm
- Fiberfill stuffing: 30 g
- Tapestry needle: 1
- Stitch markers: 2
- Scissors: 1 pair
- Optional: embroidery thread for extra definition: 2 g
Skill Level
Beginner to intermediate. The limbs and torso are mostly simple tubes, allowing beginners to make quick progress. The head and petal mouth require more patience because symmetry and sewing affect the final look.
Time Planning at a Glance
- Body (torso + legs): 1 hour 20 minutes
- Arms (2): 35 minutes
- Head base (outer head shell): 50 minutes
- Petal mouth + white texture details: 1 hour 10 minutes
- Mouth center (dark opening): 20 minutes
- Assembly (sewing + balancing stuffing): 50 minutes
- Total time: about 5 hours 5 minutes
Sizing Tips
- Thicker yarn makes a larger plush, while thinner yarn makes a mini version.
- A smaller hook creates tighter fabric and helps the head hold its shape.
- Firm, even tension is especially important for the petal mouth so it does not droop.
Instructions
a. Body (Slim Base Structure)
Making time: about 1 hour 20 minutes
Work in continuous rounds, marking your first stitch each round.
Legs (make 2)
- Start with a magic ring and crochet a small, rounded foot.
- Build a narrow leg tube by working even rounds with minimal increases.
- Add light stuffing only to the foot and lower leg, keeping the upper leg soft.
Join the legs and create the torso
4. Crochet the second leg, then join the legs with a short chain or direct join.
- Continue around both legs to form the hips and then the torso.
- Shape the body with very small increases as needed, keeping it slim and humanoid.
- Stuff gradually and press the torso into a neat shape with your fingers.
Neck opening
8. Decrease slightly at the top to form the neck.
- Fasten off with a long tail for attaching the head.
b. Arms (Long and Slim)
Making time: about 35 minutes
These long limbs help match the “cute but creepy” silhouette.
- Make a small hand start, then crochet a thin arm tube upward.
- Keep stuffing lightly so the arms stay narrow and easy to sew.
- Leave a long yarn tail and fasten off for assembly later.
c. Head Base (Outer Shell)
Making time: about 50 minutes
The head is oversized and rounded, acting as the foundation for the flower-mouth.
- Crochet a flat circle with even increases until it is wide enough for a large head.
- Work several rounds, even to turn the circle into a dome.
- Stuff firmly, but do not overfill because the mouth structure needs space.
- Leave the bottom open for stitching onto the body.
d. Petal Mouth Structure (Red + White Details)
Making time: about 1 hour 10 minutes
This is the most detailed section, but it is repetitive in a good way.
Plan the petal count.
- Choose 5 petals for a bold look or 6 petals for extra symmetry.
- Decide petal length so the red shows around the black center.
Crochet and shape the petals (red)
3. Crochet each petal as a curved leaf shape, widening toward the middle.
- Taper with decreases at the tip so every petal ends cleanly.
Add textured lines (white)
5. Use surface stitching or simple embroidery-style stitches to add white ribbing lines.
- Curve each petal slightly with your fingers so it looks like an open mouth.
Arrange the petals
7. Lay petals in a circle, then pin them temporarily to check spacing and balance.
e. Mouth Center Detail (Dark Opening)
Making time: about 20 minutes
The dark center creates a sense of depth.
- Crochet or cut a small black circle or oval (the crocheted one looks cleanest).
- Stitch it deep in the center where petals meet.
- Tighten stitches around the opening so the petals angle inward slightly.
f. Assembly of Head and Body
Making time: about 50 minutes
Attach the mouthpieces to the head
- Sew petals onto the head base, checking symmetry after each attachment.
- Secure the black center piece last so it sits perfectly in the middle.
Attach the head to the body
3. Place the head on the neck and check the posture before sewing.
- Stitch around firmly, then do a second pass if the head feels heavy.
Attach arms
5. Pin arms at equal height, then sew securely along the shoulder seam.
- Add a little extra stuffing into the neck area if the head wobbles.
Assembly Instructions (Quick Checklist)
- Align legs so the plush can sit without twisting.
- Attach arms evenly, slightly below the head.
- Reinforce the head seam because the mouth structure adds weight.
- Balance stuffing: head firm, body medium-firm, limbs lightly stuffed.
Basic Tips for Beginners
- Use a smaller hook if you see gaps between stitches.
- Count stitch totals often, especially around increases and decreases.
- Stuff with small pieces and shape slowly for smooth results.
- Pin petals before sewing to keep the mouth symmetrical.
- Weave ends in as you go, so finishing feels easy.
Common Mistakes to Avoid
- Loose stitching in the head or petals can cause stuffing to shrink and the mouth to collapse.
- Uneven petal size makes the flower mouth look lopsided.
- Weak sewing at the neck causes a floppy head.
- Overstuffing behind the petals can push them outward awkwardly.
Variations to Personalize
- Try charcoal, moss green, or dusty purple for the main body.
- Make a mini keychain version with thinner yarn and a smaller hook.
- Add glow-in-the-dark thread to the petal edges or mouth lines.
- Use lightly textured yarn for a more rustic “monster skin” effect.
Finishing Tips
- Weave tails through the inside and trim after hiding them well.
- Shape petals carefully so the mouth stays open and balanced.
- Reinforce any seam that will be handled often, especially the head join.
Tutor Suggestions for Beginners
- Follow the reference video slowly for visual help with petal placement only.
- Pause often and compare your shape before moving forward.
- Practice a single petal on scrap yarn if the mouth design feels new.
Conclusion
This Crochet Demogorgon Monster Amigurumi combines an easy slim body with a dramatic flower-mouth head, giving you a plush that is both eerie and adorable. Take your time on the petals, sew carefully, and you will end up with a one-of-a-kind handmade monster.