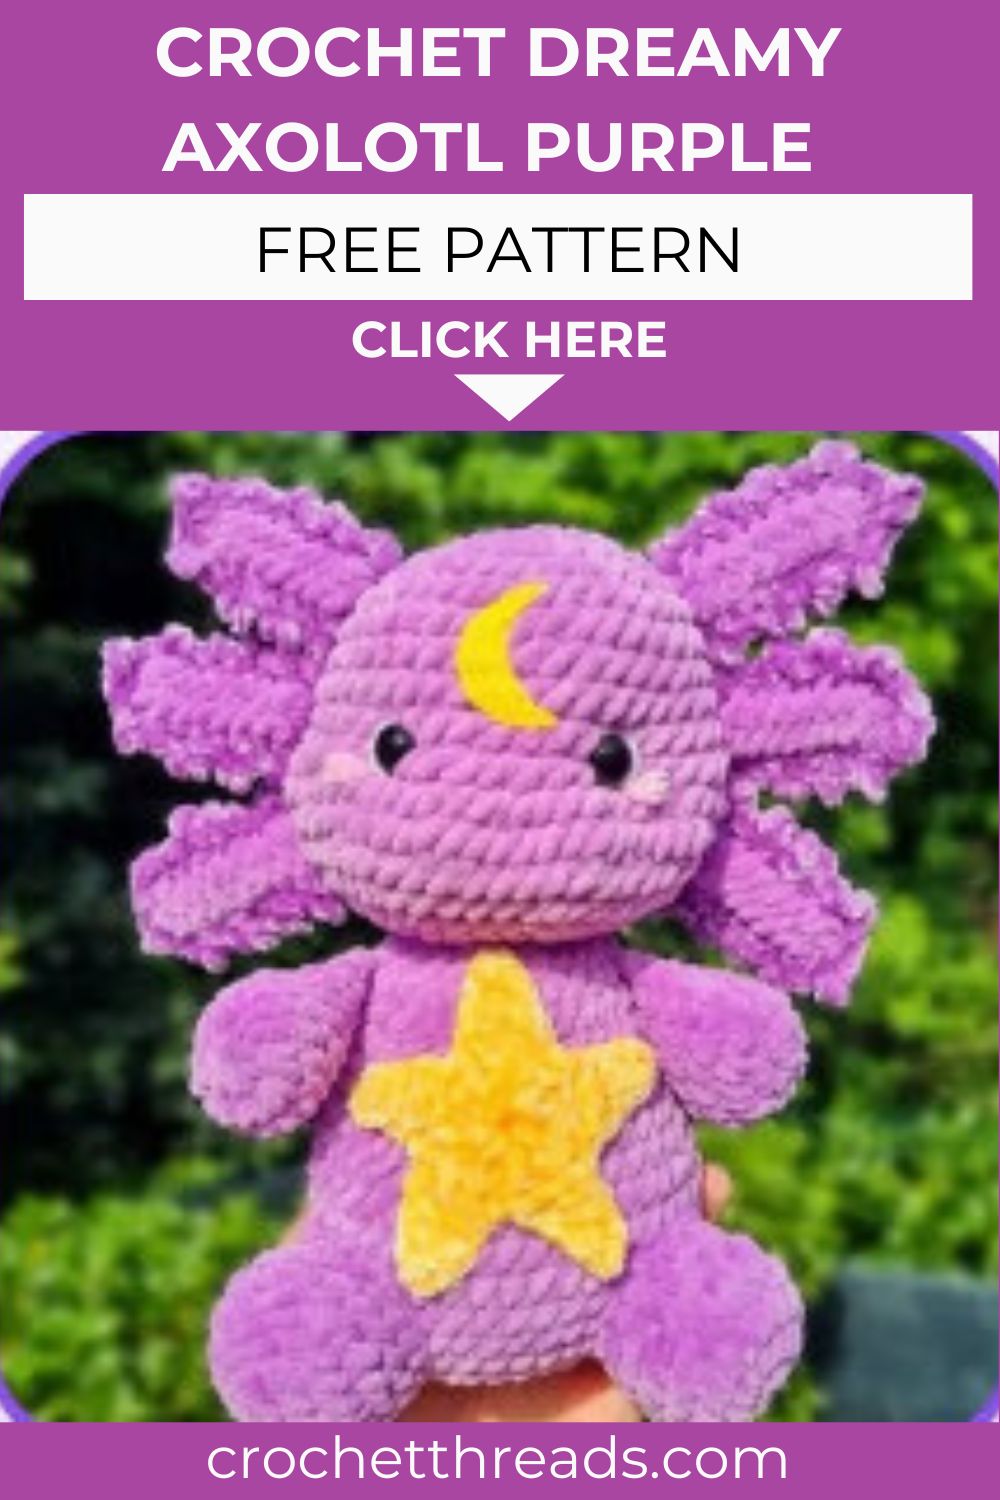
Tender Crochet Dreamy Axolotl Purple Amigurumi Pattern Toy
Not all amigurumi make you say aww out loud. This one does. A soft Crochet Dreamy Axolotl purple with a starry belly and the sleepiest little face you can stitch. It is squishy, soft, calming, and clearly made for endless little cuddles.
Crochet Dreamy Axolotl is having a real moment, and this purple one leans into the soft, sleepy side of the trend. A glowing star and a little moon rest on its belly like a tiny night sky. The chenille body feels like a cloud in your hands, while the velvet adds gentle shine. It works up in calm, cozy pieces, so the making feels as soothing as the result. Best of all, it suits dreamers of every age.

What to Expect From This Pattern
Before you cast on, here is the shape of the whole make. It comes in pieces, then joins at the end.
- You crochet the head and body separately, both in continuous rounds.
- Two arms, two feet, a plump tail, and six little fins round out the build.
- The fins are worked in pairs, then crocheted together for a soft frilly edge.
- A crochet or felt star and moon sit on the belly as the dreamy focal point.
- Safety eyes plus a touch of yarn sculpting give that gentle, sleepy face.
What You Will Need
Gather these before you settle in. Most are amigurumi staples, with a few soft extras.
Materials
- 5 mm crochet hook
- Purple chenille, size 4 medium
- Purple velvet, size 3 light
- Yellow velvet or yellow felt for the star
- Yellow felt for the moon
- Pink chenille or velvet for the cheeks
- White acrylic or cotton for the details
- Safety eyes, 14 mm
- Stuffing
- Hot or super glue, or yarn and a needle for the felt
- Scissors, stitch markers, and a tapestry needle
Abbreviations
- R: round
- Mr.: Magic ring
- ch: chain
- sc: single crochet
- hdc: half double crochet
- dc: double crochet
- trc: treble crochet
- sl st: slip stitch
- inc: increase
- dec: decrease
- FO: fasten off
How to Crochet the Dreamy Axolotl
If this design belongs to another maker, please add their credit and link before you post it.
Head (purple chenille)
- R1: 8 sc in mr (8)
- R2: 8 in (16)
- R3: (sc, inc) x8 (24)
- R4: (3 sc, inc) x6 (30)
- R5: (4 sc, inc) x6 (36)
- R6: (1 sc, inc, 4 sc) x6 (42)
- R7 to R10: 42 sc, for 4 rounds
- R11: 10 sc, inc, 3 hdc in same st, 18 sc, 3 hdc in same st, 1 inc, 10 sc (48)
- R12: 19 sc, (inc, sc) x2, 2 inc, (sc, inc) x2, 19 sc (54)
- R13: 6 sc, dec, (11 sc, dec) x3, 7 sc (50)
- R14: 3 sc, dec, (4 sc, dec) x7, 3 sc (42)
- R15: (5 sc, dec) x6 (36)
- R16: (4 sc, dec) x6 (30)
- R17: (3 sc, dec) x6 (24)
- R18: (2 sc, dec) x6 (18)
Cut the yarn. Set the safety eyes between R10 and R11, about 6 st apart. Then add the stuffing.
Body (purple chenille)
- R1: 8 sc in mr (8)
- R2: 8 iin(16)
- R3: (1 sc, inc) x8 (24)
- R4: (3 sc, inc) x6 (30)
- R5: (4 sc, inc) x6 (36)
- R6: (5 sc, inc) x6 (42)
- R7: 3 sc, inc, (6 sc, inc) x5, 3 sc (48)
- R8 to R12: 48 sc, for 5 rounds
- R13: 12 sc, (4 sc, dec) x4, 12 sc (44)
- R14: 44 sc
- R15: (9 sc, dec) x4 (40)
- R16: 40 sc
- R17: (8 sc, dec) x4 (36)
- R18: (7 sc, dec) x4 (32)
- R19: (14 sc, dec) x2 (30)
- R20: (3 sc, dec) x6 (24)
- R21: (2 sc, dec) x6 (18)
Cut the yarn and leave a long tail for sewing. Add the stuffing.
Arms (make 2, purple chenille)
- R1: 8 sc in mr (8)
- R2: 8 inin16)
- R3 to R7: 16 sc, for 5 rounds
- Add a little stuffing, not too much.
- R8: fold flat, then 8 sc across. Cut and leave a long tail.
Feet (make 2, purple chenille)
- R1: 8 sc in mr (8)
- R2: 8 incin6)
- R3: (sc, inc) x8 (24)
- R4: 24 sc
- R5: (2 sc, dec) x6 (18)
- R6 to R7: 18 sc, for 2 rounds
- Cut, leave a long tail, and add stuffing.
Tail (purple chenille)
- R1: 7 sc in mr (7)
- R2 to R3: 7 sc, for 2 rounds
- R4: (sc, inc) x3, sc (10)
- R5: 10 sc
- R6: (inc, 4 sc) x2 (12)
- R7: 12 sc
- R8: (2 sc, inc) x4 (16)
- R9: 16 sc
- R10: (3 sc, inc) x4 (20)
- R11: 20 sc
- R12: (4 sc, inc) x4 (24)
- R13: 24 sc
- Cut, leave a long tail, and add stuffing.
Fins (make 6, joined in pairs)
- R1: with purple chenille, slip knot and ch 9. Work around the chain: 7 sc from the 2nd ch from the hook, 3 sc in the same st, 6 sc, 2 sc in the same st (18). Ch 1, cut, and make a second one.
- Hold the two pieces wrong sides together. Insert the hook in the 1st sc of one and the 8th sc of the other.
- R2: with purple velvet, join both pieces: sc, (ch 2, sl st from the 2nd ch from the hook, 2 sc) x4, ch 2, sl st from the 2nd ch from the hook, sc in the same st, sc in the next st, (ch 2, sl st from the 2nd ch from the hook, 2 sc) x4. Cut and leave a long tail.
Star and Moon
- Felt works for both, or crochet the star below.
- Star R1: in a mr, ch 3 and 14 dc, sl st.
- Star R2: (ch 6, from the 3rd ch from the hook make sc, hdc, dc, trc, sl st in the 3rd st) x5.
- Cut, leave a tail, and sew it to the belly center.
- Tip: if your yarn matches the body thickness, start R2 with 5 ch, then sc, hdc, dc, sl st.
Sewing and Details
- Sew the head to the body.
- Sew the fins down the center: first at R5 to R7, second at R9 to R11, third at R13 to R15.
- Sew the feet at R6 to R10, 6 st apart.
- Sew the arms tilted slightly forward, at R14 to R19.
- Sew the tail at R6 to R11.
- Tail fin: in the center of R19 make 2 sc, 4 hdc, 4 dc, then move to the tail for 7 trc, 3 dc, hdc, 2 sc, 2 sc, sl st, and FO.
- Add pink cheeks, then sculpt the eyes with white yarn until the sleepy look appears.
Stitches and Techniques to Know
A few moves here go beyond plain rounds. Here is what to keep in mind.
- Magic ring: pull it snug, since a loose start shows later.
- Increases and decreases: these shape the round head and the tapered tail.
- Treble crochet: the tall stitch that gives the fins their soft frill.
- Joining pieces: the fins crochet together for a clean, doubled edge.
- Yarn sculpting: tightening the eyes adds that gentle, dreamy expression.
Ways to Make It Your Own
This axolotl loves a personal spin. Small changes shift the whole mood.
- Try pink, mint, or pale blue instead of purple for a new feel.
- Swap the star for a tiny heart, cloud, or crescent moon.
- Use felt shapes if you want a quicker, neater belly design.
- Add freckles or a soft blush with embroidery thread.
- Stitch a little sleep mask for an extra dreamy version.
Skill Level
This Crochet Dreamy Axolotl pattern suits confident beginners and intermediate crocheters. You will shape several pieces and assemble them. The fins and sculpted eyes need patience, yet nothing here feels truly hard.
Slip Ups to Watch For
Most hiccups come from a few small spots. Keep this list close while you work.
- Stuffing the body too firmly, which flattens that soft cuddly shape.
- Setting the eyes too far apart, which loses the sweet face.
- Skipping stitch markers, so the round counts quietly drift off.
- Pulling the velvet too tight, which strains the delicate strands.
- Sewing the tail crooked, which throws off the whole pose.
Finishing Touches
The last steps are where this axolotl softens into life. Take your time with them.
- Weave in every tail before you close each piece up.
- Shape the head gently with your hands for a round, plump look.
- Sculpt the eyes slowly, checking the face from a short distance.
- Press the star flat before sewing so it lies neatly on the belly.
- Fluff the fins with your fingers for that floaty, watery effect.
Lovely Ways to Gift It
Ngl, this one is hard to give away once it is done. Still, it makes a heartfelt present.
- Pop it on a nightstand as a soft sleepy companion.
- Pair it with a storybook for a cozy bedtime bundle.
- Give it to an axolotl fan who collects cute plushies.
- Add it to a new baby basket in calming pastel tones.
- Set it on a desk as a quiet, dreamy little friend.
Wrapping Up
So there it is, your own Crochet Dreamy Axolotl star and all. It takes a few pieces and a bit of patience, but the soft result is worth it. The sleepy face and starry belly give it real heart. Keep it close or pass it on, and it will spread a little calm. Above all, enjoy the slow, cozy rhythm of making it.