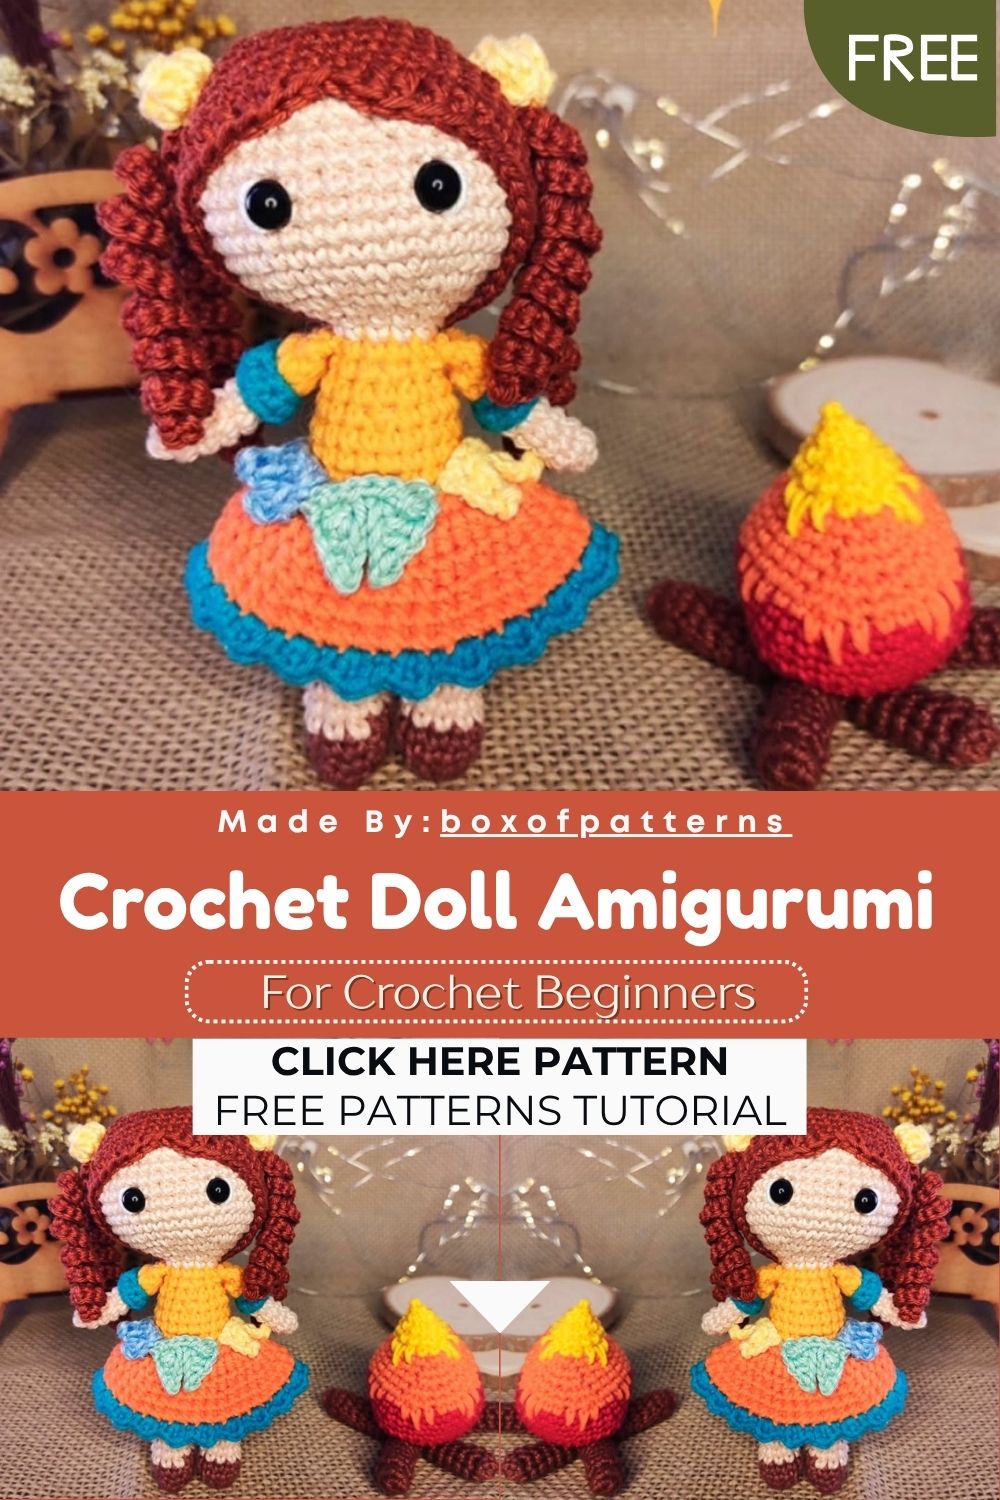
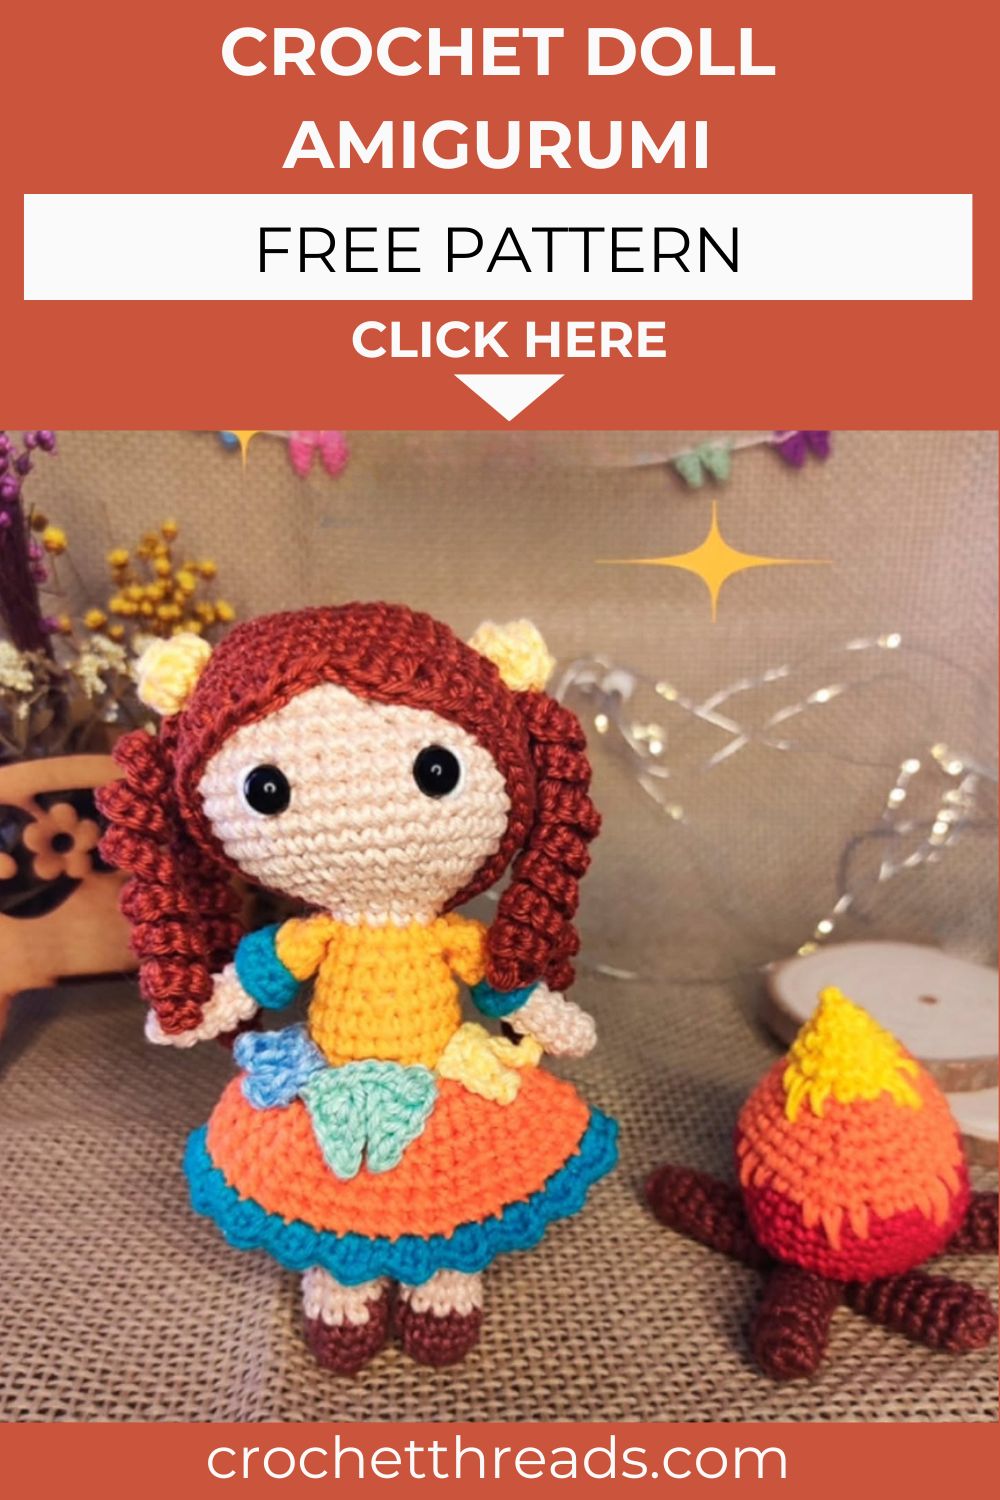
Free Crochet Doll Amigurumi Pattern – Cute Girl with Curly Hair Plushie
A charming little girl doll comes to life with curly auburn pigtails, a bright handmade dress, and a face full of personality. The free crochet pattern walks you through every stitch, so even beginners can create their own keepsake plushie with ease.
Some amigurumi patterns are straightforward and satisfying. Others are layered, detailed, and genuinely exciting to work through from start to finish. This crochet girl doll falls firmly into the second category. She has brown shoes, skin-toned legs, a bright yellow and orange dress with a flared skirt, a structured orange top with blue sleeve accents, skin-toned arms, curly brown pigtails, and tiny crocheted bunting flags sewn right onto her skirt. Furthermore, the body and head are worked as one continuous piece from the legs upward, which keeps the construction clean and eliminates complicated joining. In addition, the skirt is worked directly into a back loop only row built into the body, creating a naturally flared silhouette without any separate skirt construction. The curly hair pieces are worked as simple chain-and-increase spirals that coil beautifully when finished. Whether you make this doll as a festival keepsake, a personalized gift, or simply because she is impossible to resist, every detail of this pattern produces a finished result that is genuinely full of life and personality.
Skill Level
Intermediate. Single crochet in continuous rounds forms the main body. Additionally, back loop only skirt construction, color changes, and curly hair technique introduce satisfying new skills at a comfortable and enjoyable pace.
Materials You Will Need
Yarn — Circulo Amigurumi yarn recommended:
- Brown (color 7567) for the shoes
- Skin tone (color 7563) for the legs, arms, and head
- Light yellow (color 1317) for the underpants detail
- Yellow (color 4146) for the dress bodice
- Orange (color 4448) for the skirt
- Blue (color 2194) for the sleeve accents and skirt border
- Brown (color 7220) for the hair base
- Colors 5743, 1112, and 2137 for the bunting flags
Other Supplies:
- Crochet hook — 2.5mm for body and hair, 2.0mm for flags
- Tapestry needle
- Safety eyes — size 8mm
- Silicone fiber stuffing
- Fabric glue
- Stitch marker
- Pins
Abbreviations
- PB — Single Crochet
- PBX — Slip Stitch
- AUM — Increase (2 sc in same stitch)
- DIM — Decrease (invisible)
- MPA — Half Double Crochet
- PA — Double Crochet
Important: Read the entire pattern before beginning. Each section builds directly on the previous one.
Pattern: Legs, Body, and Head
Shoes and Legs Make 2
R1: Using brown yarn, make a magic ring with 5 sc (5). R2: 5 inc (10). R3–4: 10 sc (10)
R5: Switch to skin tone yarn. Work 10 sc in back loops only (BLO) (10)
R6–11: 10 sc for 6 rounds (10)
R12: Switch to light yellow yarn. Work 10 sc (10)
Fasten off the first leg with a slip stitch and cut yarn. Make the second leg in the same way, but do not fasten off.
Chain 2 to join the legs. Stuff both legs before continuing.
Joining the Legs and Starting the Body
R13: Join second leg to first with 1 sc, work 9 sc around first leg, 2 sc across the chain, 10 sc around second leg, 2 sc back across the chain (24)
R14–16: 24 sc for 3 rounds (24)
Dress Bodice Upper Section
R17: Switch to yellow yarn. Work 4 sc, 1 dim, 10 sc, 1 dim, 4 sc (22)
R18: 22 sc (22)
R19: 22 sc in back loops only this row will be used for the skirt later (22)
R20: 3 sc, 1 dim, 9 sc, 1 dim, 6 sc (20)
R21: 20 sc (20)
Begin stuffing at this point.
R22: (3 sc, 1 dim) x4 (16)
R23: 16 sc (16)
R24: (2 sc, 1 dim) x4 (12)
R25: 12 sc (12)
Neck
R26: Switch to skin tone yarn. Work 12 sc (12)
R27: Work 12 sc in back loops only, then 12 sc in front loops only in the same round (this firms the neck and keeps it upright). For extra firmness, apply a small amount of hot glue inside the neck after completing this round.
Head
R28: (1 sc, 1 inc) x6 (18)
R29: (2 sc, 1 inc) x6 (24)
R30: (3 sc, 1 inc) x6 (30)
R31: (4 sc, 1 inc) x6 (36)
R32: (5 sc, 1 inc) x6 (42)
R33–39: 42 sc for 7 rounds (42)
R40: (5 sc, 1 dim) x6 (36)
Place safety eyes between R36 and R37.
R41: (4 sc, 1 dim) x6 (30)
R42: (3 sc, 1 dim) x6 (24)
R43: (2 sc, 1 dim) x6 (18)
Finish stuffing the head firmly.
R44: (1 sc, 1 dim) x6 (12)
R44: (1 sc, 1 dim) x6 (12)
R45: 6 dim (6)
Close with an inverted magic ring and hide the tail securely.
Pattern: Arms Make 2
Using yellow yarn
R1: Magic ring with 6 sc (6)
R2–6: 6 sc for 5 rounds (6)
Switch to skin tone yarn.
R7: Work 6 sc in back loops only (6)
R8: 6 inches (12)
R9: (1 sc, 1 dim) x4 (8)
Fold in half and close with 3 sc through both layers. Fasten off and leave a long tail for sewing.
Before sewing onto the body sides, use blue yarn to work 6 sc into the front loops of R7 for the sleeve accent cuff.
Pattern: Skirt
Turn the finished doll upside down. Using orange yarn, join to the front loops of R19 (the back loop only row worked earlier).
R1: Work 22 sc into all front loops of R19 (22)
R2: 22 in (44)
R3–5: 44 mpa for 3 rounds (44)
R6: 44 sc (44)
Switch to blue yarn.
R7: 1 sc, (1 mpa, 1 pa, 1 mpa in same stitch) x22, fasten off and hide the tail.
This final blue round creates the decorative scalloped hem of the skirt.
Pattern: Hair Base
Using brown yarn (color 7220)
R1: Magic ring with 6 sc (6)
R2: 6 sc (6)
R3: (1 sc, 1 inc) x6 (18)
R4: (2 sc, 1 inc) x6 (24)
R5: (3 sc, 1 inc) x6 (30)
R6: (4 sc, 1 inc) x6 (36)
R7: (5 sc, 1 inc) x6 (42)
R8–14: 42 sc for 7 rounds (42)
R15: 15 mpa, 5 sc, 1 mpa, 1 slst, 1 mpa, 5 pa, 14 mpa
Fasten off and sew the hair cap over the top of the head.
Pattern: Curly Pigtails — Make 4 Total
Type 1 (make 2): Chain 31. Turn and work 30 in along the chain (60). Fasten off and leave a tail for sewing. The piece will coil naturally into a curl.
Type 2 (make 2): Chain 41. Turn and work 40 inches along the chain (80). Fasten off and leave a tail for sewing.
Sew two curls of each type to each side of the hair cap, layering them for a full, bouncy pigtail effect.
Pattern: Bunting Flags
Using 2.0mm hook and colors 5743, 1112, and 2137
Chain 5. Skip the first stitch and work: 1 slst, 1 sc, 1 mpa, 1 pa. Chain 6.
Skip the first stitch and work: 1 slst, 1 sc, 1 mpa, 1 pa. Chain 1.
Repeat this sequence for each flag. Work sc along the top of the bunting to finish the upper edge. Fasten off.
Sew or glue the finished bunting flags directly onto the skirt of the doll.
Customization and Variation Ideas
- First, change the dress color entirely. A soft mint top with a coral skirt creates a completely different doll personality using the same construction throughout.
- Additionally, try braids instead of curly pigtails by working the chain loosely and leaving them uncoiled, then grouping them into flat braid formations before sewing.
- Moreover, add a tiny crocheted hat worked in the round using scrap yarn. A small, rounded hat with a brim gives the doll a completely different character and styling.
- Furthermore, use variegated yarn for the skirt section. The color shifts naturally through the flared rounds and creates a gradient hem without any extra color change work.
- Also, skip the bunting flags and embroider small flowers directly onto the skirt using a tapestry needle and contrasting yarn for a more botanical, cottagecore-inspired variation.
- Finally, make a matching pair of dolls in different colorways as a gift set. Two dolls displayed together in coordinating but distinct outfits create a genuinely stunning handmade presentation.
Common Mistakes to Avoid
- First, forgetting the BLO row at R19: This round must be worked in back loops only. The front loops left free in this round are what you return to later for skirt attachment. Missing this step makes skirt construction impossible.
- Additionally, joining the legs without even chain tension: The 2-stitch chain that joins the legs must be worked at the same tension as the body rounds. A tight joining chain pulls the legs together and distorts the lower body shape.
- Also, placing safety eyes after R40: The eyes must go in between R36–37 while the head is still open enough to access from the inside. Always mark the position with pins before locking.
- Furthermore, skipping the neck reinforcement: R27 specifically works into both front and back loops in the same round to firm the neck. Skipping this step results in a neck that cannot support the weight of the head.
- Moreover, coiling the pigtails before sewing: Do not pre-coil the curly hair pieces before attaching them. Sew them flat onto the hair cap first, then allow them to coil naturally once released. Pre-coiling makes placement and sewing very difficult.
- Finally, applying bunting flags before the skirt is fully blocked: Allow the skirt to settle into its natural flared shape before attaching the flags. Pinning and attaching flags to an unblocked skirt results in uneven flag placement once the yarn relaxes.
Finishing Tips
- First, after closing the head, give the entire doll a firm overall squeeze and reshape both the head and body into even, balanced forms before the stuffing fully settles.
- Additionally, use fabric glue rather than sewing for the bunting flags if you prefer a quicker attachment. Press each flag firmly and allow the glue to set completely before handling.
- Moreover, when sewing the arms onto the body, pin both in place simultaneously and check the overall balance from the front before committing either one to final stitches.
- Furthermore, use a tapestry needle to separate and fluff each curl after sewing the pigtails onto the hair cap. This gives the finished hairstyle maximum volume and bounce.
- Also, if the neck feels slightly unstable after assembly, apply a small bead of fabric glue inside the neck cavity and allow it to set fully before displaying or handling the finished doll.
- Finally, photograph the finished doll from a slight angle rather than directly from the front. This viewpoint shows the skirt volume, the pigtails, the bunting flags, and the face all together in one beautifully dimensional image.
Gifting Ideas
- First, place the finished doll in a small keepsake box lined with tissue paper in a color that coordinates with her dress for a presentation that looks completely intentional and polished.
- Additionally, pair the doll with a handwritten card describing her name, her outfit colors, and the yarn used. Personal details like these transform a handmade gift into a genuine keepsake.
- Moreover, these dolls make wonderful birthday gifts for girls of all ages. The curly hair, colorful dress, and tiny flags together create a finished piece that feels festive, personal, and unique.
- Furthermore, make a doll in each family member’s favorite colors as a personalized set. A shelf of different dolls in different outfits creates a handmade collection that grows more beautiful with every addition.
- Also, consider making this doll a cultural keepsake gift. The bunting flags and festival dress styling make her a meaningful representation of celebration and handmade tradition.
- Finally, these dolls sell beautifully at craft markets and handmade boutiques. The detailed hair, flared skirt, and tiny bunting flags together create a display piece that draws genuine admiration from everyone who sees it.
Conclusion
This crochet girl doll is one of the most rewarding amigurumi patterns you will ever work through. Every section builds naturally onto the last. Furthermore, the back loop only skirt technique, the curly pigtail construction, and the tiny bunting flags together create a finished doll that feels genuinely sophisticated and full of handmade artistry. Therefore, read the entire pattern first, work the BLO row at R19 carefully, and take your time with the hair and flag details. In addition, do not rush the neck reinforcement. A firm neck reinforcement around the neck makes the finished doll look confident and well-proportioned from every angle. In conclusion, this little doll carries every stitch of love and care you put into making her. She is absolutely worth every round.