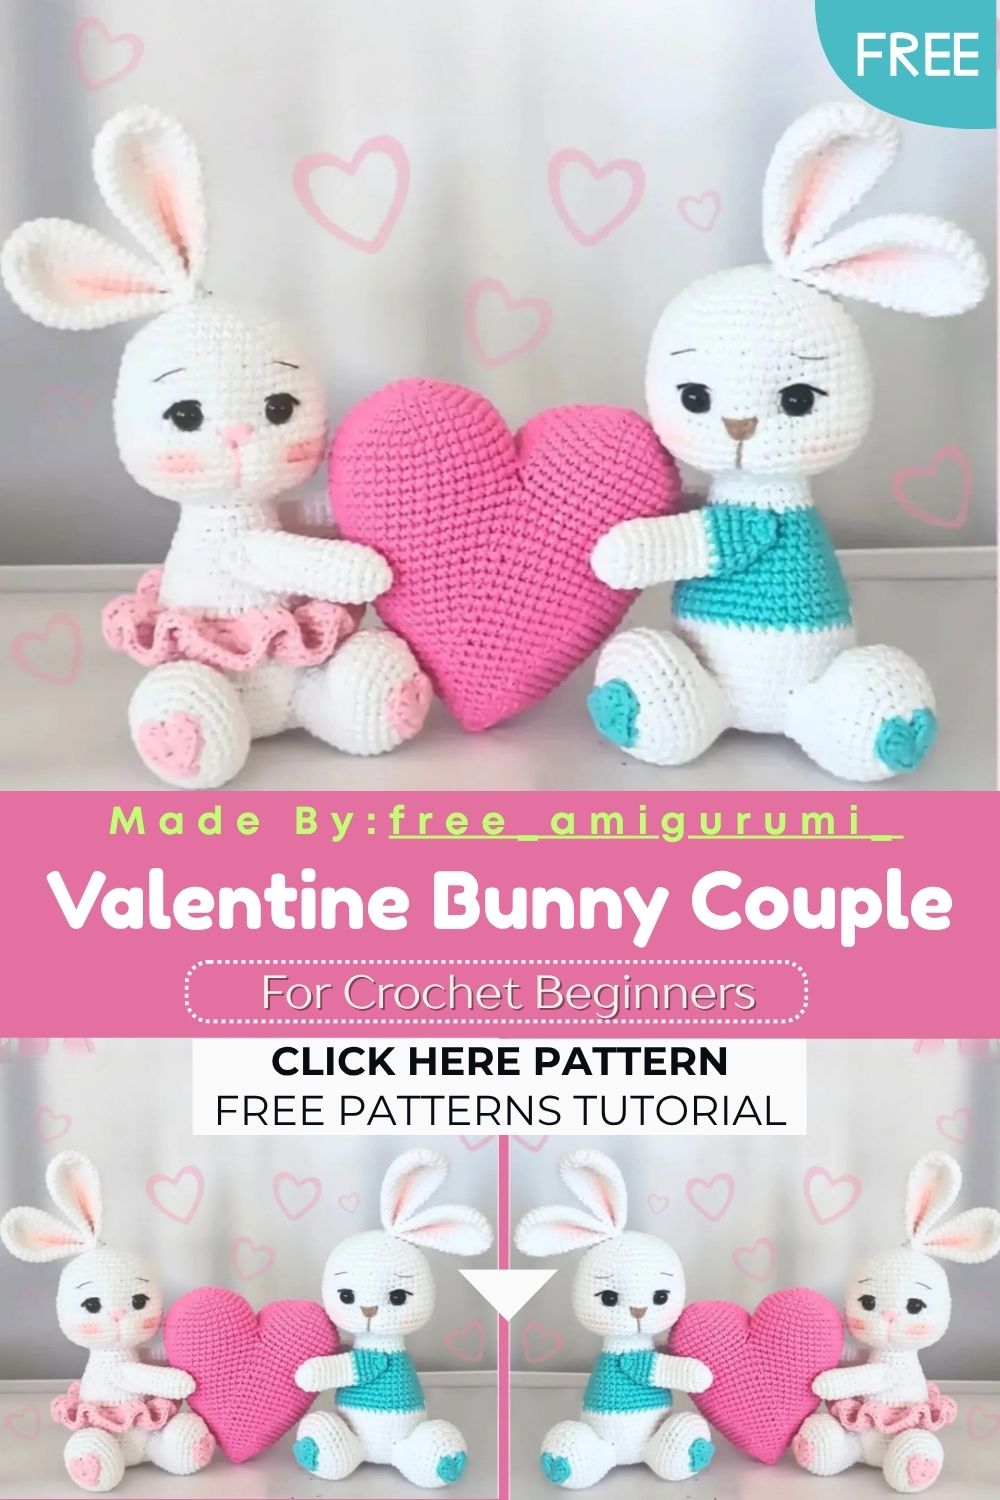
Valentine Bunny Couple Crochet Pattern – Free and Beginner Friendly
A girl bunny in pink, a boy bunny in blue, and a giant heart they can hold together this Valentine’s Day set is the sweetest handmade gift you will stitch all year!
This pattern gives you everything needed for a complete couples display. Both bunnies share the same head, ear, arm, leg, and tail construction. What changes is just the body color section and one short arm color switch for the boy. The girl gets a full skirt worked from the front loops of her body, while the boy has a clean, blue color band across his torso. And sitting between them is a large heart worked from two separate circular pieces joined and reduced into a dramatic Valentine centerpiece.
Skill Level
Beginner to intermediate. Standard increases and decreases carry most of the construction. Additionally, the skirt’s triple crochet fan round, the leg foundation chain, and the two-part heart join are the three moments that benefit from reading ahead before starting.
Materials You Will Need
Yarn Yarn Art Jeans (50g/160m) or any similar yarn:
- White for the main body, head, ears, arms, and tail of both bunnies
- Pink for the girl bunny body section and skirt
- Blue for the boy bunny body section and arm detail
- Red or any color of your choice for the heart
Other Supplies:
- Crochet hook — 2.5mm for bunnies
- Crochet hook — 3.0mm for the heart (half size larger than bunnies)
- Safety eyes — 7mm
- Fiberfill stuffing
- Sewing needle
- Scissors
Stuffing notes: Stuff the head, legs, and body tightly throughout. Stuff the arms loosely until round 6, then leave the top of the paws unstuffed completely.
Abbreviations
- CH — Chain
- SLST — Slip Stitch
- SC — Single Crochet
- HDC — Half Double Crochet
- DC — Double Crochet
- INC — Increase (2 sc in 1 stitch)
- DEC — Decrease (2 stitches together)
- BLO — Back Loop Only
- FLO — Front Loop Only
- (inc, sc) x N — Repeat N times
Pattern: Ears Make 4 Total (2 Per Bunny)
Using white yarn
R1: 6 sc in MR (6) R2: 6 inc (12) R3: (1sc, inc) x6 (18) R4: (2sc, inc) x6 (24) R5–7: 24 sc for 3 rounds (24) R8: (6sc, dec) x3 (21) R9–10: 21 sc for 2 rounds (21) R11: (5sc, dec) x3 (18) R12–13: 18 sc for 2 rounds (18) R14: (4sc, dec) x3 (15) R15–16: 15 sc for 2 rounds (15)
Fold the ear in half and close both sides together with 7 sc. Fold once more and work 3 sc to complete the ear shape. The double fold creates the natural forward-curving bunny ear that sits so well on an amigurumi head.
Pattern: Head Make 2
Using white yarn
R1: 6 sc in MR (6) R2: 6 inc (12) R3: (1sc, inc) x6 (18) R4: (2sc, inc) x6 (24) R5: (3sc, inc) x6 (30) R6: (4sc, inc) x6 (36) R7: (5sc, inc) x6 (42) R8: (6sc, inc) x6 (48) R9–11: 48 sc for 3 rounds (48) R12: (7sc, inc) x6 (54) R13–18: 54 sc for 6 rounds (54) R19: (7sc, dec) x6 (48) R20: (6sc, dec) x6 (42) R21: 21 dec (21) R22–23: 21 sc for 2 rounds (21)
Insert safety eyes between rounds 13 and 14, with 9 stitches apart between them. Embroider eyelashes, eyebrows, a small nose, and a curved mouth using dark thread after the face is complete.
Pattern: Body Girl Bunny
Using white yarn
R1: 7 sc in MR (7) R2: 7 inc (14) R3: (1sc, inc) x7 (21) R4: (2sc, inc) x7 (28) R5: (3sc, inc) x7 (35) R6: (4sc, inc) x7 (42) R7: 42 sc (42) R8: (13sc, inc) x3 (45) R9–12: 45 sc for 4 rounds (45) R13: (7sc, dec) x5 (40)
Change to pink yarn.
R14: 40 sc (40) R15: BLO 40 sc (40)
The front loops saved from R15 are used to attach the skirt later.
R16: (8sc, dec) x4 (36) R17–18: 36 sc for 2 rounds (36) R19: (4sc, dec) x6 (30) R20: 30 sc (30) R21: (3sc, dec) x6 (24) R22: 24 sc (24) R23: (6sc, dec) x3 (21) R24: 21 sc (21)
Pattern: Body Boy Bunny
Work the same as the girl body from R1 to R12.
Change to blue yarn at R13 and continue working in blue through R23 following the same stitch counts as the girl body.
Change back to white yarn and complete R24 in white.
Pattern: Skirt (Girl Only)
Hold the girl bunny with head facing downward. Attach yarn to the front loops of R15.
R1: (3 dc in one stitch) x40 (120), 1 slst
R2: 120 sc across all stitches
The triple dc fans create a full, ruffled skirt that spreads naturally around the girl bunny’s lower body.
Pattern: Legs Make 4 Total
Using white yarn
Chain 5. Starting from the 2nd loop from the hook:
R1: 1 inc, 2 sc, 4 sc in one loop, 2 sc, 1 inc (12) R2: (inc, sc) x6 (18) R3: 1sc, inc, 6sc, inc, 1sc, inc, 6sc, inc (22) R4: 1 inc, 8sc, (inc, sc) x2, inc, 8sc (26) R5: 1 inc, 9sc, (inc, 2sc) x2, inc, 9sc (30) R6: 30 sc (30) R7–8: 10sc, 12hdc, 8sc for 2 rounds (30) R9: 5sc, 10 dec, 5sc (20) R10: 6sc, (dec, sc) x2, dec, 6sc (17)
Pattern: Arms Make 4 Total
Using white yarn
R1: 6 sc in MR (6) R2: (1sc, inc) x3 (9) R3: (2sc, inc) x3 (12) R4–13: 12 sc for 10 rounds (12) R14: (2sc, dec) x3 (9) R15: (1sc, dec) x3 (6)
For the boy bunny arm, change from white to blue at round 11.
Sew each arm to both the front and back of the body for a secure, balanced attachment.
Pattern: Tail Make 2
R1: 6 sc in MR (6) R2: 6 inc (12) R3: (3sc, inc) x3 (15) R4: (4sc, inc) x3 (18) R5: (5sc, inc) x3 (21) R6: 21 sc (21) R7: (5sc, dec) x3 (18)
Stuff firmly. Sew the tail between rounds 5 and 10 at the back center of each body.
Pattern: Heart
Using red yarn and 3.0mm hook
Make two identical halves.
Part 1: R1: 6 sc in MR (6) R2: 6 inc (12) R3: (1sc, inc) x6 (18) R4: (2sc, inc) x6 (24) R5: (3sc, inc) x6 (30) R6: (4sc, inc) x6 (36) R7: (5sc, inc) x6 (42) R8–12: 42 sc for 5 rounds (42)
Fasten off Part 1. Make Part 2 identically but do not cut the yarn.
Joining: Connect both parts with 9 sc worked through both sides simultaneously.
Then crochet in a circle: 33 sc on one side, 33 sc on the other side (66)
R14–17: 66 sc for 4 rounds (66) R18: (9sc, dec) x6 (60) R19–20: 60 sc for 2 rounds (60) R21: (8sc, dec) x6 (54) R22: 54 sc (54) R23: (7sc, dec) x6 (48) R24: 48 sc (48) R25: (6sc, dec) x6 (42) R26: 42 sc (42) R27: (5sc, dec) x6 (36) R28: 36 sc (36) R29: (4sc, dec) x6 (30) R30: 30 sc (30) R31: (3sc, dec) x6 (24) R32: (3sc, dec) x4 (20) R33: (3sc, dec) x4 (16) R34: (2sc, dec) x4 (12) R35: (1sc, dec) x4 (8)
Fasten off. Stuff firmly and close.
Customization and Variation Ideas
- First, make both bunnies in the same color for a matching friendship pair rather than a romantic couple display.
- Additionally, swap the pink and blue for lavender and mint for a softer, more gender-neutral pastel variation.
- Moreover, add tiny crochet bows to the girl bunny’s ears for an extra feminine touch.
- Furthermore, embroider small hearts onto the boy bunny’s blue section for a coordinated detail that ties both characters together visually.
- Also, make the heart in dusty rose instead of red for a vintage Valentine aesthetic that photographs beautifully in natural light.
- Finally, scale the entire pattern up using chunky yarn and a larger hook for a version twice the size that makes an even more impressive display piece.
Common Mistakes to Avoid
- First, working R15 of the girl body in both loops: This round must be BLO only. The saved front loops are essential for attaching the skirt; without them, the skirt has nowhere clean to anchor.
- Additionally, using the same hook size for the heart: The heart uses a half-size larger hook specifically to give the finished piece a slightly looser, more rounded shape. Using the same 2.5mm hook produces a heart that is too tight and stiff.
- Also, joining the heart halves unevenly: Work all 9 joining sc through both layers at the same tension for a clean connection that holds the two halves together without pulling to one side.
- Furthermore, leaving paw tops stuffed: The pattern specifically calls for leaving the top of each paw unstuffed. Fully stuffed paws create a stiff arm that cannot bend or pose naturally.
- Moreover, sewing ears too high on the head: The ears attach at round 2 of the head. Placed any higher they sit too far back and the bunny loses its characteristic forward-facing ear position.
- Finally, inserting eyes after round 18: Eyes must go in between rounds 13 and 14 while the head interior is still accessible. Leaving them until later makes placing the backings nearly impossible.
Finishing Tips
- First, when sewing the ear twice, once flat and once folded, take your time aligning the layers evenly before working the connecting sc. A well-shaped ear makes an enormous difference to the overall head proportions.
- Additionally, sew the arms through both the front and back of the body as instructed, not just through one side. This keeps both arms sitting naturally against the body without rotating or drooping.
- Moreover, display the finished heart between the two bunnies before sewing anything permanently to check the visual balance of the full scene from the front.
- Furthermore, use matching white yarn for all body-to-head joining stitches so the seam disappears into the surface completely.
- Also, stuff the tail very firmly before sewing it on; a loosely stuffed tail flattens with handling and loses its characteristic pom-pom shape very quickly.
- Finally, photograph both bunnies holding the heart between them from directly in front at a slight downward angle to capture all three pieces together in one clean, balanced image.
Gifting Ideas
- First, present the complete set of both bunnies and the heart arranged together in a shallow gift box lined with tissue paper for a Valentine’s Day gift that needs no extra decoration.
- Additionally, personalize the bunnies with embroidered initials on each chest for a couple’s gift that feels genuinely one-of-a-kind.
- Moreover, these make wonderful anniversary or wedding gifts as well as Valentine’s presents, since the couple format translates beautifully to any romantic occasion.
- Furthermore, make just the heart alone as a standalone gift for someone who loves handmade home décor; it looks beautiful displayed on a shelf without the bunnies.
- Also, make a mini version of each bunny using finer yarn and 1.5mm hooks for a pair of keychains that a couple can carry separately.
- Finally, these sets sell strongly at Valentine’s Day craft markets where the full three-piece display draws attention immediately and photographs well for social media promotion.
Conclusion
This bunny couple pattern is one of those projects where the finished result genuinely exceeds what the stitch counts suggest it will look like. The double-folded ears, the ruffled skirt, the blue color band on the boy, and the dramatic two-part heart all work together to create something that feels like a complete, designed set rather than three separate pieces. Therefore, read the heart joining section before starting that piece, save those front loops at R15 of the girl body, and stuff the legs and tail tightly for the best finished proportions. In conclusion, your Valentine bunny couple is ready to make someone genuinely happy.
Happy crocheting! Cannot wait to see your bunny pair come to life.