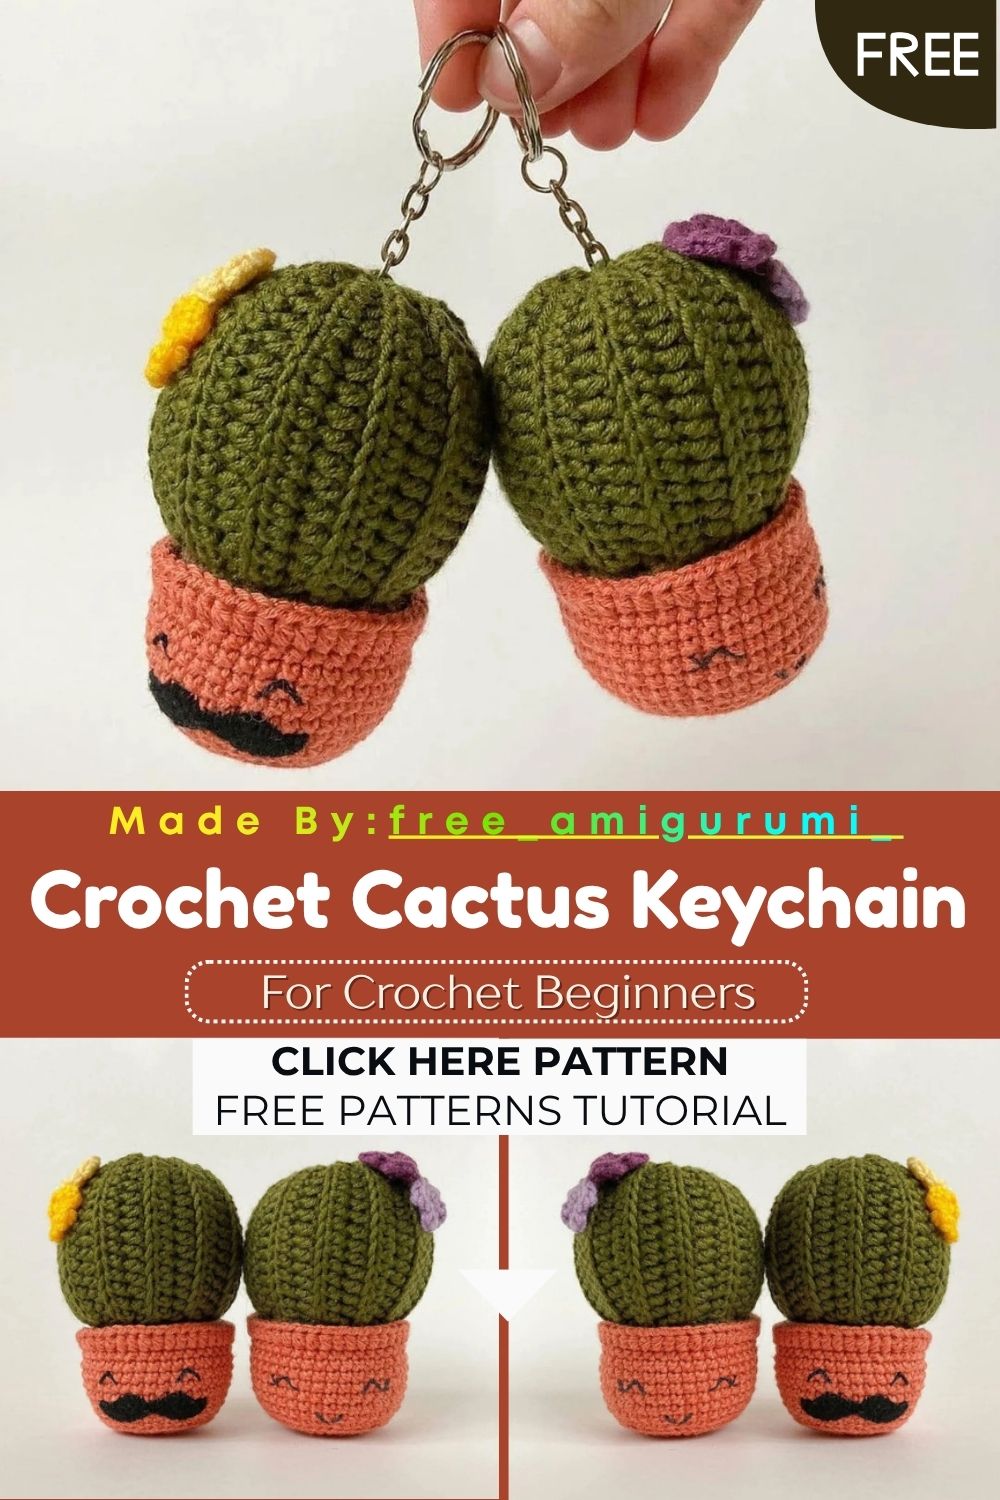
Free Crochet Cactus Keychain Pattern
A ribbed green body, a terracotta pot, tiny crocheted flowers, and felt mustaches, this little cactus is the most cheerful desk companion you will ever stitch!
Most crochet cactus patterns are worked in rounds. This one takes a different approach for the main body. The cactus is worked in turning rows of half double crochet through the back loops only, creating a beautifully ribbed rectangular panel that is then rolled and seamed into the classic barrel cactus shape. The pot builds upward from a magic ring with a natural rim detail created through a front loop only edging added after assembly. The whole piece sits together in a way that looks genuinely considered and finished.
At about 10cm tall, it works equally well as a keychain, a pincushion, or a standalone desk decoration.
Skill Level
Beginner to intermediate. Turning row construction for the cactus body is the main technique that differs from standard amigurumi. Additionally, the front loop edging on the pot rim and the five-petal magic ring flower introduce two quick new finishing skills.
Materials You Will Need
Yarn Gazzal Baby Cotton (165m/50g, 60% cotton 40% acrylic) or similar weight:
- Green for the cactus body
- Terracotta for the pot
- Brown for the ground section
- Any color for the small flowers
Other Supplies:
- Crochet hook — 2mm
- Fine thread for decoration details
- Polyester fiberfill stuffing
- Long needle
- Scissors
- Stitch marker
- Pins
- Felt for mustaches
- Craft glue
Finished size: Approximately 10cm tall.
Abbreviations
- MR — Magic Ring
- CH — Chain
- SC — Single Crochet
- HDC — Half Double Crochet
- SLST — Slip Stitch
- INC — Increase
- DEC — Decrease
- BLO — Back Loops Only
Pattern: Cactus Body
Using green yarn. Worked on turning rows.
Work 1 ch and turn at the end of every row throughout this section.
Row 1: Chain 17. Starting from the second stitch from the hook: 16 hdc
Work each following row in back loops only.
Rows 2–23: Continue working 16 hdc per row in BLO for 23 rows total.
Leave a long thread end at the end.
Using this tail, sew the two short edges of the rectangle together to form a cylinder. Then pull the upper opening closed by running a stitch around the top edge and pulling it tight. Secure the thread firmly and weave in all ends.
The BLO construction creates distinct horizontal ribs across the finished cactus surface, mimicking the natural ridged texture of a real barrel cactus.
Stuff the cactus firmly with fiberfill before securing the bottom for assembly.
Pattern: Pot and Ground
Starting with terracotta yarn
R1: 8 sc in MR (8) R2: 8 inc (16) R3: (1sc, inc) x8 (24) R4: 1sc, inc, (2sc, inc) x7, 1sc (32) R5: (3sc, inc) x8 (40)
R6: BLO 40 sc (40)
This back loop only round creates the visual ridge that marks the base of the pot walls.
R7–9: 40 sc for 3 rounds (40) R10: (19sc, inc) x2 (42) R11–13: 42 sc for 3 rounds (42)
Change to brown yarn.
R14: BLO 42 sc (42)
This second BLO round marks the transition between the terracotta pot and the brown ground surface.
R15: (5sc, dec) x6 (36) R16: (4sc, dec) x6 (30) R17: (3sc, dec) x6 (24)
Stuff at this point.
R18: (2sc, dec) x6 (18) R19: (1sc, dec) x6 (12)
Pull all 12 remaining stitches closed using a needle. Secure the thread and weave in the ends.
Pot Rim Edging
After assembly, attach terracotta yarn to the front loops of round 13. Chain 2 and work hdc in a full circle. Slip stitch into the first stitch to close. Secure the thread and weave in the ends.
This creates the raised decorative rim that sits at the top of the pot, giving it a distinctly finished, pottery-like appearance.
Pattern: Flowers
Using your chosen flower color
In MR, work: ch1, 2 hdc, ch1, slst.
Repeat this combination 4 more times for a total of 5 petals.
Pull the magic ring closed. Secure the thread and leave a long tail for sewing onto the cactus surface.
Make as many flowers as you like and distribute them across the cactus body for the most natural, blooming cactus appearance.
Assembly
Step 1: Cut a length of green yarn and thread it onto a long needle. Secure it inside the stuffed cactus. Run wide gathering stitches along the bottom edge of the cactus cylinder and pull gently until the lower section narrows enough to sit inside the pot with a visible strip of brown ground between the cactus base and the pot rim.
Step 2: Position the cactus in the center of the pot and secure it with pins before sewing. Sew the bottom edge of the cactus to the brown ground section using green yarn, catching stitches from both the cactus bottom edge and the ground surface. Secure firmly and weave in ends.
Step 3: Attach terracotta yarn to the front loops of round 13. Work the hdc pot rim edging as described above.
Step 4: Sew the finished flowers onto the cactus surface in your preferred arrangement. Glue or sew small felt mustache shapes onto the cactus face if using the character version.
Keychain Option
To convert the finished cactus into a keychain, sew a metal ring with a short chain link onto the very top of the cactus after assembly. This allows the piece to attach to any bag, keys, or zipper pull.
Pincushion Option
To make a stable pincushion, cut a firm cardboard or plastic circle to fit the base of the pot. Place it inside before closing and add a small weight, such as pebbles, coins, or dried beans; all work well to keep the finished piece from tipping.
Customization and Variation Ideas
- First, make the cactus in pale blue or dusty pink for a pastel desert aesthetic that suits cottagecore and boho home decor perfectly.
- Additionally, add extra rows to the cactus turning row section for a taller, more columnar cactus shape that sits more dramatically above the pot rim.
- Moreover, use variegated green yarn for an automatic color shift across the ribbed body that mimics the subtle color variation of real cactus plants.
- Furthermore, make two smaller cactuses in the same pot for a grouped planter display that looks like a real succulent arrangement.
- Also, add tiny embroidered cross stitches in brown thread across the green body to represent cactus spines for a more botanically accurate finished look.
- Finally, make the pot in white and paint small terracotta-colored dots across the surface using fabric paint for a hand-decorated pottery effect without any extra yarn work.
Common Mistakes to Avoid
- First, working the cactus body in both loops instead of back loops only: The BLO construction is what creates the ribbed texture. Working both loops produces a flat, textureless panel that loses the entire cactus surface effect.
- Additionally, not pulling the cactus base tight enough before assembly: If the bottom edge is not gathered sufficiently, the cactus will sit too high in the pot, and the brown ground strip will not be visible. The ground detail is what makes the finished piece look like a real potted plant.
- Also, skipping the front loop edging on the pot rim: This hdc edging is added after full assembly and is easy to skip. However, the raised rim it creates is the main detail that elevates the pot from a simple crochet tube into something that genuinely looks like pottery.
- Furthermore, sewing flowers before the cactus is fully assembled in the pot: Always complete the full assembly first, then add flowers. Positioning flowers before the cactus is in its final position means they may end up in awkward placements once the piece is settled.
- Moreover, overstuffing the pot base: The closing rounds of the brown ground section need to pull closed smoothly. Too much stuffing in the lower section makes the final needle-close technique very difficult to execute neatly.
- Finally, gluing the felt mustaches before the face position is finalized: Press them in place with pins first and step back to check the expression from a normal viewing distance before applying glue permanently.
Finishing Tips
- First, when gathering the cactus base for assembly, pull gradually and evenly rather than cinching from one point. Even tension around the full base circumference creates a much neater join against the brown ground.
- Additionally, use pins generously when positioning the cactus in the pot before sewing. The cactus tends to shift during stitching without adequate pinning at multiple points.
- Moreover, when sewing the flowers, use a small knot at the back of each petal attachment to prevent individual petals from pulling free with handling over time.
- Furthermore, if the cactus ribs look slightly inconsistent after the cylinder is seamed, a light hand-press while the yarn is still warm from being worked smooths the surface significantly.
- Also, after attaching the pot rim edging, run your finger around the rim to encourage it to sit upright rather than flopping inward or outward against the pot wall.
- Finally, photograph the finished cactus from a slight three-quarter angle to show both the ribbed cactus texture and the pot rim detail together in one appealing image.
Gifting Ideas
- First, attach a keyring and present the finished cactus in a small kraft paper envelope for a quick, charming gift that takes under a minute to package.
- Additionally, make a trio of cactus keychains in different green shades and gift them together in a small drawstring bag as a complete desert garden set.
- Moreover, these make wonderful desk gifts for colleagues, especially the pincushion version for anyone who sews or crafts at work.
- Furthermore, pair a finished cactus pot with a small bag of real succulent soil and a tiny real cactus seedling for a nature-themed gift bundle that carries both a handmade and a living element.
- Also, make a collection of five different cactus sizes and display them together on a small wooden tray as a complete miniature desert garden for a housewarming gift.
- Finally, these sell reliably at craft markets year-round, but especially in spring and summer when plant-themed home decor is at peak popularity among buyers.
Conclusion
This little cactus pattern is a masterclass in how much character a small amount of yarn can hold. The turning row ribbed body is genuinely different from any other amigurumi construction method, and the result looks convincingly like a real barrel cactus at first glance. Therefore, work the cactus rows carefully in BLO throughout, gather the base evenly before assembly, and do not skip the pot rim edging. In conclusion, this cheerful little cactus is ready to sit on a desk, hang from a bag, or hold a pin collection, depending on exactly who it is made for.
Happy crocheting! Cannot wait to see your little cactus come to life.