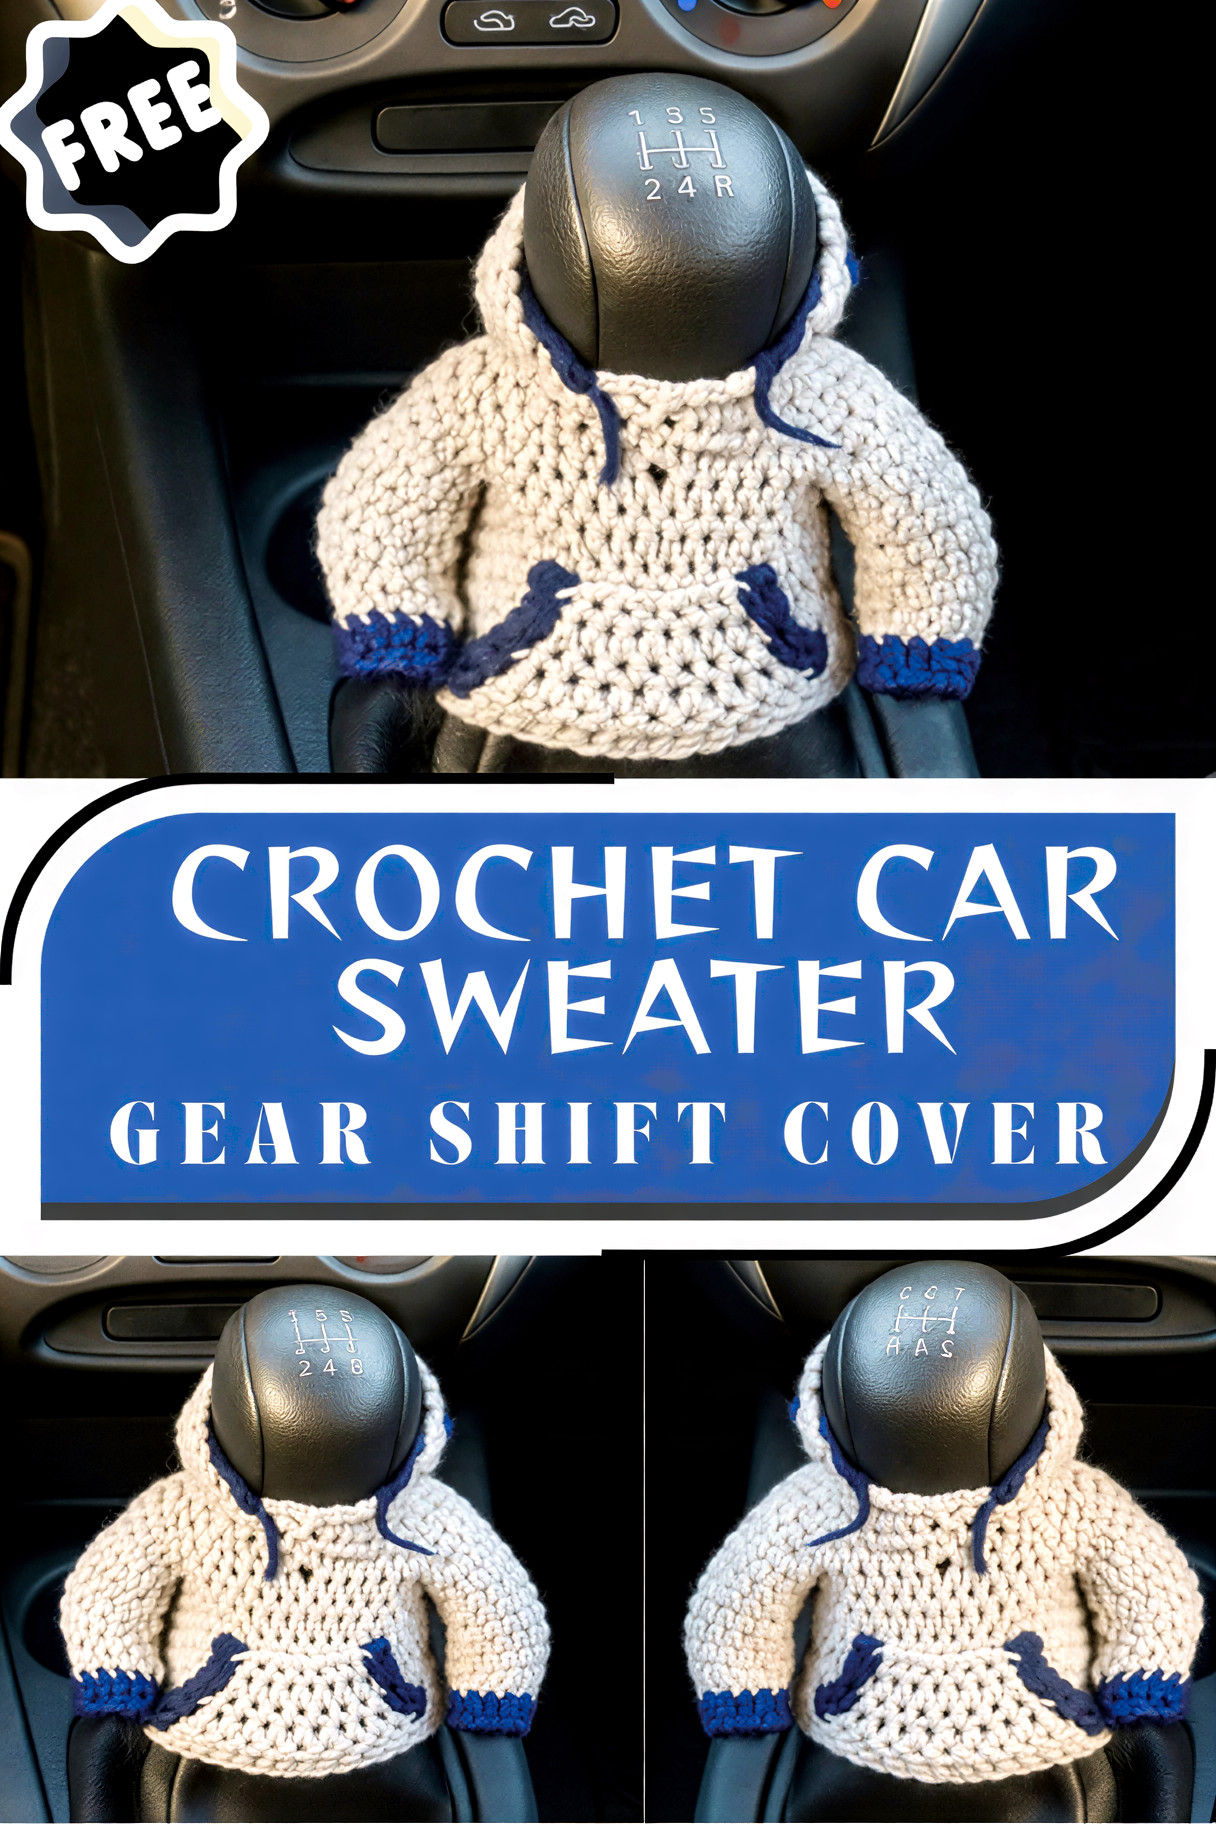
Crochet Car Sweater – Gear Shift Cover Beginner Friendly Pattern
If you’re looking for a fun crochet project that’s cute, practical, and fast to finish, you’ll love making a mini crochet car sweater, a tiny hoodie-style cover that slips right over your gear shift. It resembles a miniature pullover with little sleeves and a hood detail, transforming an everyday car part into instant decor.
Crochet car accessories are trending because they add personality without spending a lot, and they’re a great way to use leftover yarn. Plus, a handmade gear shift cover feels cozy in your hand especially in hot summers or cold winters when the gear knob gets uncomfortable.
This mini crochet car sweater is also perfect for gifts. Do you know someone who loves cute car decor, cozy aesthetics, or handmade items? A tiny hoodie gear shift cover is the kind of unexpected present that always gets a smile.
Materials Needed
Here’s what you’ll need to crochet your mini gear shift hoodie: Medium-weight
- t yarn (cream or beige for the body)
- Contrasting yarn (blue for cuffs and small details)
- 4mm or 4.5mm crochet hook
- Yarn needle
- Scissors
- Measuring tape
- Stitch markers (optional)
Medium-weight yarn (often called worsted weight) is easiest for beginners and makes a nice, flexible fabric that stretches just enough for a snug fit.
Crochet Abbreviations
Use these simple abbreviations throughout the pattern:
- ch – chain
- sl st – slip stitch
- sc – single crochet
- hdc – half double crochet
- dc – double crochet
- st – stitch
- inc – increase
Step-by-Step Mini Crochet Car Sweater Pattern (Beginner Friendly)
Step 1: Measuring the Gear Shift
Before you crochet, take two quick measurements:
- Circumference: Wrap measuring tape around the gear knob at the widest part you want the cover to fit.
- Height: Measure from where you want the bottom edge to sit up to the top of the gear knob.
How to adjust stitch count
- Your foundation chain needs to match the circumference (minus a little stretch).
- For a snug fit, aim for your chain ring to be about 1–2 cm (½ inch) smaller than the actual circumference, since crochet stretches.
Why snug fit matters
A gear shift cover should stay in place. If it’s loose, it may twist, slide, or bunch up when shifting—so snug (but not tight) is the goal.
Step 2: Sweater Body
This section is the main “sweater torso” that wraps around your gear shift.
1) Chain and join
- ch enough stitches to match your measured circumference (snug fit).
- Make sure the chain is not twisted.
- sl st to the first chain to form a ring.
Tip: If you’re unsure, try wrapping the chain ring around the gear knob before joining.
2) Work in rounds using hdc
- Round 1: ch 1 (does not count as a st), hdc in each ch around, sl st to join.
- Rounds 2–?: ch 1, hdc in each st around, sl st to join.
Keep crocheting until the body reaches most of your measured height, leaving space for the hoodie collar area at the top.
3) Optional shaping (slight decreases)
Some gear knobs narrow toward the top. If yours does, you can taper slightly so the cover hugs nicely:
- On a shaping round, do: hdc in the next few sts, then hdc2tog (a simple decrease), repeat around as needed.
- Keep decreases subtle—too many will make it hard to pull the cover on.
Beginner-friendly option: skip shaping at first. Many gear shifts work fine with a straight tube.
Step 3: Creating the Hoodie Collar
Now the fun part: turning the top into that mini hoodie look.
1) Work back-and-forth rows (not in the round)
Instead of continuing in rounds, you’ll create a small collar/hood opening by working rows.
- Decide where you want the “front opening” to be.
- Crochet across about half to two-thirds of the stitches, then turn.
Example approach:
- Row 1: ch 1, hdc across a section of sts, turn.
- Rows 2–6: ch 1, hdc across, turn.
This creates a flap that starts to look like a hood base.
2) Create the hood opening
To make the hood shape, you can add a little height at the back by crocheting a couple of extra rows, or simply keep it even for a simple, rounded collar look.
Beginner-friendly hood shortcut:
- Crochet a small rectangular flap (about 5–8 rows), then fold it slightly at the top and stitch the top edge partly closed to suggest a hood.
3) Add ribbed edging using single crochet
For a neat hoodie edge:
- Join contrasting yarn (blue) around the hood opening.
- Work sc evenly around the edge.
- If the edge starts to ripple, use fewer stitches. If it pulls tight, add a few extra sc.
Optional “ribbed look” trick (still simple):
- Work one round of sc inthe back loop only around the opening to create a subtle ridge.
4) Attach small drawstrings
- With contrasting yarn, make two drawstrings: ch 25–40 (depending on how long you want them).
- Weave them through the front hood edge using a yarn needle (like shoelaces).
- Tie small knots at the ends.
Step 4: Making Mini Sleeves
These tiny sleeves make the cover look like a real hoodie sweater.
1) Chain a small tube shape
- With body color yarn (cream/beige), ch 10–14 (adjust depending on how chunky you want the sleeves).
- sl st to join into a small ring.
2) Work 6–8 rounds
- ch 1, sc or hdc around (choose sc for a tighter sleeve, hdc for a softer look).
- sl st to join each round.
- Repeat for 6–8 rounds.
You now have a mini sleeve tube. Make two.
3) Add contrasting color cuffs
- Switch to blue yarn.
- Work 1–2 rounds of sc for a cuff.
- Fasten off, leaving a tail for sewing.
4) Sew sleeves securely to the sides
- Position sleeves on the sides of the sweater body.
- Use stitch markers to hold in place (optional).
- Sew neatly with a yarn needle, going through both layers.
Tip: Sew through strong points (stitch “V” shapes), so sleeves don’t pop off with use.
Step 5: Decorative Details
This is where your mini crochet car sweater gets personality.
Optional pocket detail
Make a small pocket rectangle:
- ch 8–12
- Work 4–6 rows of sc or hdc
- Sew onto the front of the sweater body
You can even add a tiny “pocket trim” in blue yarn with a round of sc.
Add stripes or a color accent.s
- Crochet one or two rounds in contrasting yarn near the bottom edge or across the body for a sporty look.
- Or embroider a simple heart, star, or small initial with leftover yarn.
Secure all ends neat.ly
Weave in every yarn tail using a yarn needle. Since this is a car accessory, you want it sturdy and tidy.
Step 6: Final Assembly & Fitting
Now it’s time to try it on.
- Slip the sweater over the gear shift from the top or bottom, depending on your gear knob shape.
- Adjust snugness:
- Too loose? Add an extra round of decreases near the top, or weave elastic thread through the bottom edge.
- Too tight? Undo the seam, add a few stitches, or size up your hook.
- Safety check: Make sure it doesn’t interfere with driving. The cover should not restrict movement, catch on buttons, or slide around while shifting.
Important: Keep drawstrings short and secure so they don’t dangle or distract.
Customization Ideas
Make your mini crochet hoodie gear shift cover feel totally personal:
- Change colors to match your car interior (black/gray, pastel, neon, or sporty stripes)
- Add name embroidery (a small initial or short word looks great)
- Add holiday themes (red/white for winter, orange/black for Halloween, pastel for spring)
- Make a matching steering wheel cover using the same yarn palette for a coordinated .set
Why You’ll Love This Crochet Car Accessory
- Protects your gear shift from heat, cold, scratches, and everyday wear
- Stylish interior decor that instantly adds a cozy, handmade vibe
- Unique handmade gift for crochet lovers, new drivers, or car decor fans
- Quick crochet project (1–2 h, ours) depending on your speed and details
It’s also a great stash-buster project when you want something satisfying without committing to a big blanket or sweater.
Common Mistakes to Avoid
Making it too loose
A loose cover can rotate or slip. Always measure and aim for a snug stretch fit.
Tight collar opening
If the hood/collar area is too tight, it can be hard to put on, or it may bunch up. Keep the top opening comfortable and flexible.
Uneven sleeves
If the sleeves sit at different heights, the hoodie won’t look balanced. Mark both sides before sewing and measure placement.
Using very thick yarn
Super bulky yarn can make the cover stiff and oversized. Stick with medium-weight yarn so it hugs the gear shift smoothly.
FAQs
How long does it take to crochet a gear shift cover?
Most people can finish this mini crochet car sweater in 1–2 hours, especially if you keep the design simple and skip extra details like pockets.
Is a crochet gear shift cover safe to use?
Yes—when made correctly. It should fit snugly, not slide, and must not interfere with shifting. Keep drawstrings short and secure.
What yarn is best for crochet car accessories?
Medium-weight (worsted) yarn is a great choice for beginners. Acrylic is durable and easy to wash, while cotton stays firm and holds shape well.
Can beginners make this mini crochet car sweater?
Absolutely. This pattern uses basic stitches like chain, slip stitch, single crochet, and half double crochet, plus simple shaping if needed.
How do I adjust the size for different cars?
Measure your gear shift circumference and height first. Then adjust:
- The starting chain to match the circumference
- The number of rounds to match height
- Add small decreases if your gear knob narrows toward the top
Conclusion
A mini crochet hoodie gear shift cover is one of the cutest ways to bring crochet into everyday life, and it’s a project you can finish quickly, even as a beginner. Try the classic cream-and-blue combo, or experiment with bold colors and fun details like pockets, stripes, or initials.