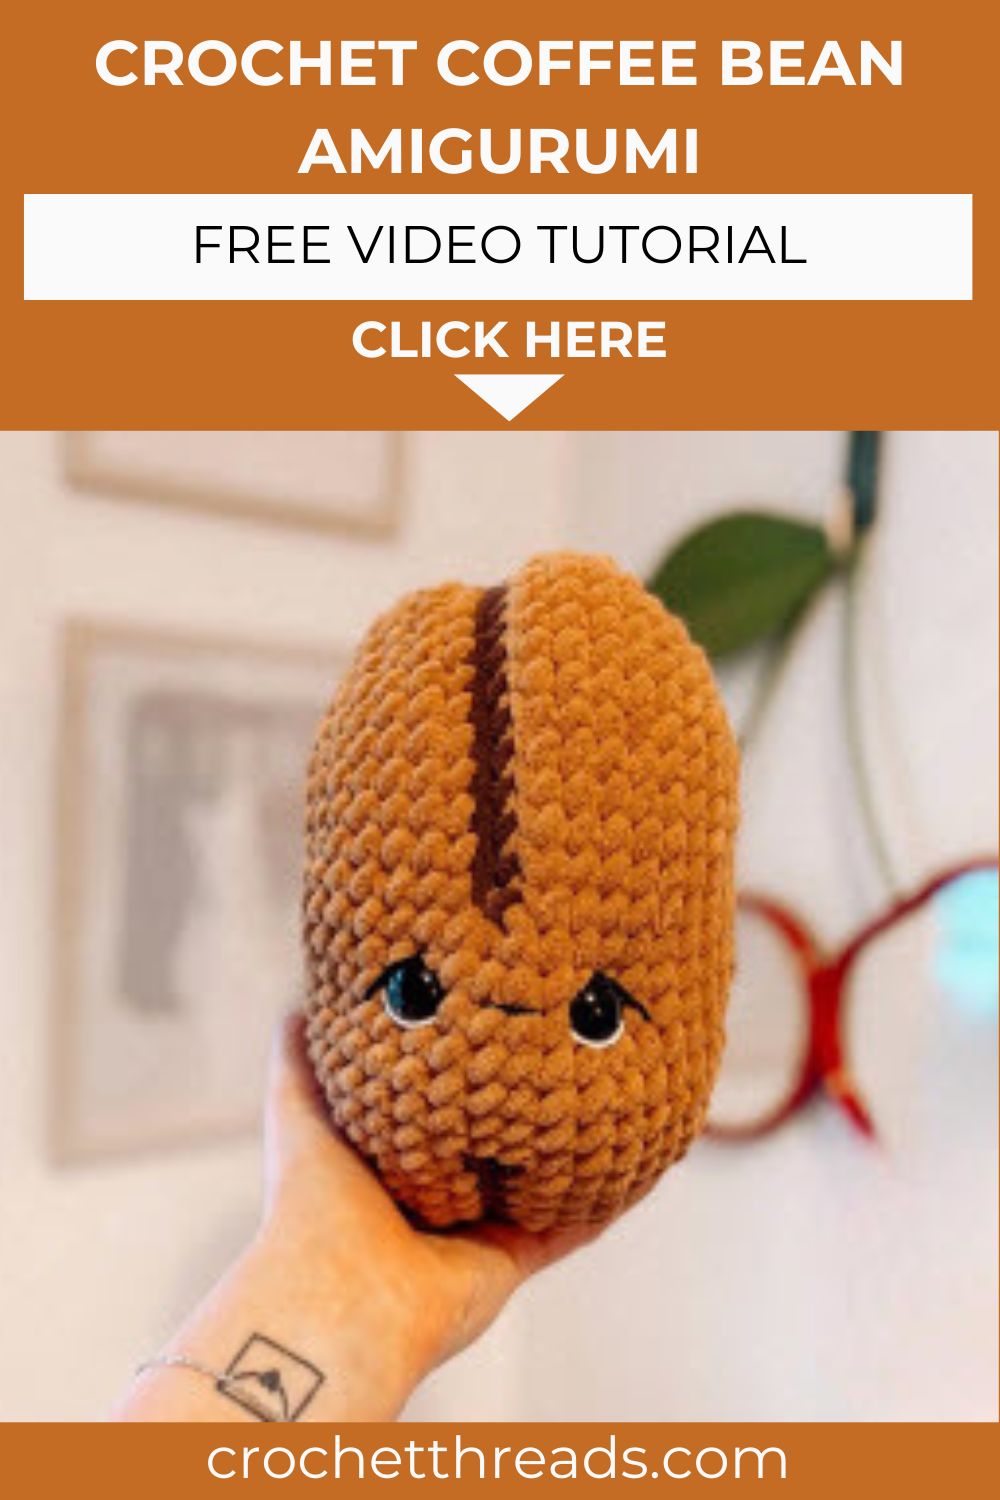
Make Your Own Crochet Coffee Bean Amigurumi Free Pattern
Coffee lovers, this one is for you! This little crochet coffee bean amigurumi is quick, cute, and endlessly squishable. Grab your hooks and let us make something adorable together today.
There is something special about turning a few balls of yarn into a tiny coffee bean you can hold in your hand. This free pattern walks you through every round, from the first magic chain to the final embroidered face, so even your very first amigurumi feels achievable and fun.

Pattern Overview
Before you pick up your hook, here is a quick look at what this little project involves so you know exactly what you are getting into.
- This coffee bean is worked in continuous rounds rather than joined rounds, which keeps the surface smooth and seam-free.
- The whole shape is built from a single chain start, so the bean grows outward and then gathers back in for that classic rounded look.
- You will use two shades of brown to create the signature dark crease that runs down the center of every coffee bean.
- Safety eyes and simple embroidery give the bean its sweet little face, so no complicated shaping is required.
- The finished piece is small, portable, and beginner-friendly, which makes it a wonderful gift, keychain charm, or shelf decoration.
- Because it is stuffed firmly as you go, the bean holds its plump shape beautifully and stands up to plenty of squishing.
Difficulty Level and Stitches Used
This pattern is written for confident crocheters and uses US crochet terminology throughout. Everything is worked in continuous rounds using the yarn under method, which gives neat, tight stitches. Here are the abbreviations you will see along the way.
- MR – magic ring
- sc – single crochet
- inc – two single crochets worked into the same stitch
- dec – invisible decrease
- slst – slip stitch
- FLO – front loops only
- BLO – back loops only
- (#) – the stitch count at the end of the round
- (…)* # – Repeat the instructions inside the brackets the listed number of times
Materials Used
Gather these supplies before you begin so you can crochet without interruptions.
- Super Bulky yarn (Scheepjes Big Darling): Medium Brown (Teddy) and Dark Brown (Bigfoot)
- Weight 4 cotton yarn: White and Black for the facial details
- 6mm crochet hook
- 18mm safety eyes
- Darning needle
- Toy stuffing
- Scissors
- Stitch markers (optional but very helpful)
- Amigurumi sticks (optional, for stuffing tight corners)
If you would like to use a different yarn, here are some hook pairings that work nicely: Bernat Blanket with a 7mm hook, Premier Basix Chenille with a 7mm, Yarnsmiths Snug as a Bug with a 7mm, Alize Velluto or HMBB Blanket with a 6mm, Yarnsmiths Chunky Chenille with a 4.5mm, and Wolans Bunny Baby with a 4mm.
Special Techniques
A couple of small techniques make this bean look polished, so it is worth reading these before you start.
- Color changes mid-round: The dark crease is formed by switching between Teddy and Bigfoot within the same round. Always make the change on the very last pull through of the previous stitch so the new color sits cleanly.
- Back loops only work: Several rounds ask you to crochet into the BLO, which creates a crisp ridge. This ridge is what gives the bean its deep, realistic groove down the middle.
- The yarn under method: Working your single crochets with yarn under instead of yarn over produces shorter, denser stitches that hide the stuffing and keep the bean firm.
The Crochet Coffee Bean Amigurumi Pattern
Work in Teddy Bear (Medium Brown) with your 6mm hook. Begin with a chain of 15.
Starting the Bean (Rounds 1–10)
- Round 1: Starting in the 2nd chain from the hook, inc, 12sc, (inc)*2, 12sc, inc (32)
- Round 2: sc around (32)
- Round 3: (inc)*2, 12sc, (inc)*3, 14sc, inc (38)
- Round 4: (inc)*2, 15sc, (inc)*4, 15sc, (inc)*2 (46)
- Rounds 5–6: sc around for 2 rounds (46)
- Round 7: (inc)*3, 18sc, (inc)*5, 18sc, (inc)*2 (56)
- Rounds 8–10: sc around for 3 rounds (56)
On the last stitch of round 10, change to Bigfoot (Dark Brown).
Forming the Center Crease (Rounds 11–13)
- Round 11: Working in the BLO, 14sc. Change to Teddy Bear and work in both loops, 7sc. Change to Bigfoot and work in the BLO, 34sc (56)
Note: the 7sc worked in Teddy Bear marks the front of the coffee bean and will help you place the eyes later.
- Round 12: Working in Bigfoot, 14th. Change to Teddy Bear, 7sc. Change to Bigfoot, 34slst.
On the last stitch of round 12, change to Teddy Bear.
- Round 13: Working in the BLO, 14sc. Working in both loops, 7sc. Working in the BLO, 34sc (56)
Shaping and Placing the Eyes (Rounds 14–18)
- Rounds 14–15: sc around for 2 rounds (56)
- Round 16: (dec)*3, 18sc, (dec)*5, 18sc, (dec)*2 (46)
- Round 17: sc around (46)
- Round 18: (dec)*2, 15sc, (dec)*4, 15sc, (dec)*2 (38)
Now insert your 18mm safety eyes between rounds 15–14 and rounds 9–8, using the gap between the two dark brown lines as your guide. Start stuffing the bean, adding more stuffing as you work. Shape it as you go so it stays long and rounded rather than spreading out too wide.
Closing the Bean (Rounds 19–22)
- Round 19: sc around (38)
- Round 20: (dec)*2, 12sc, (dec)*3, 14sc, dec (32)
- Round 21: (dec)*16 (16)
- Round 22: (dec)*8 (8)
Finish stuffing, then fasten off and leave a long tail. Close the gap along its length and whip stitch through the front loops of the four pairs of stitches. Weave in your ends. Do not worry if the right side of the bean sits slightly higher than the left, as that is exactly how a real coffee bean looks.
Assembly
Once your bean is stuffed and closed, a few finishing touches bring the face to life.
- Shape the eyes first. Using a 10 inch strand of Teddy Bear yarn, enter the side of the head and travel across the back of both eyes, tugging gently so a small loop settles above each eye. This creates that sleepy, content expression.
- Add the white highlights. With a 10-inch strand of white cotton, stitch a small loop beneath each eye so it catches the light, then weave the ends back into the body.
- Define the eyes with black. Using black cotton, place a short stitch just outside and below each eye to give it a defined corner, hiding your ends inside the bean afterward.
- Embroider the mouth. With a separate strand of black cotton, work a small mouth centered between the two eyes, spanning roughly two stitches for a tidy, happy smile.
Common Mistakes to Avoid
Keep an eye on these little pitfalls and your bean will turn out perfectly the first time.
- Skipping the stitch markers. In continuous rounds it is easy to lose your place. Drop a marker at the start of each round to keep your counts accurate.
- Stuffing too late. If you wait until the end to stuff, the narrow ends become hard to fill. Add stuffing gradually as the shape closes.
- Loose color changes. Changing color on the wrong pull-through leaves a smudge of the old shade. Always complete the swap on the final yarn under of the previous stitch.
- Eyes placed too early or unevenly. Use the brown crease lines as your reference and double-check symmetry before clicking the backs on, since safety eyes cannot be moved afterward.
- Over-widening the bean. Press and shape it as you stuff so it keeps that long oval silhouette instead of puffing into a ball.
Important Remarks
A few final reminders to make your crochet session smooth and enjoyable.
- Tension matters. Work your single crochets snugly so the stuffing never peeks through the gaps between stitches.
- Read ahead. Glance at the next round before you start it, especially around the color change rounds, so the transitions feel effortless.
- Make it your own. Lighter or darker browns, a tiny blush on the cheeks, or a small leaf on top can all give your bean a personal twist.
- Safety note. If this Crochet Coffee Bean Amigurumi is meant for a baby or very young child, swap the safety eyes for embroidered ones to keep it completely child safe.
Conclusion
And there you have it, your very own crochet coffee bean amigurumi ready to brighten up a desk, a shelf, or a keyring. What makes this little project so satisfying is how much character comes from such simple steps. The two-tone brown crease, the firm stuffing, and that gentle embroidered smile turn a handful of stitches into something genuinely charming. Take your time with the color changes and the eye placement, because those small details are what give the bean its personality. Once you have made one, you may find it hard to stop at just a single bean, and a whole little jar of them makes a wonderful handmade gift for any coffee lover in your life.