Stylish Crochet Easter Bunny Beginner Amigurumi Easy Pattern
Easter always feels like the perfect excuse to crochet something small, soft, and instantly smile-worthy, and this little bunny is exactly that. With plush yarn and a simple round shape, you will get that “tiny cuddle toy” look without complicated steps.
This Crochet Easter Bunny Beginner Amigurumi is designed for first-timers: a combined head and body, short arms and legs, tall upright ears with a sweet inner color, and an easy face using safety eyes, a tiny nose, and blush cheeks.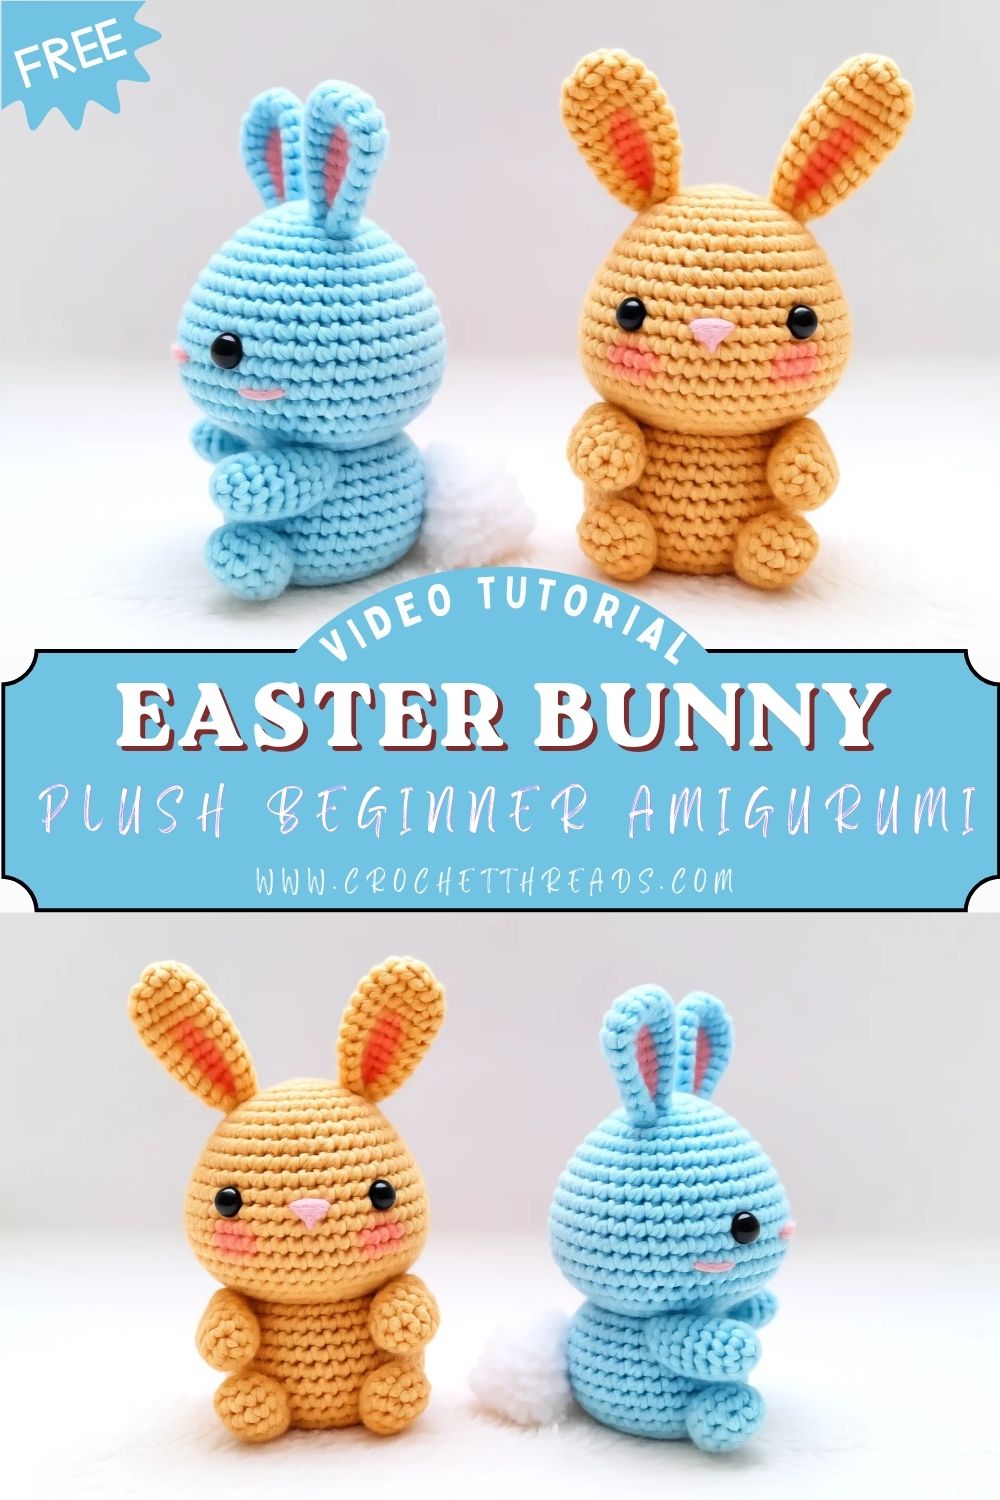
Amigurumi is the art of crocheting small stuffed figures using simple stitches, most often in a spiral. Because each piece is built with basic increases and decreases, an amigurumi project can feel calm and predictable. At the same time, the results look adorable and polished, even with beginner skills. Therefore, a beginner Amigurumi Crochet Easter Bunny is a cozy place to start.
Bunny plushies stay popular year after year, especially around Easter, because they instantly match the season’s gentle, happy mood. Additionally, long upright ears and tiny limbs create a “baby animal” look that feels extra cute in pastel colors. Most importantly, this beginner-friendly amigurumi bunny uses soft textures and simple shapes, so complicated details never get in the way. As a result, the finished toy looks plush, rounded, and gift-ready without stressful steps.
Materials Needed
- Yarn: Soft cotton or plush yarn in pastel shades (for example: baby pink, pale blue, soft yellow)
- Yarn weight: Worsted (4) in cotton or Super bulky (6) plush/velvet
- Hook size: 3.5 mm (for worsted cotton) or 5.0 mm (for plush yarn)
- Safety eyes: 8 mm black safety eyes (for a mini plush look)
- Stuffing: 30–40 g polyester fiberfill
- Stitch marker: 1 locking stitch marker (or a scrap of yarn)
- Tapestry needle: 1 blunt yarn needle
- Optional:
- Blush yarn/thread: light pink embroidery thread or thin yarn
- Keychain ring: 25 mm ring (if turning the bunny into a bag charm)
Skill Level
Beginner / Easy.
First, this pattern uses only single crochet, increases, and decreases. Next, each part is small, so practice happens quickly without long rounds.
Making Time (Overview)
Total time: 2–4 hours at a relaxed beginner pace.
Additionally, plush yarn may take slightly longer because stitches can be harder to see, so extra counting helps.
Step-by-Step Instructions
Stitches used: magic ring (MR), single crochet (sc), increase (inc), decrease (dec), slip stitch (sl st)
Notes: Work in continuous rounds unless stated. Use a stitch marker to track the first stitch of each round.
Body (3 Clear Steps)
1) Head + body shaping (round plush structure) — ~45–70 minutes
- Round 1: MR, 6 sc (6)
- Round 2: inc around (12)
- Round 3: (sc, inc) around (18)
- Round 4: (2 sc, inc) around (24)
- Round 5: (3 sc, inc) around (30)
- Round 6: (4 sc, inc) around (36)
- Rounds 7–10: sc around (36)
Next, begin gentle narrowing to form the lower part of the head.
8. Round 11: (4 sc, dec) around (30)
- Round 12: (3 sc, dec) around (24)
After that, the neck-to-body transition starts, keeping the bunny compact and plush.
10. Round 13: (2 sc, inc) around (32)
- Round 14: sc around (32)
- Round 15: (3 sc, inc) around (40)
- Rounds 16–18: sc around (40)
2) Increasing + forming a compact body — ~20–35 minutes
- Round 19: (3 sc, dec) around (32)
- Round 20: sc around (32)
- Round 21: (2 sc, dec) around (24)
- Round 22: sc around (24)
Meanwhile, start adding stuffing to keep the body evenly rounded.
3) Closing and stuffing — ~15–25 minutes
- Round 23: (sc, dec) around (16)
- Round 24: dec around (8)
Finally, stuff firmly but gently until the bunny feels plush (not stiff). Cut yarn, close the opening with a tapestry needle, and weave in the end.
Additional Parts
Ears (long, upright, slightly curved) — ~20–30 minutes total (make 2)
- Round 1: MR, 6 sc (6)
- Round 2: (sc, inc) around (9)
- Rounds 3–10: sc around (9)
- Round 11: (2 sc, inc) around (12)
- Rounds 12–15: sc around (12)
Next, flatten the ear and crochet the top closed with 6 sc through both layers, or simply leave open for easier shaping. After that, lightly stuff only the bottom third so the ears stand up yet stay soft. Leave a long tail for sewing.
Arms (tiny, rounded) — ~10–15 minutes total (make 2)
- Round 1: MR, 6 sc (6)
- Round 2: inc around (12)
- Rounds 3–4: sc around (12)
- Round 5: (2 sc, dec) around (9)
- Rounds 6–7: sc around (9)
Then, lightly stuff the hand area only. Fold the opening flat and close with 4–5 sc across. Leave a long tail for sewing.
Legs (small and balanced) — ~15–20 minutes total (make 2)
- Round 1: MR, 6 sc (6)
- Round 2: inc around (12)
- Round 3: sc around (12)
- Round 4: (2 sc, dec) around (9)
- Rounds 5–6: sc around (9)
After that, stuff more firmly than the arms so the bunny sits nicely. Fold flat and close with 4–5 sc across. Leave a long tail.
Tail (small fluffy ball) — ~5–8 minutes
- Round 1: MR, 6 sc (6)
- Round 2: inc around (12)
- Round 3: sc around (12)
- Round 4: (2 sc, dec) around (9)
- Round 5: dec around (5)
Next, add a pinch of stuffing. Then, close the opening and leave a tail for sewing.
Details / Face Features — ~10–20 minutes
1) Eyes placement
First, place 8 mm safety eyes between Rounds 8 and 9 of the head. Next, space them about 6–7 stitches apart for a gentle, cute look. After that, insert the washers inside and lock them securely before final stuffing.
2) Nose stitching
Then, stitch a tiny nose with pink yarn or embroidery thread, centered between the eyes and about 2 rounds lower. After that, add one short vertical stitch under the nose for a simple smile line.
3) Blush cheeks
Meanwhile, add blush using a light pink thread or a soft yarn scrap. Make a few small horizontal stitches under each eye, keeping both sides even. Finally, tug gently so the blush sits flat and subtle.
Face & Assembly — ~25–45 minutes
- Attach ears symmetrically
First, pin the ears on top of the head, slightly toward the sides, for a wide-eyed, baby-bunny vibe. Next, angle them so they stand upright with a slight outward curve. After that, sew around the base of each ear using small stitches. - Fix limbs evenly
Then attach the arms around the upper body area, roughly at Rounds 14–16, keeping them level. Next, sew the legs lower, around Rounds 20–22, so the bunny sits balanced. Meanwhile, check symmetry from the front before tightening the yarn. - Add tail neatly
Finally, sew the tail centered on the back, slightly above the bottom. After that, weave all the ends into the body and trim neatly.
Beginner-Friendly Tips
- Use stitch markers: First, mark the first stitch of every round to avoid losing count.
- Maintain even tension: Next, keep stitches snug so stuffing does not show through.
- Stuff gradually: After that, add small bits of fiberfill often, shaping the head and body as the rounds close.
Special Features
- Soft plush texture: Pastel yarn makes the bunny look sweet and giftable.
- Cute expression: Simple eyes, a tiny stitched nose, and blush cheeks create instant charm.
- Compact mini size: Small parts finish quickly, which keeps motivation high.
- Long bunny ears: Upright ears make the silhouette clearly “bunny,” even without extra details.
Sizing Tips
- Smaller hook = tighter stitches: First, size down by 0.5 mm for a firmer finish.
- Thicker yarn = bigger bunny: Next, swap worsted-weight yarn for plush yarn to create a chunkier plush. bunny
- Adjust size easily: After that, add 1–2 extra plain rounds in the head and body to make a slightly taller bunny.
Finishing Tips
First, smooth any lumps by gently pressing and rolling the stuffing inside. Next, hide all yarn ends by threading them through the body, then trim them after a short travel path. After that, tighten sewing stitches carefully so parts sit snug but not puckered. Finally, shape the ears by bending them slightly and pinching the base to achieve a neat, upright look.
Common Mistakes to Avoid
- Loose stitches: If gaps appear, switch to a smaller hook and tighten the tension.
- Overstuffing: Too much stuffing can stretch stitches and distort the round head.
- Misplaced eyes: Always preview eye placement with pins or temporary markers before locking.
- Uneven ears: Count rounds carefully, and pin both ears before sewing permanently.
Variations & Customization Ideas
- Different pastel colors: Try mint green, lavender, or creamy peach for a spring palette.
- Add a bow or scarf: Next, crochet a tiny bow tie or a simple chain scarf for extra charm.
- Turn into a keychain: After that, stitch a 25 mm ring between the ears for a cute bag accessory.
- Change facial expressions: Finally, tilt the smile line, add sleepy eyelids with thread, or use slightly larger eyes for a babyish look.
Tutor Suggestions FOR ( Crochet Easter Bunny Beginner Amigurumi)
First, focus on one piece at a time and celebrate each finished part, because small wins build confidence. Next, count stitches out loud or mark completed rounds on paper to stay relaxed. Meanwhile, if a round goes wrong, undoing a few stitches is normal and does not mean failure. Finally, keep practicing the same increase-and-decrease rhythm, since that repetition is exactly how amigurumi becomes easy.
Conclusion
A soft pastel bunny brings instant Easter warmth, especially when the shape is round, plush, and beginner-friendly. Because this Crochet Easter Bunny Beginner Amigurumi uses simple stitches and cute details, it stays fun from start to finish. Next, try one bunny in pink, then make another in blue or yellow for an adorable set. Finally, tuck the finished plush into a basket, add a tiny bow, and enjoy a handmade spring keepsake that looks sweet in any home.