Charming Crochet Flower Teacup Plush Amigurumi Pattern
Some crochet projects just make you smile, and this little flower teacup plush is one of them. It brings together a cozy mug, a sweet smiling face, and a blooming purple flower into one cuddly make.
Crochet Flower Teacup Amigurumi is having a moment, and this one earns its spot with charm to spare. You’ll shape a sturdy saucer, a rounded cup with sweet safety-eye features, a curved handle, and layered chain-stitch petals. The result is a desk-friendly plush that looks far trickier than it really is.
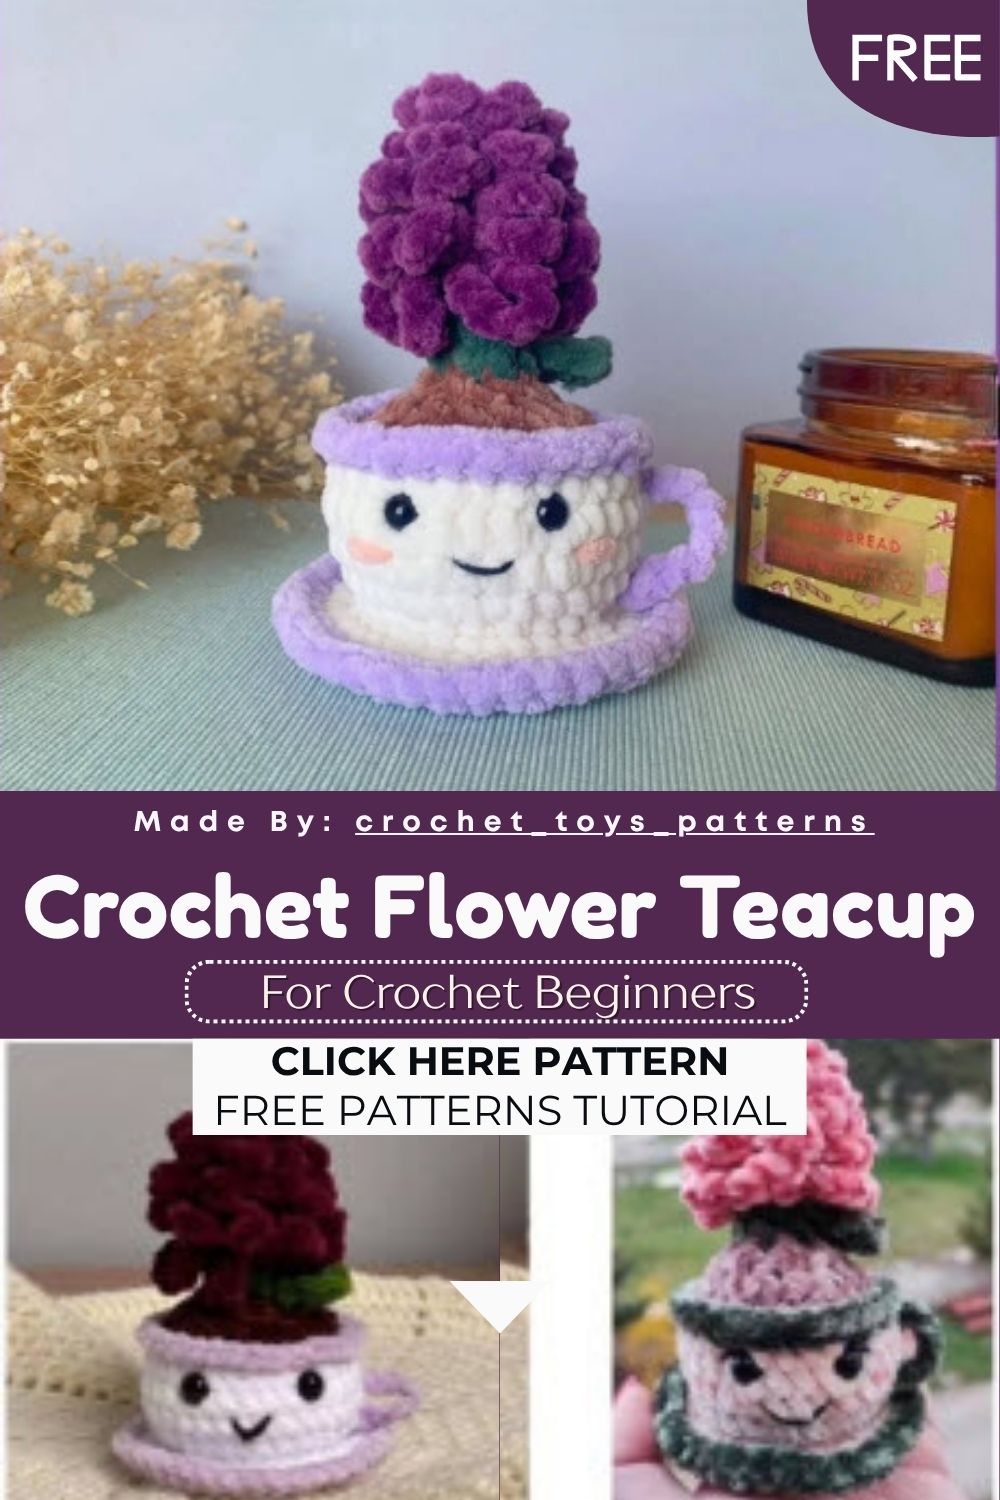
What makes this design extra special is how it balances cozy and whimsical. The soft chenille gives the cup a plump, huggable feel, while the cascading flower adds a playful pop of color. It works up surprisingly fast, uses only small amounts of yarn, and rewards you with a finished piece that feels handmade in the best possible way.
Why You’ll Love This Make
Instead of a dry rundown, here’s the heart of what makes this little Crochet Flower Teacup so satisfying to stitch:
- It builds upward in one connected flow. You start flat with the saucer, then crochet the cup directly onto its loops no separate pieces to seam together awkwardly.
- Loop-only stitches do the heavy lifting. Working into front or back loops is what creates those crisp ledges where the saucer meets the cup and where the flower blooms out.
- The face is forgiving. Safety eyes, a tiny embroidered smile, and a dab of pink blush give it personality in seconds.
- The flower is pure chain magic. Each petal is just a chain looped back into a stitch, repeated until your cup overflows with blossoms.
- It’s scrap-friendly. A few grams of chenille yarn in each shade is all you need, making it a perfect stash-buster.
Gather Your Materials
- Chenille yarn, size 6:
- Purple — 6 g
- Light purple — 5 g
- White — 7 g
- Brown — 3 g
- Green — 3 g
- Pink — less than 1 g
- Black fine yarn (for the mouth)
- 4 mm crochet hook
- 8 mm safety eyes
- Scissors
- Stitch markers
- Stuffing
- Sewing needle
Quick Abbreviation Key
- Mr — magic ring
- R — round
- [x] — total stitches in that round
- (1 sc, 1 inc) x n — repeat the bracketed sequence n times
- st — stitch
- sc — single crochet
- inc — increase (2 sc in 1 st)
- dec — decrease
- hdc — half double crochet
- dc — double crochet
- ch — chain
- FLO — front loop only
- BLO — back loop only
- FO — fasten off
- slst — slip stitch
Skill Level
Confident beginners will feel at home. You’ll lean on magic rings, loop-only stitches, and basic shaping nothing advanced, just a handful of familiar techniques layered into one fun project.
Techniques Worth Knowing
A couple of moves carry most of this pattern, so a quick heads-up makes them painless:
- Front-loop and back-loop work is what separates the saucer rim, the cup wall, and the flower base into clean tiers. When a round says FLO or BLO, work only into that single loop and leave the other one free. Those free loops become anchors for the next part.
- Joining onto a left loop is how the cup and flower begin. You’ll pull up a fresh loop right where you parked a stitch marker, so marking that spot accurately really matters.
- Stuffing as you go keeps the cup firm and round. Once you start the decreases, add stuffing in small handfuls before the opening gets too tight to reach.
The Pattern
Saucer
Begin with white yarn.
- R1: 8 sc in mr [8]
- R2: 8 in [16]
- R3: (1 sc, 1 inc) x8 [24]
- R4: in BLO (1 sc, 1 inc, 1 sc) x8 [32]
- R5: (3 sc, 1 inc) x8 [40]
- Change color to light purple.
- R6: 40 sc [40]
Invisible FO, cut the yarn short, and weave in the end. Place a stitch marker in the front loop of the first stitch of R4 for a later step.
Teacup
Pull up a loop with white yarn in the front loop of the first stitch of R4 of the saucer (where you left the marker).
- R1: 24 sc [24]
- R2: (2 sc, 1 inc) x8 [32]
- R3–5 (3 rounds): 32 sc [32]
- Change to light purple and cut the white yarn you’re done with it.
Place a stitch marker in the back loop of the first stitch of R6 for later.
- R6: in FLO 32 sc [32]
Invisible FO, cut the yarn, and weave in the ends. Insert the safety eyes between R4–5, four visible stitches apart, on the opposite side of the round from where you began it.
Now pull up a loop with brown yarn in the back loop of the first stitch of R6 (your marker).
- R7: (2 sc, 1 dec) x8 [24]
- R8: (1 sc, 1 dec) x8 [16] start stuffing firmly, and keep stuffing as you go
- R9: 8 dec [8]
- Change to green and cut the brown yarn.
- R10: in FLO 8 sc [8]
- R11–12 (2 rounds): 8 sc [8] –stuff as you go
The next four rounds are worked in BLO.
- R13–16 (4 rounds): in BLO 8 sc [8]
FO, then use a needle to pass through the back loop of each remaining stitch to close the hole. Weave in the end.
Handle
Pull up a loop with light purple yarn between R4–5, four stitches apart from the right eye. Chain 8, then slip stitch between R1–2. Cut the yarn and weave in the ends.
Place a stitch marker in the front loop of the first stitch of each round (R13 through R16) for the flower step.
Flower
Pull up a loop with purple yarn in the front loop of the first stitch of R13 (where you left a marker). You’ll work into all front loops from R13 to R16, plus the front loops left from closing the hole.
- Ch 7, slst in the same st, slst in the next st – repeat 7 more times (8 front loops from R13)
- Ch 6, slst in the same st, slst in the next st – repeat 7 more times (8 front loops from R14)
- Ch 5, slst in the same st, slst in the next st -repeat 7 more times (8 front loops from R15)
- Ch 4, slst in the same st, slst in the next st – repeat 7 more times (8 front loops from R16)
- Ch 3, slst in the same st, slst in the next st – repeat 7 more times (8 front loops from closing the hole)
FO, cut the yarn, and weave in the ends. Embroider a mouth between R3–4 with the black fine yarn, and add a touch of pink blush to the cheeks.
Leaf (optional)
Use green yarn.
- R1: in mr, work 1 sc, 1 hdc, 1 dc, ch 1, 1 hdc, 1 sc
After closing the magic ring, do not join it to the first stitch. FO and tighten the mMr Cut the yarn, leaving a tail to sew with. Stitch the leaf onto R10 (on the green stem) just above the handle.
Putting It All Together
The Crochet Flower Teacup mostly assembles itself as you stitch, but a few finishing touches bring it to life:
- Set the eyes before closing. Lock the safety eyes in firmly between R4–5 while the cup is still open. Once it’s stuffed, you can’t reach the back.
- Mind the marker side. Position the eyes on the side opposite your round’s starting marker so the seam stays at the back.
- Anchor the handle evenly. Counting four stitches out from the right eye keeps the handle balanced and natural-looking.
- Bloom from the base up. Work the petals tier by tier, longest chains first, so they cascade outward instead of bunching.
- Tuck the leaf last. Sew it on after the flower so you can angle it to peek out nicely above the handle.
Beginner Pitfalls to Dodge
- Working both loops on a FLO/BLO round. This buries the ledge you need for the next section. Always leave the unused loop free.
- Losing your markers. The cup and flower both start at marked stitches, so a missing marker means hunting for the right loop.
- Stuffing too late. Once the decreases tighten the opening, packing it firmly gets tough add a little at a time.
- Crowding the eyes. Four stitches apart looks just right; closer together makes the face feel pinched.
- Rushing the petals. Each chain length is intentional, so keep them for that layered, full-bloom look.
Maker’s Notes
- Chenille shows tension. Keep your stitches snug and even, since fluffy yarn hides mistakes but also shows loose gaps.
- Colors are yours to play with. Swap the purple flower for any shade of pastel, sunny, or bold all look lovely.
- The leaf is optional. Skip it for a simpler finish, or add a second one for a fuller stem.
- Count the color changes. A quick stitch check whenever you switch yarn saves frogging later.
- Display or gift. This plush sits happily on a shelf and makes a thoughtful handmade present.
Final Thoughts
There’s something quietly joyful about a Crochet Flower Teacup that can’t actually hold tea but warms you up anyway. With its rounded cup, cheerful face, and overflowing bloom, this little plush proves that a few grams of yarn can turn into a whole lot of personality. Take your time with the petals, enjoy watching the flower unfurl, and don’t be surprised if you end up making a matching set. Whatever shades you choose, your cozy crochet teacup is sure to bring a smile every time you spot it.