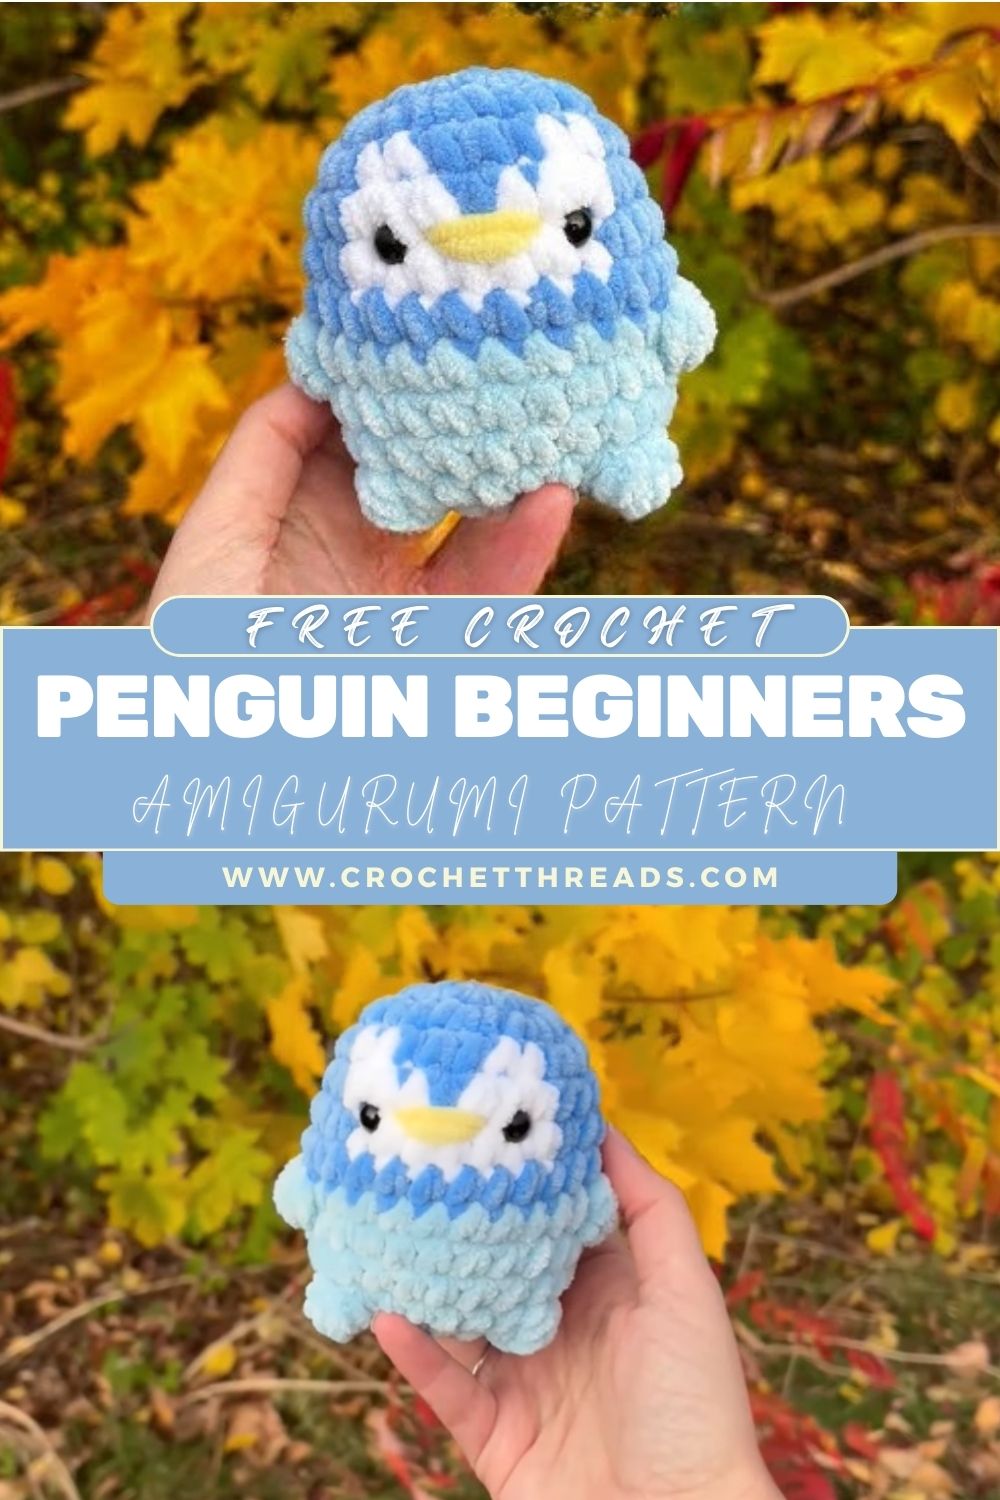
Crochet Penguin Beginners Amigurumi Pattern Step-by-Step
Want a cute crochet penguin pattern that looks like a soft plush toy? This amigurumi penguin is beginner-friendly, works up fast in chunky yarn, and includes a clear step-by-step pattern with helpful tips.
Amigurumi is the Japanese-inspired art of crocheting small stuffed toys, and it’s one of the best ways to learn shaping with simple stitches. If you’re following a soft plush-style beginner tutorial, a penguin is a perfect first “wow” project: it’s mostly round, forgiving, and endlessly customizable.
This amigurumi penguin design has that modern plush look people love:
- A small, rounded body with almost no neck (super beginner-friendly)
- Blue and light-blue tones for a cosy, wintery vibe
- A white facial patch that instantly reads “penguin”
- A tiny yellow beak
- Cute black safety eyes
- A chunky yarn texture that looks soft, fluffy, and huggable
Crochet penguins are popular because they make adorable gifts, nursery decor, desk buddies, and quick practice projects. They also offer that relaxing rhythm of amigurumi: rounds of single crochet, simple increases, and neat decreases. By the end, you’ll not only have a plush penguin—you’ll feel more confident reading patterns and shaping amigurumi.
Materials Needed
For the plush, chunky look (beginner-tutorial style), choose a soft, bulky yarn (chenille/velvet) if you can. You may also use standard acrylic; your penguin will simply look less “fluffy.”
- Blue yarn: main body/head
- Light blue yarn: lower body/accent
- White yarn: facial patch
- Yellow yarn: beak
- Crochet hook: 4.0 mm–6.0 mm (use smaller end for tighter stitches with chunky yarn)
- Fiberfill stuffing
- Safety eyes: 8 mm–12 mm (10 mm is a sweet spot)
- Yarn needle, scissors, stitch marker
Optional: black embroidery thread for extra mouth detail, felt circles for cheeks, or a small amount of orange yarn for the feet for a brighter contrast.
Skill Level
Beginner / Advanced Beginner
This pattern is written for beginners who can:
- Crochet in continuous rounds
- Make a magic ring
- Do single crochet, increase, and decrease
- Sew small pieces on neatly (basic assembly)
Plush/chunky yarn can make stitch definition slightly harder to see, but the shape is very forgiving—perfect for a first plush amigurumi.
Crochet Abbreviations
- MR = Magic Ring
- sc = single crochet
- inc = increase (2 sc in the same stitch)
- dec = decrease (single crochet 2 together; invisible decrease recommended)
- sl st = slip stitch
- ch = chain
- st = stitch
- FO = fasten off
Finished Size
Approximate finished size:
- 12–18 cm (5–7 in) tall using chunky yarn and a 5 mm hook
Size varies based on:
- yarn thickness (bulky vs worsted)
- hook size
- your tension and stuffing firmness
Design Overview (How This Plush Penguin Is Built)
This penguin is made with simple parts that suit beginners:
- Body (Head + Body combined): one rounded piece for a clean plush look
- Face patch: a white oval/circle sewn on the front
- Beak: tiny yellow triangle/oval sewn to the face patch
- Wings: small side flaps (easy, no complex shaping)
- Feet/Base: optional small flattened feet or a slightly flattened bottom so it sits
- Face details: safety eyes placed for a cute expression
Step-by-Step Crochet Pattern (Plush Amigurumi Penguin)
Pattern Notes (Read This First)
- Work in continuous rounds (do not join with sl st unless stated).
- Use a stitch marker to mark the first stitch of each round.
- For plush yarn, stitches can be hard to see, count carefully, and feel the bumps.
- Stitch counts are shown in ( ) at the end of each round.
Colour plan (suggested):
- Start with blue for the top (head)
- Change to light blue around the belly area for a soft two-tone look
A) Body (Head + Body Combined) – Blue + Light Blue
Start in Blue
Round 1: MR, 6 sc (6)
Round 2: inc around (12)
Round 3: (sc, inc) around (18)
Round 4: (2 sc, inc) around (24)
Round 5: (3 sc, inc) around (30)
Round 6: (4 sc, inc) around (36)
Rounds 7–9: sc around (36)
At this stage, you have a nice,e rounded head top. The penguin style is “no neck,” so we keep it smooth and continuous.
Change to Light Blue (Lower Body)
Do the last yarn-over of the final stitch in Round 9 with light blue to change colour or neatly.
Rounds 10–12: sc around (36)
Now we start tapering slightly toward the base so it looks like a plush, egg-shaped form.
Round 13: (4 sc, dec) around (30)
Round 14: sc around (30)
Round 15: (3 sc, dec) around (24)
Round 16: sc around (24)
Add Safety Eyes (recommended before closing)
Because plush yarn is thick, it’s easiest to insert eyes once the body is still open.
Eye placement guide:
- Place eyes between Rounds 8 and 9 (blue area), centred on the front.
- Space them about 6–7 stitches apart for a cute look.
- If you prefer a “baby” look, place eyes slightly lower/closer together.
Snap on the backs only after you’re happy with placement (or use felt/embroidery for child-safe options).
Stuffing Stage
Begin stuffing now:
- Stuff firmly enough to keep it round, but not so much that stitches stretch.
Round 17: (2 sc, dec) around (18)
Add more stuffing, especially around the lower sides, to keep the “plush egg” shape.
Round 18: (sc, dec) around (12)
Round 19: dec around (6)
FO, weave the ail through the maining stitches, and pull tight to close.
B) Face Patch (White) – Oval/Circle
This patch is sewn on the front and helps the penguin read clearly, especially in two-tone yarn.
Round 1: MR, 6 sc (6)
Round 2: inc around (12)
Round 3: (sc, inc) around (18)
Round 4: (2 sc, inc) around (24)
Round 5: sc around (24)
FO, leave a long tail for sewing.
Optional Oval Variation (more “penguin face”)
If you want it slightly oval instead of round:
- After Round 4 (24), work Round 5: (3 sc, inc) around (30)
- Then Round 6: sc around (30)
This creates a larger patch that covers more of the belly area.
C) Beak (Yellow) – Small Triangle/Oval
A simple beak that sits between the eyes, slightly low.
Round 1: MR, 4 sc (4)
Round 2: (sc, inc) around (6)
Round 3: sc around (6)
FO, leave a tail for sewing.
Pinched Beak Tip (easy shaping)
When sewing on, lightly pinch the beak into a tiny triangle by making a couple of stitches across the top edge.
D) Wings (Make 2) – Blue
Quick side flaps. These are purposely simple for beginners.
Round 1: MR, 6 sc (6)
Round 2: (sc, inc) around (9)
Rounds 3–4: sc around (9)
Round 5: (sc, dec) around (6)
FO, leave a tail for sewing.
Optional: Don’t stuff wings for a soft, floppy look.
E) Feet / Base Options (Choose One)
Option 1: No Separate Feet (Beginner-Simplest)
This is totally acceptable for plush penguins. To help it sit:
- When stuffing, make the bottom slightly flatter by pressing it gently on a table before fully closing.
Option 2: Tiny Feet (Make 2) – Yellow (or orange if you prefer)
Round 1: MR, 6 sc (6)
Round 2: sc around (6)
FO, leave the tail for sewing.
Flatten the feet slightly while sewing, so they look like little flippers.
F) Assembly (Quick Overview)
You’ll attach in this order for the cleanest look:
- Sew a face patch
- Sew beak
- Attach wings
- Attach feet (if using)
- Final check: eye alignment + expression
G) Face Details (Expression Tips)
- Eye height matters: Higher eyes look more “cute and curious.” Lower eyes look more “sleepy.”
- Beak placement: If the beak is too high, the penguin looks surprised. Slightly lower (but still centred) looks sweet.
- Optional: stitch a tiny “smile” under the beak with black thread (a short V or shallow curve).
12) Assembly Instructions (Step-by-Step, Beginner-Friendly)
Step 1: Position and Sew the Face Patch
- Pin or hold the white face patch on the front of the body.
- Place it so the top of the patch sits under the eyes, covering the mid-front.
- Sew around the edge using a whip stitch, catching stitches cleanly (try not to pull too tight).
Alignment tip: Look straight at the penguin from the front in good light. Adjust before you commit.
Step 2: Attach the Beak
- CCCentre theeak between the eyes.
- Place it slightly overlapping the top area of the white patch.
- Sew around the beak edge.
- Add a few extra securing stitches through the middle so it won’t lift.
Step 3: Attach Wings (Make it Symmetrical)
- Pin wings on each side of the body around the “midline,” slightly toward the front.
- Sew each wing along the top and side edge (leave the bottom edge free so it flaps).
Symmetry trick: Attach the first wing, then count stitches on the body to match the second wing’s placement.
Step 4: Attach Feet (Optional)
- Place feet on the lower front, spaced evenly.
- Sew firmly since feet take the most handling.
- Keep them slightly flattened.
Step 5: Final Expression Check
- Ensure eyes are level.
- Ensure the beak is centred.
- Press the plush gently to settle stuffing and shape.
Stuffing Tips (For a Smooth Plush Look)
- Use small bits of stuffing and build up gradually.
- For chunky yarn, overstuffing can stretch stitches. Keep it plush, not hard.
- Stuff more around the sides to keep a round silhouette.
- Flatten the base gently so it can sit (especially if you skipped separate feet).
Beginner Tips (Learn Faster + Neater Results)
Counting Stitches (Most Important Skill)
- Count each round before moving on.
- If you lose track, recount the last round—don’t guess.
- Use a stitch marker and move it every round.
Magic Ring Tips
- Keep the ring loose until you have all stitches in.
- Pull the tail firmly to close.
- If MR is frustrating, use the alternative: ch 2, 6 sc in the first ch (works fine for plush yarn).
Invisible Decrease (Cleaner Shaping)
Use invisible decreases to avoid bumpy “steps,” especially on the body:
- Insert hook into front loop of next stitch, then front loop of next stitch, yarn over, pull through, yarn over, pull through two.
Colour Change Tip (Neat Transition)
Change colour on the last yarn-over of the final stitch of the previous round. This keeps the line cleaner.
Customisationn Ideas (Make It Your Own)
- Different colors:
- Pastel penguin (lavender + white)
- Classic penguin (black + white + orange beak)
- Ice penguin (white + pale blue + silver accents)
- Keychain version: Use smaller yarn (DK) and a 2.5–3.0 mm hook; add a keyring loop at the top.
- Mini plush version: Stop increasing earlier (max 24 stitches instead of 36).
- Holiday theme: Add a tiny scarf, Santa hat, or earmuffs.
- Sleepy penguin: Embroider curved closed eyes instead of safety eyes.
Common Mistakes to Avoid
- Loose stitches/gaps: Stuffing may show through—use a smaller hook or tighten tension.
- Wrong stitch count: Causes lumps or a body that leans. Recount your rounds.
- Misplaced eyes: Always test placement before snapping backs on.
- Uneven stuffing: A lumpy bottom or dented sides can occur when stuffing isn’t distributed evenly.
- Face patch pulling: Sewing too tightly can cause the fabric to pucker—use gentle tension.
Care Instructions
- Spot clean with a damp cloth and mild soap.
- Plush chenille yarn can shed if scrubbed hard—dab gently.
- Air dry fully; reshape while damp.
- Store in a clean, dry place away from direct sunlight.
Child safety note: Safety eyes are not recommended for children under 3. Use embroidered or felt eyes instead.
Who Is This Pattern For?
This crochet penguin pattern is perfect for:
- Beginners learning amigurumi basics in a soft plush style
- DIY bloggers needing a cute, seasonal-friendly crochet project
- Gift makers (birthdays, baby showers, winter gifts)
- Etsy sellers looking for quick plush makes (see FAQ for selling guidance)
- Any crochet hobbyist who loves small, satisfying projects
Conclusion
A plush-style amigurumi penguin is one of the most rewarding beginner crochet projects: it’s mostly a single, simple shape, it teaches key amigurumi skills, and it looks adorable in chunky yarn. With the blue and light blue tones, soft white face patch, and tiny yellow beak, this penguin has a sweet, “cuddly” personality that fits any craft style, from minimalist to kawaii.
Take your time with the eye placement and face patch, keep your stitch counts steady, and you’ll end up with a penguin you’ll be proud to gift (or keep).