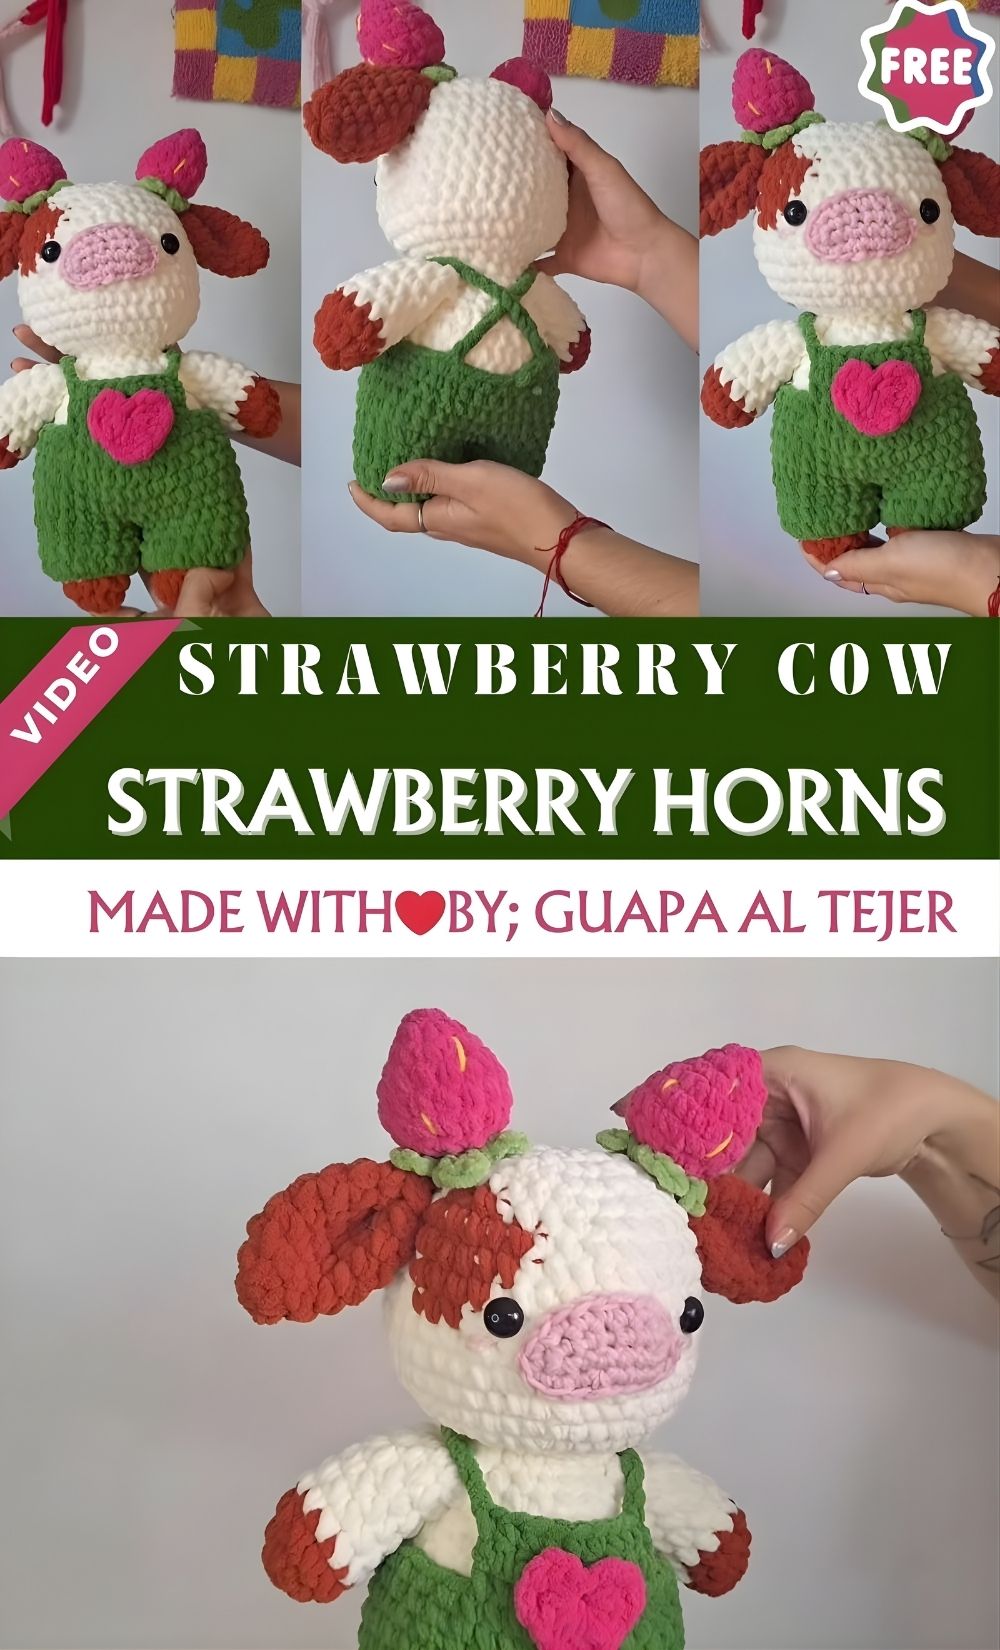
Crochet Strawberry Cow Amigurumi Pattern Plush Kawaii Strawberry Horns
If you love cute crochet animals, this crochet strawberry cow is about to become your new favorite project. With plush yarn, strawberry “horns,” and sweet little overalls, this Crochet Strawberry Cow Amigurumi is quick to make, extra cuddly, and totally gift-worthy.
The strawberry cow amigurumi trend blends two things crocheters adore: classic cow cuteness and kawaii strawberry vibes. This design features a soft plush body, rosy cheeks, and tiny strawberry-inspired horns that make it instantly recognizable and irresistibly sweet. Whether you’re making it for Valentine’s Day, a birthday, or as cozy nursery decor, this Crochet Strawberry Cow Amigurumi Pattern creates a handmade gift that feels thoughtful and modern. The shaping is beginner-friendly, but still fun for intermediate makers who want a polished, professional finish, especially with the overalls and heart applique.
Materials Needed
- Plush yarn (super bulky/chenille recommended):
- White (main body)
- Brown (spots, optional)
- Pink (muzzle, cheeks, heart, accents)
- Green (overalls + strawberry leaves)
- Crochet hook: 4.5 mm–6.0 mm (use what matches your yarn; most plush yarn works well with 5.0 mm)
- Safety eyes: 12 mm (or 10 mm for smaller cow)
- Fiberfill stuffing
- Yarn needle (tapestry needle)
- Stitch markers
- Scissors
- Optional: pink embroidery thread (smile/nostrils), blush, white felt (eye shine)
Crochet Abbreviations
- MR = Magic Ring
- sc = Single crochet
- inc = Increase (2 sc in one stitch)
- dec = Decrease (single crochet decrease / invisible decrease)
- sl st = Slip stitch
- ch = Chain
- BLO = Back loop only
- FLO = Front loop only
Notes:
- Work in continuous rounds unless stated otherwise.
- Use a stitch marker to mark the first stitch of each round.
- Plush yarn hides stitches—counting is key!
Strawberry Cow Amigurumi Pattern (Step-by-Step)
HEAD (white)
Start withana MR and crochet in continuous rounds.
R1: 6 sc in MR (6)
R2: inc x6 (12)
R3: (sc, inc) x6 (18)
R4: (2 sc, inc) x6 (24)
R5: (3 sc, inc) x6 (30)
R6: (4 sc, inc) x6 (36)
R7–R11: sc around (36)
Place safety eyes between R9–R10, about 7–8 stitches apart (adjust for your kawaii look).
R12: (4 sc, dec) x6 (30)
R13: (3 sc, dec) x6 (24)
R14: (2 sc, dec) x6 (18)
R15: (sc, dec) x6 (12)
Stuff firmly, shaping as you go.
R16: dec x6 (6)
Fasten off, close the hole.
MUZZLE / NOSE (pink)
Crochet in rounds; lightly stuff for a puffy muzzle.
R1: 6 sc in MR (6)
R2: inc x6 (12)
R3: (sc, inc) x6 (18)
R4: sc around (18)
Fasten off, leaving a long tail for sewing.
Optional nostrils: embroider two small vertical stitches onto the muzzle.
EARS (make 2: white + optional pink inner)
Outer ear (white):
R1: 6 sc in MR (6)
R2: (sc, inc) x3 (9)
R3: (2 sc, inc) x3 (12)
R4: sc around (12)
Fold the ear flat and sc 6 across to close. Fasten off with a sewing tail.
Optional inner ear (pink, make 2):
Ch 5
Round 1: sc in 2nd ch from hook, sc 2, 3 sc in last ch; working other side: sc 2, inc (10)
Fasten off and sew insidethe outer ear.
HORNS / STRAWBERRY TOP (make 2, pink)
These are strawberry-style little “horns” with a hint of shaping.
R1: 6 sc in MR (6)
R2: sc around (6)
R3: (sc, inc) x3 (9)
R4: sc around (9)
Lightly stuff.
Fasten off with a long tail for sewing.
Strawberry Leaves (green, make 2 small tops)
Ch 6, sl st in 2nd ch from hook, sc, hdc, dc, sl st.
Fasten off. Stitch leaves near the base/top of each horn for a strawberry vibe.
BODY (white)
R1: 6 sc in MR (6)
R2: inc x6 (12)
R3: (sc, inc) x6 (18)
R4: (2 sc, inc) x6 (24)
R5: (3 sc, inc) x6 (30)
R6–R9: sc around (30)
R10: (3 sc, dec) x6 (24)
R11: sc around (24)
R12: (2 sc, dec) x6 (18)
Stuff firmly—especially the bottom so it can sit.
R13: (sc, dec) x6 (12)
R14: dec x6 (6)
Fasten off, leave a tail to sew the body to the head.
ARMS (make 2, white)
R1: 6 sc in MR (6)
R2: sc around (6)
R3: (sc, inc) x3 (9)
R4–R6: sc around (9)
Lightly stuff just the hand end.
Flatten opening and sc 4 across to close.
Fasten off, leaving a sewing tail.
LEGS (make 2, white)
R1: 6 sc in MR (6)
R2: inc x6 (12)
R3–R4: sc around (12)
R5: (2 sc, dec) x3 (9)
R6–R7: sc around (9)
Stuff firmly. Flatten and sc 4 across to close.
Fasten off with a long tail for sewing.
Attaching legs tip: Sew legs to the bottom front of the body, spaced evenly so the cow can sit.
OVERALLS / CLOTHES (green)
This creates a ssimplee removable-looking overall style (but you’ll sew it on for neatness).
Overall “Shorts” (green)
Ch 22, join to form a ring with sl st (don’t twist).
R1: sc around (22)
R2: sc around (22)
Now split for two leg holes:
- sc 11, ch 1, skip remaining stitches by joining to the start of those 11 with sl st to form the first leg opening.
Repeat for the other 11 stitches to form the second leg opening. (Adjust if your stitch counts differ.)
Leg trim (each hole): attach yarn, sc around the opening (about 11–12 sc), sl st to join. Fasten off.
Bib (green)
Attach yarn to the front center of the shorts.
Row 1: ch 1, sc 6, turn
Row 2–4: ch 1, sc 6, turn
Fasten off.
Straps (make 2, green)
Ch 10–14 (fit to your cow), sl st to the top corners of the bib and secure at the back.
Sew a small stitch at the back so the straps stay put.
How to fit: Pin the overalls on the body first, then adjust the strap length before fastening.
HEART APPLIQUE (pink)
Ch 3.
Into the first ch: (3 dc, 3 tr, 3 dc), ch 1, sl st.
Fasten off, leaving a tail. Sewa heart onto the bib.
ASSEMBLY
- Sew muzzle centered on the head, slightly below the eyes. Lightly stuff the muzzle before fully closing.
- Embroider a smile (optional) under the muzzle in pink or brown.
- Attach horns/strawberries on top of the head, spaced evenly. Add green leaves at the base for the strawberry look.
- Sew ears to the sides of the head, slightly below horn level.
- Sew head to body using a whip stitch, aligning the face forward and keeping it stable (add extra stitches at the front/back).
- Attach arms to the sides of the body just under the head.
- Attach legs to the bottom front of the body, symmetrical for a sitting pose.
- Add brown spots (optional): stitch small brown ovals or circles onto the head/body, or crochet tiny circles and sew on.
- Put on/sew overalls neatly in place so they don’t shift.
STUFFING AND SHAPING
- Stuff in small pieces, pushing fiberfill into curves (cheeks, head sides, body base).
- For plush yarn, firm stuffing gives the best shape—especially the head, so the safety eyes don’t sink in.
- Shape as you go: pinch the head into a round ball and the body into a slightly oval “bean” so it sits well.
- Avoid overstuffing at closing rounds (it can stretch stitches and show gaps).
Helpful Tips for Beginners
- Count every round. Plush yarn hides stitches, so stitch counts keep your cow symmetrical.
- Use stitch markers (and move them each round). A second marker can help track eye placement.
- Stuff gradually—especially the head and muzzle—so you can shape without lumps.
- Pin before sewing. Use pins or spare yarn to “baste” parts in place and confirm symmetry.
- Invisible decreases (dec) look cleaner on amigurumi and reduce holes.
Styling Ideas
- Valentine’s gift: Add a mini heart garland or personalize with initials on the bib.
- Nursery decoration: Make it in pastel tones and place it on a shelf with other kawaii amigurumi.
- Kawaii desk toy: Use smaller safety eyes and add blush for an extra-cute expression.
- Handmade craft market item: Offer color options (pink strawberry, red strawberry, or even blueberry cow!) and sell as a “crochet plush cow pattern” inspired plushie lineup.
Conclusion
This Crochet Strawberry Cow Amigurumi Pattern is the perfect blend of cozy plush texture and kawaii charm. If you’ve been wanting a cute crochet animal that’s fun to make and impossible not to hug, this little strawberry cow is it. Save the pattern, pick your plush yarn, and enjoy every adorable stitch!