Fabulous Cute Crochet Cat Amigurumi Pattern Step‑by‑Step Beginners
If you love tiny plushies, this crochet cat amigurumi is going to steal your heart, with an orange kitty with big eyes and sweet contrast details. It’s an easy beginner crochet tutorial that works up quickly, and this guide will walk you through clear, beginner-friendly steps from head to tail (and all the cute face details).
This project is an adorable DIY crochet cat plush inspired by the orange amigurumi cat shown in the reference: a round, cuddly body, oversized eyes, and little accents that make it extra expressive, especially the light blue under‑eye circles and contrasting ear color. The result is a charming little handmade crochet toy you can gift, display on a shelf, or keep as your own pocket-sized crochet buddy.
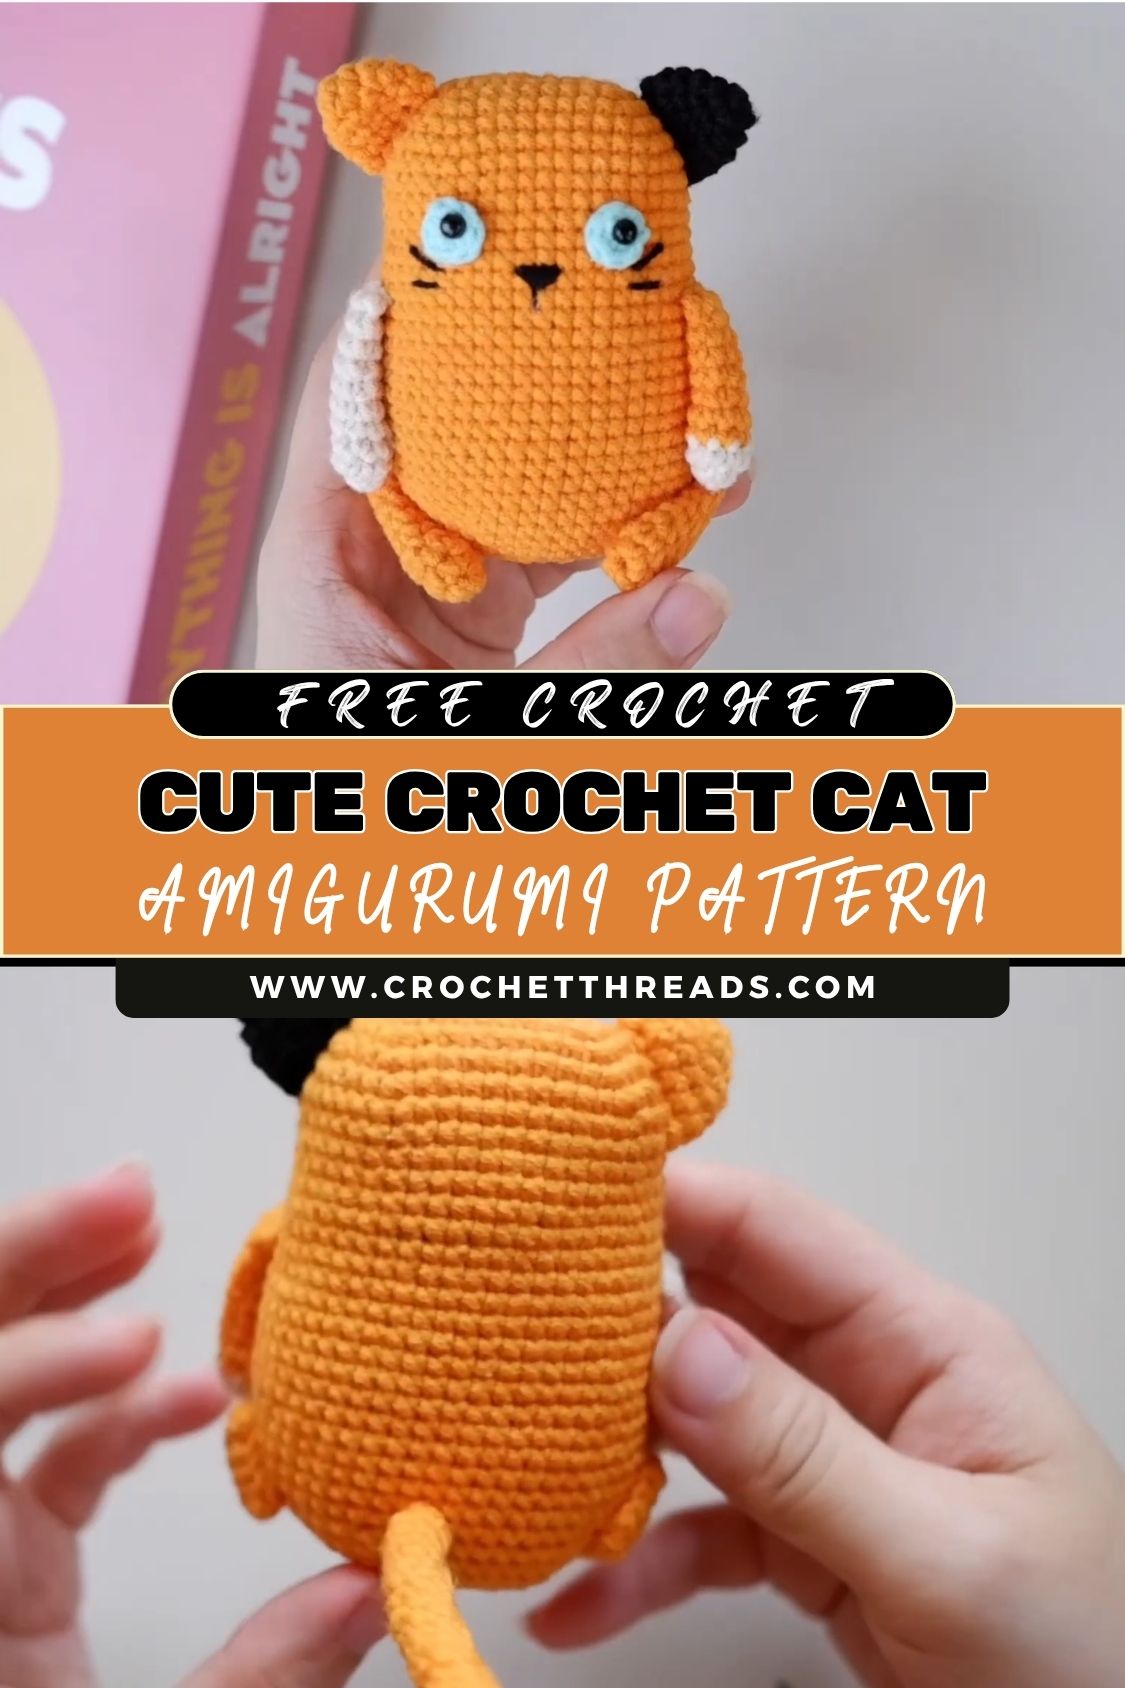
What makes this easy crochet pattern so fun is that it uses simple shapes and basic stitches—mostly single crochet, increases, and decreases. That’s why it’s perfect as a beginner crochet toy: you’ll practice amigurumi fundamentals (working in continuous rounds, stuffing smoothly, and assembling parts neatly) without complicated construction.
In this article, you’ll learn the full step‑by‑step instructions for crocheting the head, body, ears, arms, legs, and face. You’ll also get tips for adjusting the size, keeping stitches tight, and swapping safety eyes for embroidery if you’re making this for small children.
Materials List
To match the look of the cat (orange with bold facial accents), gather:
Yarn Colors
- Orange yarn (main cat color)
- White yarn (muzzle highlight or small accents, optional)
- Light blue yarn (under‑eye circles)
- Black yarn (whiskers, nose/mouth embroidery, optional eye outline)
- Contrasting ear color (could be white, cream, or a lighter orange—depending on the look you want)
Tools & Notions
- Crochet hook: 2.5 mm–4.0 mm
(Use a smaller hook than the yarn label suggests for tighter amigurumi stitches.) - Safety eyes (8–12 mm depending on your yarn size) or black embroidery thread/yarn
- Fiberfill stuffing
- Tapestry needle (yarn needle)
- Stitch markers (or a scrap of yarn)
- Scissors
Crochet Abbreviations
- sc — single crochet
- ch — chain
- sl st — slip stitch
- inc — increase (2 sc in same st)
- dec — decrease (sc 2 together; invisible decrease recommended)
- st(s) — stitch(es)
Pattern notes
- Work in continuous rounds (spiral crochet) unless otherwise stated.
- Use a stitch marker to track the first stitch of each round.
- Numbers in parentheses at the end of a round show the total stitch count.
Step‑by‑Step Crochet Cat Pattern
Head (Orange)
A classic amigurumi sphere makes a cute, clean head.
- Rnd 1: Magic ring, 6 sc (6)
- Rnd 2: inc x6 (12)
- Rnd 3: (sc, inc) x6 (18)
- Rnd 4: (sc 2, inc) x6 (24)
- Rnd 5: (sc 3, inc) x6 (30)
- Rnd 6: (sc 4, inc) x6 (36)
- Rnd 7–10: sc around (36) for 4 rounds
Add eyes before closing
- Place safety eyes between Rounds 8 and 9, about 6–7 sts apart (adjust for your preferred “cute factor”).
- If using embroidered eyes, wait until the face section.
- Rnd 11: (sc 4, dec) x6 (30)
- Rnd 12: (sc 3, dec) x6 (24)
- Start stuffing firmly, shaping as you go.
- Rnd 13: (sc 2, dec) x6 (18)
- Rnd 14: (sc, dec) x6 (12)
- Add more stuffing.
- Rnd 15: dec x6 (6)
- Fasten off, close the opening, and weave in ends.
Body (Orange)
You can sew the body to the head later (beginner-friendly), or crochet as one piece. Here’s the separate-body method.
- Rnd 1: Magic ring, 6 sc (6)
- Rnd 2: inc x6 (12)
- Rnd 3: (sc, inc) x6 (18)
- Rnd 4: (sc 2, inc) x6 (24)
- Rnd 5: (sc 3, inc) x6 (30)
- Rnd 6–9: sc around (30) for 4 rounds
- Rnd 10: (sc 3, dec) x6 (24)
- Rnd 11: (sc 2, dec) x6 (18)
- Stuff the body (firm but not overstretched).
- Rnd 12: (sc, dec) x6 (12)
- Rnd 13: dec x6 (6)
- Fasten off, close, weave in ends.
Ears (Make 2)
These are small triangles with a cute contrast inner-ear option.
Outer ear (Orange) — Make 2
- Rnd 1: Magic ring, 4 sc (4)
- Rnd 2: (sc, inc) x2 (6)
- Rnd 3: sc around (6)
- Rnd 4: (sc 2, inc) x2 (8)
- Fasten off, leave a sewing tail. Flatten.
Inner ear (Contrast color, optional) — Make 2
- Ch 4, sc in 2nd ch from hook and across (3)
- Fasten off, sew onto the center of the ear.
Attach ears
- Sew ears on top of the head, slightly angled outward.
- Pin first to ensure symmetry.
Arms & Legs
Arms (Make 2, Orange)
- Rnd 1: Magic ring, 6 sc (6)
- Rnd 2–5: sc around (6) for 4 rounds
- Lightly stuff (optional), flatten the opening.
- Fasten off, leave a long tail for sewing.
Legs (Make 2, Orange)
- Rnd 1: Magic ring, 6 sc (6)
- Rnd 2: (sc, inc) x3 (9)
- Rnd 3–4: sc around (9) for 2 rounds
- Stuff lightly, flatten.
- Fasten off, leave a tail.
Attach limbs
- Sew arms to the sides of the body around the upper-mid area.
- Sew legs to the bottom front so the cat can sit upright.
Eyes & Face Details (Light Blue + Black + White)
These details create the “big-eyed” look.
Under‑eye circles (Make 2, Light Blue)
- Rnd 1: Magic ring, 6 sc (6)
- Rnd 2: inc x6 (12)
- Slip stitch to finish, fasten off with a sewing tail.
Attach: Sew one circle beneath each eye (or position them so the eyes sit partly on top of the blue circles, depending on the style you want).
Muzzle (Optional, White)
If you want a little snout highlight:
- Rnd 1: MR, 6 sc (6)
- Rnd 2: (sc, inc) x3 (9)
Fasten off, lightly stuff (optional), and sew to the lower face.
Embroider nose, mouth, whiskers (Black)
- Nose: small triangle or short vertical stitch centered on the muzzle area
- Mouth: a small “Y” or two tiny curves
- Whiskers: 2–3 short lines per cheek
Keep whiskers short so they don’t snag.
Assembly (Sewing It Together Neatly)
- Head to body: Sew the head centered on top of the body using tight whip stitches.
- Ears: Attach securely on top, matching height and angle.
- Arms & legs: Sew symmetrically—pin first, then stitch.
- Face pieces: Sew the blue circles (and the muzzle, if used), then embroider the features.
- Weave in ends: Run the yarn tails through the inside of the piece, then trim.
Shape-check tips
- Gently roll the head and body between your palms to smooth the stuffing.
- If the head tilts, remove a few stitches and resew—this one change makes a big difference.
Tips & Tricks (Beginner-Friendly)
- Adjust the size:
Use thicker yarn and a larger hook for a larger plush, or thinner yarn and a smaller hook for a mini cat. Keep the same stitch counts for the same proportions. - Crochet tightly for a firm surface:
Amigurumi looks best with tight stitches. If you see stuffing through gaps, go down a hook size. - Safety eyes alternative (kid-safe option):
For babies/toddlers, skip safety eyes and embroider eyes with black yarn. You can add a tiny white highlight stitch to make them look shiny. - Make it extra polished:
Add a thin black embroidered line above the eyes for “eyelids” or a tiny blush dot with pink yarn.
Conclusion
This crochet cat amigurumi is a sweet, satisfying make that’s perfect if you want a cute plush without complicated shaping. With this step‑by‑step crochet cat pattern, you’ll practice core amigurumi skills and end up with a lovable DIY crochet cat that works beautifully as a handmade gift idea. If you try this easy beginner crochet tutorial, share your finished cat (and your color choices!) and explore more patterns to build your own collection of adorable handmade crochet toy projects.