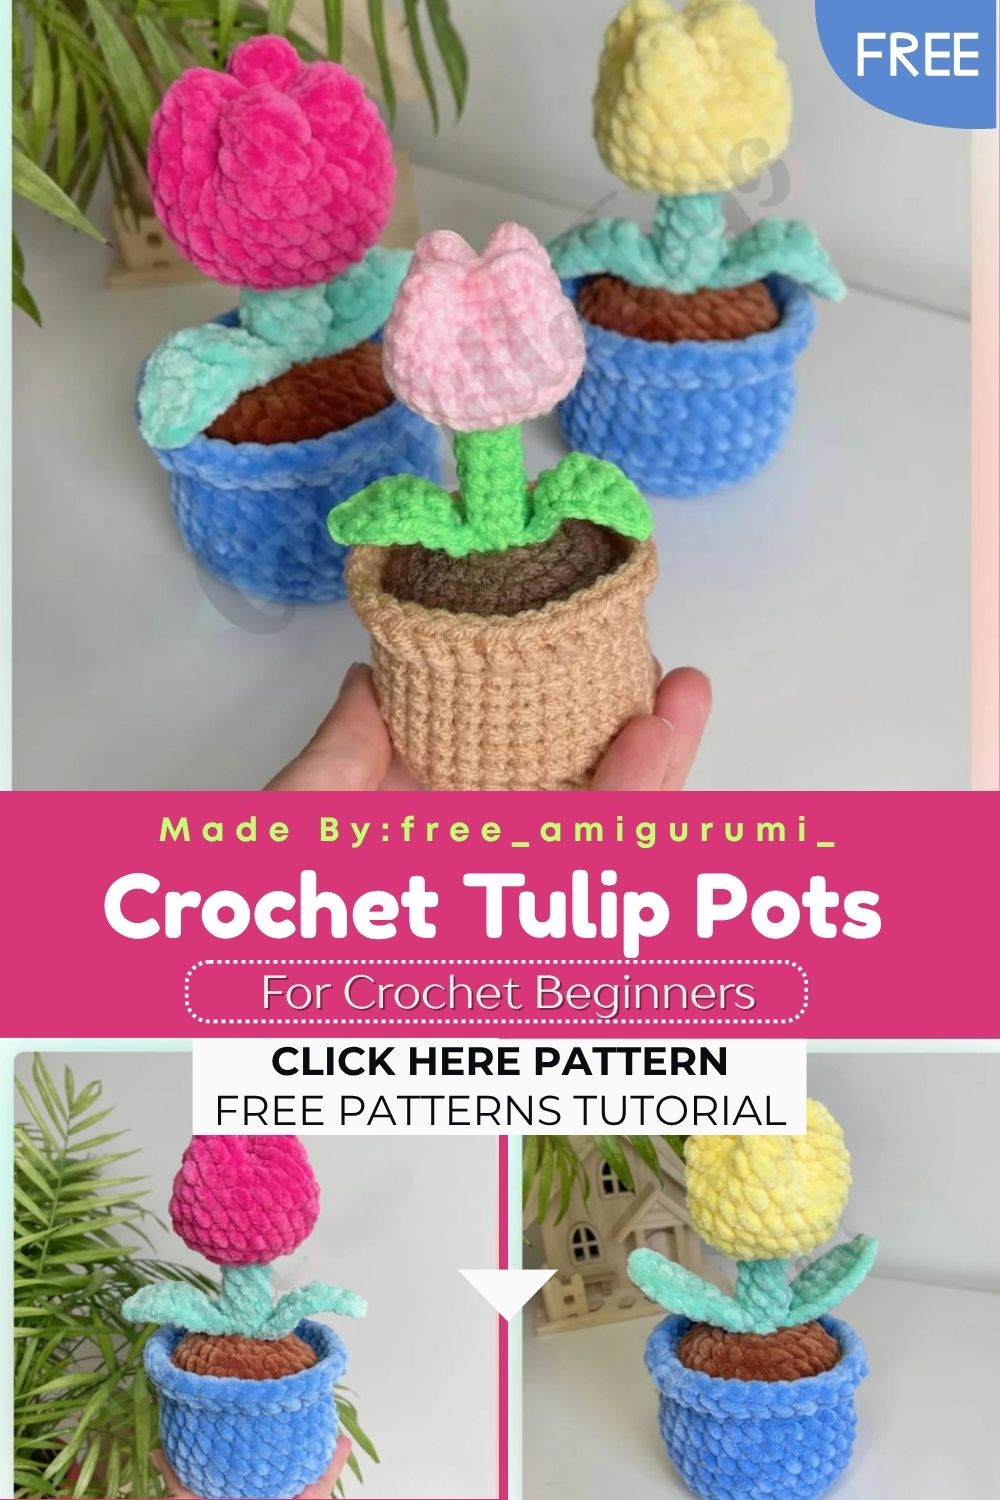
These Mini Crochet Tulip Pots Make Perfect Gifts – Free Pattern
A blue pot, a brown soil top, two green leaves, and a pink bloom on a chunky stem, this little planter is the handmade gift nobody expects, but everyone wants!
There is something genuinely satisfying about making a plant that never needs watering. This mini tulip pot combines several separate pieces into one cohesive scene. The pot uses a back loop only round to create a natural rim edge. Meanwhile, the soil disc sits right inside the pot opening. The stem rises from that base in green, then transitions smoothly into a pink bud at the top. Two small leaves worked along a foundation chain attached to the stem on either side. Together, the whole thing looks like a proper potted tulip sitting on a shelf.
Skill Level
Easy to intermediate. Basic increases, back loop and front loop techniques, and color change between stem and bud are the main skills involved. Additionally, the foundation chain leaf construction uses a mix of hdc, dc, and tr stitches that are easy to follow once practiced.
Materials You Will Need
Yarn:
- Blue plush yarn for the pot — Chenille Home Slim by Loops and Threads
- Brown chenille yarn for the soil
- Green Sweet Snuggles Lite yarn for the stem and leaves
- Pink Sweet Snuggles Lite yarn for the bud
Other Supplies:
- Crochet hook — 5mm
- Polyfill stuffing
- Cardboard or plastic circle (6cm diameter) for the pot base
- Stitch markers
- Yarn needle
- Scissors
Finished size: Approximately 16.5cm long with a 7cm diameter pot when using the listed materials.
Abbreviations
- MR — Magic Ring
- SC — Single Crochet
- INC — Increase
- DEC — Decrease
- HDC — Half Double Crochet
- DC — Double Crochet
- TR — Treble Crochet
- CH — Chain Stitch
- (…) x N — Repeat N times
- SLST — Slip Stitch
- FO — Fasten Off
- BLO — Back Loop Only
- FLO — Front Loop Only
- BPSC — Back Post Single Crochet (optional alternative)
Pattern: Pot
Using blue plush yarn
R1: 6 sc in MR (6) R2: 6 inc (12) R3: (1sc, inc) x6 (18) R4: (2sc, inc) x6 (24) R5: (3sc, inc) x6 (30)
R6: BLO 30 sc (30)
This back loop only round creates the natural flat base edge of the pot. Alternatively, you can use BPSC here for a similar textured result.
R7–12: 30 sc for 6 rounds (30)
R13: FLO 29 dc, 1 sc. Close the row and fasten off.
This final front loop-only round creates the decorative rolled rim at the top of the pot. Work slowly around this round and check that the dc stitches sit evenly before fastening off.
Cut a 6cm cardboard or plastic circle and place it at the bottom of the pot before filling with stuffing. The rigid base keeps the pot sitting flat and stable on any surface.
Pattern: Soil
Using brown yarn
R1: 6 sc in MR (6) R2: 6 inc (12) R3: (1sc, inc) x6 (18) R4: (2sc, inc) x6 (24) R5: (3sc, inc) x6 (30)
Slip stitch to close. Leave a long tail for sewing.
Find the back loops of R13 on the pot. Sew the soil disc into the pot opening at this position. The brown surface sitting inside the blue rim looks exactly like a real potted plant once assembled.
Pattern: Leaves Make 2
Using green yarn
Chain 8. Starting from the second chain from the hook, work along the chain:
hdc, dc, tr, tr, tr, dc, hdc
Pull out the thread and leave a tail for sewing the leaf to the stem. The graduated stitch heights create a naturally pointed leaf shape that tapers from the base to the tip.
Pattern: Stem and Bud
Starting with green yarn
R1: 6 sc in MR (6)
R2–6: 6 sc for 5 rounds (6)
On the last stitch of R6, change color to pink yarn.
R7: 6 inc — in this pattern 1 inc equals 3 sc (18)
R8: (2sc, inc) x6 (24)
R9–14: 24 sc for 6 rounds (24)
Slip stitch to close. Leave a tail of approximately 15 to 20 cm.
Add stuffing to the stem section, keeping it firm. Add a small amount of stuffing to the bud at the top, keeping it light so the bud shape remains soft rather than stiff.
Connect the sides of the bud crosswise using the long tail to cinch and shape the top of the bud into a naturally closed tulip shape.
Assembly
Sew both leaves onto the stem at a symmetrical position, one on each side. Angle them slightly outward and upward for the most natural plant appearance.
Sew the completed stem and bud unit into the center of the soil disc, pushing the base of the stem securely down into the stuffed pot and anchoring it with several stitches on all sides.
Customization and Variation Ideas
- First, swap the pink bud for deep red or soft lavender for a completely different tulip variety using the same construction throughout.
- Additionally, make a small collection of three pots in different colors: yellow, white, and coral, and display them together as a handmade windowsill garden.
- Moreover, try making the pot in terracotta orange instead of blue for a more realistic potted plant aesthetic that suits earthy home decor perfectly.
- Furthermore, add extra leaves by making three or four instead of two for a fuller, more lush stem arrangement.
- Also, use a scrap of white felt cut into tiny petal shapes and glued around the bud for a more dimensional flower effect at the very top.
- Finally, make the pot in a smaller size using finer yarn and a 3mm hook for a miniature version perfect for dollhouse displays or tiny shelf decorations.
Common Mistakes to Avoid
- First, skipping the cardboard base: The pot without a rigid base tends to tip sideways on flat surfaces. Cut the cardboard circle before assembling, so it is ready to insert before the soil is sewn in place.
- Additionally, working R6 in both loops instead of back loops only: This round must be BLO to create the flat base ridge. Working both loops removes the texture that defines the bottom edge of the pot.
- Also, working R13 in both loops instead of front loops only: The decorative rim depends entirely on the FLO construction. The dc stitches worked in FLO curl forward naturally to create the rolled pot rim effect.
- Furthermore, overstuffing the bud: A bud that is too firmly stuffed loses its soft, slightly closed tulip shape. A small amount of light stuffing is all that is needed for the bud section.
- Moreover, leaving the leaf tails too short: Each leaf needs a generous sewing tail to attach securely to the stem. Cut at least 15 to 20cm before beginning the leaf chain.
- Finally, sewing the stem without centering it first: Pin the stem base to the center of the soil disc before committing to any stitches. An off-center stem is the most immediately noticeable finishing error on this piece.
Finishing Tips
- First, when cinching the bud crosswise at the top, pull the yarn gradually and evenly from multiple angles rather than pulling hard from one direction. This creates the most natural closed bud shape.
- Additionally, press each leaf lightly between your fingers after completing it to encourage the foundation chain to lie flat and the graduated stitches to curve naturally.
- Moreover, when sewing the soil disc into the pot, work a running stitch around the entire perimeter rather than just a few anchor points. This keeps the disc sitting flat and stable inside the rim.
- Furthermore, weave every yarn end through at least three direction changes before trimming. Plush and chenille yarns both shed more easily than standard acrylic and need extra securing.
- Also, after full assembly, place the pot on a flat surface and check from all angles that the stem sits vertically before the final stitches are tightened. Adjusting at this stage is far easier than after the yarn is knotted.
- Finally, photograph the finished tulip pot beside a real plant or on a windowsill for the most natural and appealing product-style presentation.
Gifting Ideas
- First, wrap the finished pot in a small square of tissue paper secured with a ribbon for a presentation that mimics a real florist’s gift without any elaborate packaging.
- Additionally, make a pair of tulip pots in two different bud colors and present them together as a coordinated set for a Mother’s Day or housewarming gift.
- Moreover, these make wonderful teacher appreciation gifts, especially displayed on a small wooden tray with a handwritten note tucked underneath.
- Furthermore, gift a tulip pot alongside a small packet of real flower seeds for a gift that says the same thing in two completely different ways.
- Also, make a matching set of five pots in spring colors and sell them as a bundle at craft markets. Potted plant amigurumi attract a consistent and enthusiastic audience at any seasonal fair.
- Finally, attach a small handwritten care card that playfully lists instructions for the plant: water it never, repot it never, enjoy it always. This is a gift detail that always gets a genuine laugh.
Conclusion
This little tulip pot genuinely delivers more visual impact than the stitch count suggests it should. The cardboard base, the rolled rim detail, and the color-change stem-to-bud transition all work together to create something that reads as a complete, cohesive object rather than just an assembled collection of crocheted pieces. Therefore, get that cardboard circle cut before starting, work your BLO and FLO rounds carefully, and take your time cinching the bud shape at the top. In conclusion, this little pot is ready to sit on a shelf and make people do a double-take every single time.
Happy crocheting! Cannot wait to see your tulip pot in bloom.