
Sparkling Crochet Vest Top Easy Everyday Wear Pattern for Beginners
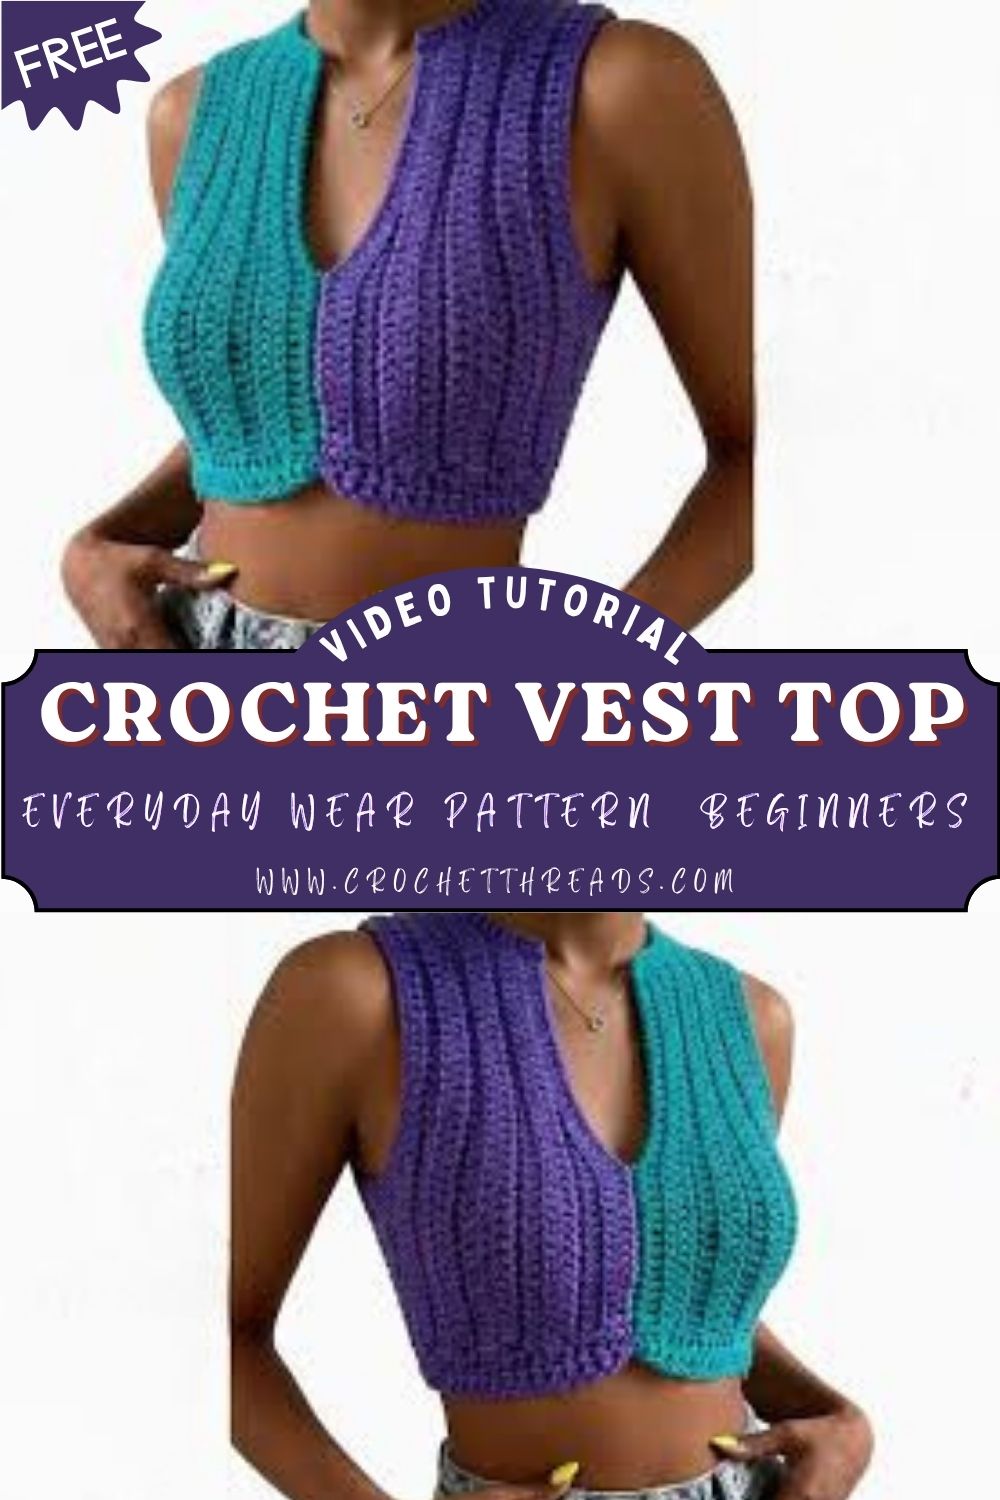
Bold color blocking and a deep V-neck can make a simple handmade piece look straight off a boutique rack. That’s exactly the vibe of this ribbed crochet vest top: clean, modern, and wearable.
Trendy handmade vest tops are popping up everywhere in modern crochet fashion, and this beginner-friendly pattern is a fun way to join in without feeling overwhelmed.
Crochet isn’t staying tucked away in “crafty” corners anymore; it’s leading the handmade fashion trend. Social feeds, summer markets, and even high-street styling are full of crocheted tanks, vests, and textured tops that look fresh and intentional.
A vest top is also one of the easiest garments to wear. In warm months, it’s a breezy standalone piece. When the weather cools down, it layers beautifully over a fitted tee, a crisp button-up, or even a slim turtleneck. That makes it a year-round project, not a “one-season” make.
Most importantly, this style hits that sweet spot: comfort + style. Ribbing gives stretch and a body-hugging fit without needing complicated shaping. The result feels snug and flattering, while still soft enough for everyday wear.
What Makes This Vest Top Special
This design is inspired by the provided image and tutorial structure, featuring a look that’s on-trend but still totally approachable for beginners:
- Ribbed texture that creates clean vertical lines and a stretchy feel
- Sleeveless cropped fit that pairs well with high-waisted jeans, skirts, or shorts
- Deep V neckline for a modern, slightly dressy silhouette
- Two-tone color blocking (purple + teal) for that bold, playful contrast
- Stretchable, body-hugging look thanks to simple ribbing techniques
The best part: it’s built from straightforward panels, so you can focus on getting a neat fabric and a great fit rather than wrestling with complicated garment construction.
Materials Needed
Yarn (medium weight / worsted or light worsted):
- Color A (example: purple): 150–220 g / 250–400 m
- Color B (example: teal): 150–220 g / 250–400 m
Total estimate: 300–440 g / 500–800 m depending on size and length
Hook:
- 3.5 mm to 5.0 mm (choose the size that gives a flexible ribbed fabric that stretches nicely)
Notions:
- Yarn needle (for seaming and weaving ends)
- Stitch markers (at least 4)
- Measuring tape
- Scissors
Helpful optional tool: a row counter (ribbing can be repetitive in the best way).
Skill Level
Beginner to Easy
Perfect for crocheters who know basic stitches and want their first wearable that looks polished.
Abbreviations
- ch = chain
- sc = single crochet
- hdc = half double crochet
- dc = double crochet
- sl st = slip stitch
Time Planning (Overview)
- Front panel: 2–3 hours
- Back panel: 2–3 hours
- Joining & edging: 1–2 hours
Total: 5–7 hours
Time varies based on size, yarn thickness, and how often you stop to admire the color blocking.
Pattern Instructions
Size + Fit Notes (Quick but Important)
This vest top is worked as two main panels (front and back) using ribbing. You’ll get the best fit by measuring as you go.
Key measurements to aim for:
- Width: Bust measurement (around fullest part) minus 2–6 cm for negative ease (ribbing stretches).
- Length: Cropped length typically 35–45 cm, or adjust to preference.
A simple approach: crochet the panel width to match half your bust, minus a small amount, so it hugs nicely.
Front Panel (Ribbed Section)
1) Create the ribbing height (from the bottom to the top of the fabric).
Chain to the desired vest height, from the hem to the underarm. For a cropped look, this is often around 30–40 chains, but your yarn and hook will change the exact number. Add 1 turning chain if using sc ribbing.
2) Work ribbing rows using a loop technique.
Ribbing is typically made by working into the back loop only (BLO) (or front loop only) so the fabric forms raised ridges.
- Row 1: Work sc (or hdc for thicker ribs) across the chain.
- Row 2 onward: Turn, ch 1, then sc BLO across.
Keep going until the panel width reaches the measurement you need for half the width of your body (from the side seam to the center front).
3) Mark the armhole height.
Once the front panel reaches your desired underarm point, place stitch markers at both sides to remind you where armhole shaping begins. Many beginners skip this and regret it later—markers make everything calmer.
Shaping the V Neck (Gradual and Clean)
The front panel is split into two halves, so the V-neckline forms neatly.
1) Find the middle.
Fold the panel in half (widthwise) and mark the center. This is where the V will dip.
2) Work each side separately.
Continue ribbing, but now you’ll stop short at the neckline edge on every few rows to create a diagonal line.
A beginner-friendly method:
- On the neckline edge, decrease 1 stitch (or simply turn early by 1 stitch) every 2–4 rows, depending on how deep and wide you want the V.
- Keep the armhole edge straight so the side seam stays crisp.
3) Check V depth as you go.
Hold the panel up to your body (or a similar-fitting top) to see where the V lands. A deep V looks modern, but it should still feel comfortable when worn.
Repeat for the second half of the front, mirroring the shaping so both sides match.
Back Panel
The back panel is made using the same ribbed stitch, but without neckline shaping.
- Chain the same starting length as the front panel (same height).
- Work the same ribbing rows until they match the front panel width and length up to the shoulders.
- Keep edges neat, and even this is what makes seaming look “store-bought.”
To ensure both panels match, lay the back panel directly over the front panel as you crochet and compare widths regularly.
Tip for neatness: Carrying yarn across ribbing can get bulky. For clean results, cut and rejoin when needed, then weave ends securely.
Shoulder Straps
Shoulder straps can be built in two easy ways:
Method 1: Crochet straps directly from the panel.
At the top of the front, crochet a strap from each shoulder area:
- Choose a strap width of 3–6 cm (depending on look)
- Work straight rows of ribbing or sc until it reaches the back panel comfortably
Method 2: Seam shoulders first, then add straps.
This helps you control placement, especially with a deep V.
Adjustable fit guidance:
Try the vest on (or pin panels together) and decide whether you want the neckline higher or lower before locking in strap length.
Side Seaming (Even and Beginner-Proof)
Oncethe front and back panels are finished:
- Place them right sides facing (or right sides out—choose your preferred seam look)
- Use stitch markers to match: hem corners, underarm points, and top corners
Join sides with:
- sl st seam for a flatter look, or
- sc seam for structure
Stop sewing at the armhole markers to leave a comfortable opening.
Assembly Instructions
Joining the Shoulders
- Align front and back at the top edges
- Seam each shoulder to create the neckline opening
- Leave enough space in the center for the V to remain open and flattering
Sewing the Sides
- Match ribbing rows as evenly as possible
- Seam from hem upward to the armhole marker on both sides
Shaping the Armholes
- Try it on and check armhole comfort
- More coverage needed? Seam a little higher.
- Prefer a more open, sporty cut? Leave a slightly larger opening.
Neckline Finishing
To make the V neckline look polished:
- Work a round of sc evenly around the neckline
- Place (sc, ch 1, sc) at the V point to help it sit flat
- Add a second round if you want a firmer edge
Beginner Tips
- Keep tension consistent so ribbing doesn’t wave or pinch
- Measure while working instead of relying only on stitch counts
- Try fitting as you crochet—ribbing stretch can surprise you
- Use stitch markers at the center V and armhole points
- Avoid tight edges: use a slightly larger hook for edging if needed
Common Mistakes to Avoid
- Uneven ribbing: skipping BLO/FLO by accident changes the texture fast
- Wrong sizing: forgetting negative ease can lead to a loose, gaping top
- Tight neckline: edging too tightly can pull the V upward
- Poor color joining: messy transitions distract from the sleek design
- Uneven panels: always compare front and back before seaming
Customization Ideas
- Make it longer for a full-length tank or tunic-style top
- Swap colors: neutrals, pastels, or bold neon contrasts all work
- Add buttons on the sides for a cute, adjustable detail
- Turn it into a cardigan vest by leaving the front open and adding ties
- Create an oversized version for a relaxed, streetwear-inspired fit
Finishing Touches for ( Crochet Vest Top )
- Weave in ends securely (especially at color changes)
- Block lightly to relax ribbing and smooth seams
- Smooth edges with a final sc round if needed
- Adjust fit by tweaking straps or adding a short waistband row
Conclusion
A ribbed crochet vest top like this is the kind of project that feels satisfying from start to finish: easy stitches, quick progress, and a final look that fits right into modern crochet fashion. The deep V-neckline, cropped shape, and purple-and-teal color blocking give it trendy, handmade vest-top energy while remaining comfortable enough for easy everyday wear. Grab two colors you love, take them panel by panel, and enjoy wearing something you made with your own hands.


