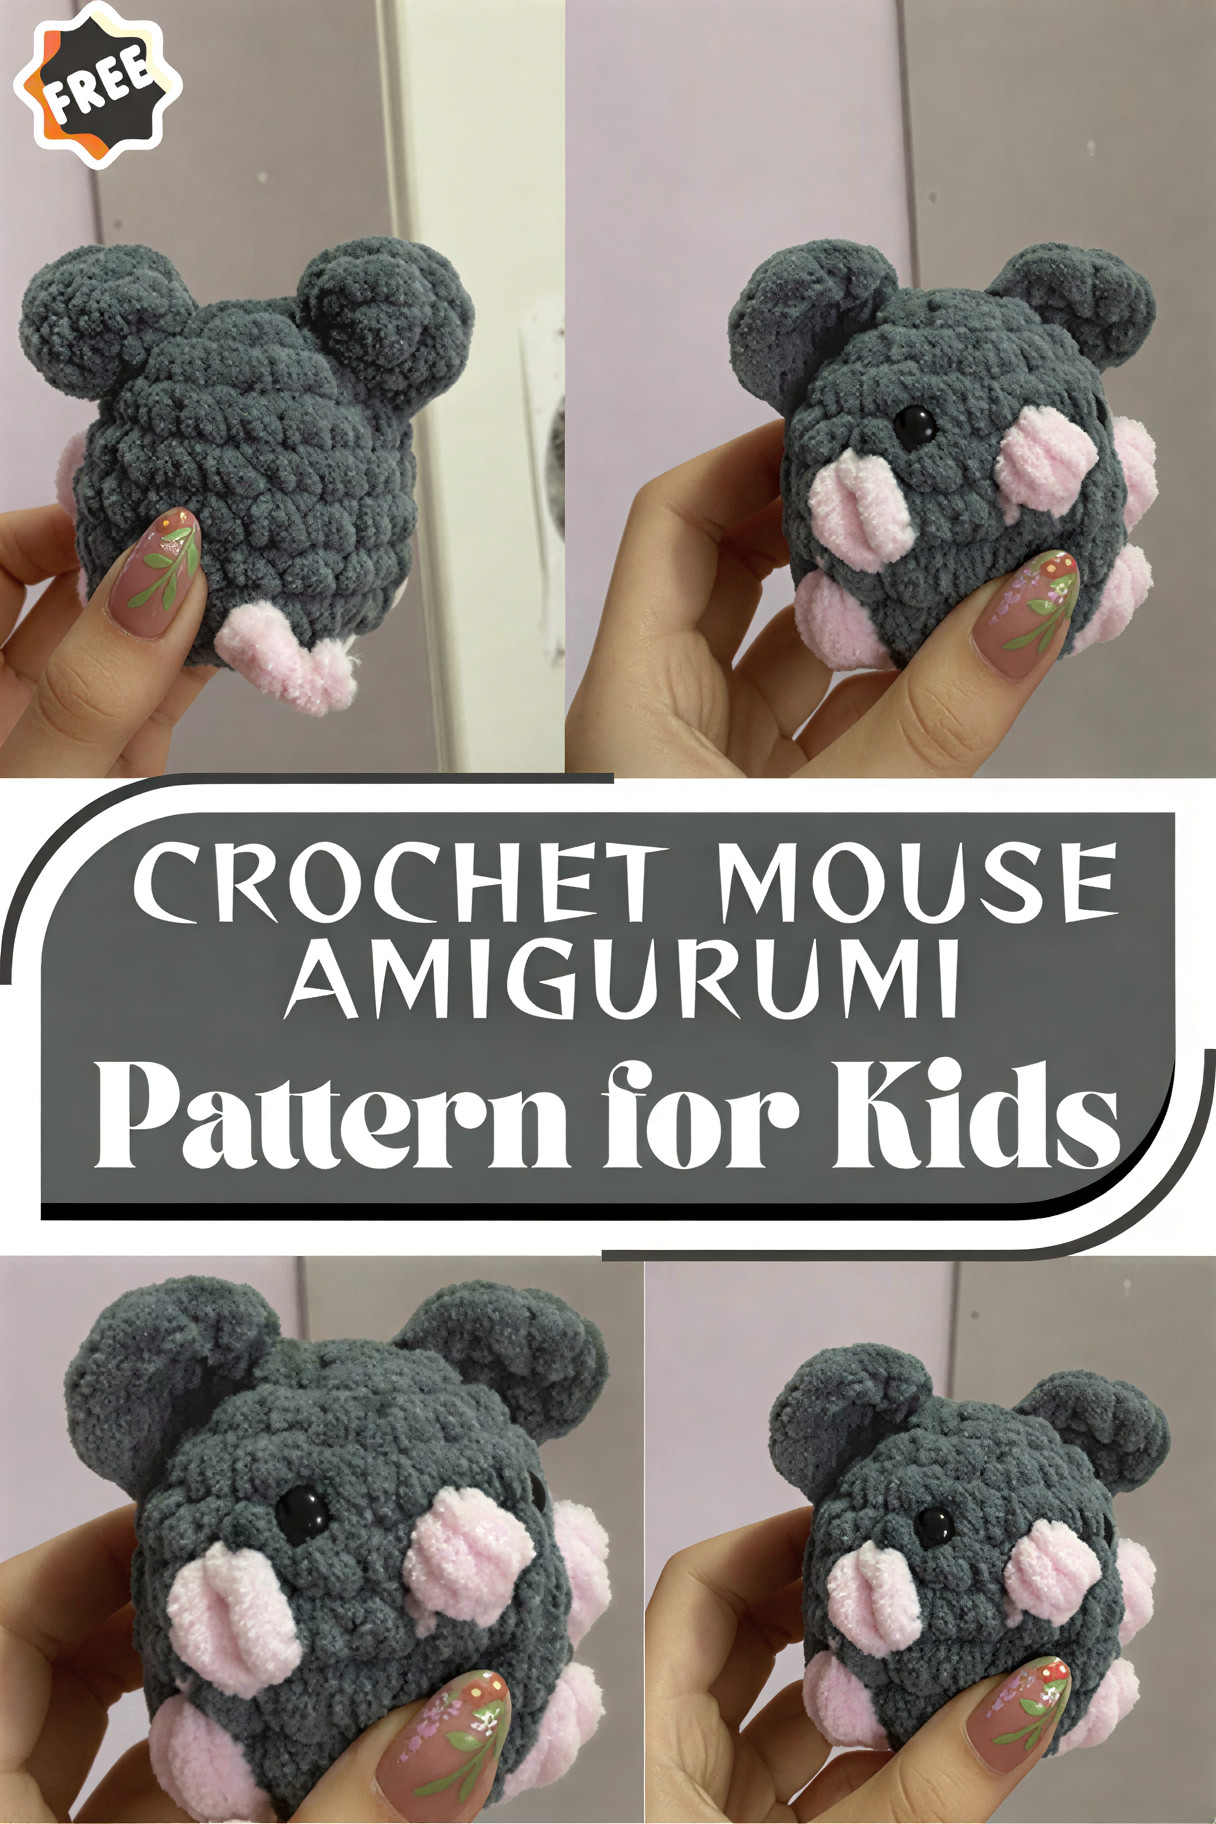
Low-Sew Free Crochet Mouse Amigurumi Pattern for Kids
If you’ve been wanting to try amigurumi but felt intimidated by tiny hooks, tight stitches, or complicated shaping, this is the project for you. This Free Crochet Mouse Amigurumi tutorial walks you through making a small, plush, kawaii-style tiny mouse using chunky velvet/chenille yarn so it works up fast, feels incredibly soft, and looks like something you’d spot in a boutique gift shop.
This little mouse has a round, ball-shaped body, two small, round ears, a tiny pink nose, rosy cheeks, and a short tail. It’s designed as a beginner crochet mouse with minimal sewing: the body is worked in continuous rounds, and most parts are small, quick pieces. You’ll end up with a squishy crochet plush mouse that’s perfect as a desk buddy, nursery decor, or a handmade crochet gift idea.
Materials List (Chunky Plush Mouse)
This amigurumi mouse pattern is written for chunky velvet/chenille yarn (often labeled “blanket,” “velvet,” or “chenille” yarn). Plush yarn hides stitches a bit, but it’s incredibly forgiving and gives that soft stuffed texture instantly.
Yarn
- Main color: Chunky chenille/velvet yarn (super bulky/Category 6)
- Example shades: light gray, cream, white, tan
- Accent colors:
- Pink chenille or smooth worsted (for nose + cheeks)
- Optional: pink felt circles for cheeks (no embroidery)
Recommended amounts (approx.):
- 30–60 g main chenille yarn (depends on brand/thickness)
- 5–10 g pink yarn or small felt piece
Hook
- 4.5 mm to 5.5 mm crochet hook (use the smaller end for tighter stitches)
- Many chunky chenille skeins suggest 6–8 mm, but for amigurumi, I typically size down to reduce gaps.
Notions
- Safety eyes: 10 mm or 12 mm (choose based on your finished size)
- Stuffing: Polyester fiberfill
- Tapestry needle (yarn needle)
- Stitch markers (must-have for continuous rounds)
- Scissors
Optional Tools (Helpful for Plush Yarn)
- Straight pins (for placement)
- A small brush or pet slicker brush (very gently fluffs ends)
- Embroidery floss (for whiskers or mouth)
Skill Level
Beginner
This is a quick crochet project and a great first plush amigurumi. You’ll practice:
- Single crochet in continuous rounds
- Increases and decreases
- Simple seaming (minimal)
If you can make a magic ring (or chain ring), single crochet, and count rounds, you can do this.
Abbreviations (US Crochet Terms)
- MR = magic ring
- ch = chain
- sc = single crochet
- inc = increase (2 sc in the same stitch)
- dec = decrease (single crochet 2 together)
- Recommended: invisible decrease for amigurumi
- sl st = slip stitch
- st(s) = stitch(es)
- rnd = round
- rep = repeat
- BLO = back loop only
- FLO = front loop only
Notes:
- Work in continuous rounds unless the instructions say otherwise.
- Use a stitch marker to mark the first stitch of each round.
Step-by-Step Pattern Instructions (Chenille Yarn Amigurumi)
Finished Size (Approx.)
- About 4–6 in (10–15 cm) tall, depending on yarn, hook, and stuffing.
Tension & Fabric Tip
With plush yarn, it’s normal not to “see” each stitch clearly. Count carefully and feel the stitch tops with your fingers. The goal is a tight fabric that doesn’t show stuffing.
Body (Round Ball Shape, Continuous Rounds)
This body is a simple sphere, the classic amigurumi shape, pe and the foundation of many cute crochet animals.
Rnd 1: MR, 6 sc in MR (6)
Rnd 2: inc in each st around (12)
Rnd 3: (sc, inc) rep around (18)
Rnd 4: (2 sc, inc) rep around (24)
Rnd 5: (3 sc, inc) rep around (30)
Rnd 6: (4 sc, inc) rep around (36)
Now you’ll build height.
Rnd 7–11: sc around (36) for 5 rounds
Add Safety Eyes (before closing)
Place eyes between Rnds 8 and 9 (guidance below). If you’re adding felt or embroidering cheeks, do it after assembly, but plan placement now.
Start decreasing.
Rnd 12: (4 sc, dec) rep around (30)
Rnd 13: (3 sc, dec) rep around (24)
Rnd 14: (2 sc, dec) rep around (18)
Stuff Firmly
Begin stuffing now. Plush yarn stretches—stuff gradually and evenly, shaping as you go.
Rnd 15: (sc, dec) rep around (12)
Rnd 16: dec around (6)
Fasten off, leave a tail. Use a needle to weave through the front loops of the remaining stitches and pull tight to close. Weave in the end.
Shape Tip: Roll the sphere between your palms gently to distribute stuffing and smooth lumps.
Ears (Make 2, Small Round Discs)
Ears are quick and tiny—perfect for a low-sew amigurumi piece.
Rnd 1: MR, 6 sc (6)
Rnd 2: inc around (12)
Rnd 3: sc around (12)
Fasten off, leaving a tail for sewing.
Optional inner ear detail:
With pink yarn, embroider a small oval in the center, or sew a tiny pink felt circle.
Nose (Small Pink Snout)
Choose one of these beginner-friendly options.
Option A: Crochet Nose (Tiny, Soft, No Hard Parts)
With pink yarn (chenille or smooth yarn):
Rnd 1: MR, 4 sc (4)
Rnd 2: inc around (8)
Rnd 3: sc around (8)
Fasten off, leave a tail.
Lightly stuff (optional) or leave unstuffed for a flat kawaii nose.
Option B: Embroidered Nose (Fastest)
Use pink yarn or embroidery floss:
- Stitch a small triangle or V-shape centered beneath the eyes.
If you want truly minimal sewing, Option B is excellent.
Tail (Small Tail, Minimal Effort)
With main yarn or pink yarn:
Option 1: Simple Chain Tail (Quickest)
- Ch 8–12 (adjust length)
- Starting inthe 2nd ch from the hook, sl st back down the chain
Fasten off, leave a tail for attaching.
Option 2: Cord Tail (Thicker, Cutest With Plush Yarn)
- Ch 10–14
- Sc in each chain (or sl st for tighter cord)
Fasten off, leave a tail.
Assembly Instructions (Low-Sew Plan)
This is designed to be a low-sew amigurumi: you’ll attach two ears, the nose (if crocheted), and the tail. Everything is small and quick.
Step 1: Eye Installation (If Using Safety Eyes)
Insert safety eyes before you fully close the body (recommended around Rnd 12–14). Secure washers inside.
If you forgot, you can still add them later, but it’s harder with stuffed plush.
- If using the crocheted nose, center it below the eyes, slightly forward on the round body.
- Sew around the edge using the tail.
- Add a pinch of stuffing behind the nose if you want it to pop.
- Pin ears first so they look even.
- Sew each ear on the upper half of the head/body sphere.
- Keep stitches small and tight so ears stand upright.
- Place the tail on the back, lower half of the body.
- Sew securely with several passes (tails get tugged a lot).
Step 5: Cheeks (Pink Blush)
Choose one:
- Felt cheeks: glue or sew tiny pink circles under/next to the eyes.
- Embroidered cheeks: make a few small horizontal stitches in pink yarn.
- Blush makeup: a tiny dab of real blush on a cotton swab (gentle, not washable unless sealed).
Placement Guide (Eyes, Ears, Cheeks)
Placement is what gives that “kawaii” personality. Use pins and step back to look before committing.
Eyes
- Place between Rounds 8 and 9
- Space about 6–7 stitches apart (center-to-center) for a cute, friendly look
- Closer = more babyish/kawaii
- Wider = more “curious” expression
Tip for symmetry:
Count from the center front. Mark the “front” stitch line with a stitch marker.
Nose
- Centered about 2–3 rounds below the eyes
- If embroidering, keep it small—oversized noses can look less mouse-like.
Ears
- Place ears on the upper sides, roughly aligned with the top of the eyes or slightly above.
- For a softer look, angle them slightly outward rather than straight up.
Cheeks
- Place cheeks just below the outer corners of the eyes, about 1–2 stitches down and 1 stitch out from the nose line.
Tips for a Perfect Amigurumi Shape (Especially With Chenille)
Chenille yarn is dreamy, but it behaves differently from smooth cotton/acrylic. These tips help your chenille yarn amigurumi look clean and professional.
1) Size Down Your Hook
A smaller hook makes tighter stitches and prevents stuffing from peeking through.
2) Count Every Round
Plush yarn hides stitch definition. Use a stitch marker and count at the end of each round so the sphere stays symmetrical.
3) Stuff in Stages
- Under-stuffing makes it floppy.
- Over-stuffing stretches stitches and shows gaps.
Add stuffing at Rnd 14, then adjust again at Rnd 15, then final top-off before closing.
4) Use Invisible Decreases
Invisible decreases look smoother and prevent “pointy” decreases.
5) Smooth the Shape
After finishing, gently roll the mouse body between your palms to distribute stuffing and soften any lumps.
6) Hide Seams in Plush
Chenille is forgiving—sink your sewing stitches slightly into the fabric,c and they disappear nicely.
Common Mistakes and Fixes
Mistake 1: Holes Between Stitches (Stuffing Showing)
Cause: Hook too large or loose tension
Fix:
- Use a smaller hook (e.g., from 5.5 mm down to 4.5 mm)
- Stuff less firmly near the edges
- Consider lining the inside with a small piece of pantyhose/mesh if needed (advanced but effective)
Mistake 2: Body Looks Like an Egg Instead of a Ball
Cause: Too many increase rounds or too few straight rounds
Fix:
- Foa r rounder shape: keep the same number of “straight rounds” as written (Rnd 7–11)
- If it’s tall: reduce straight rounds by 1
- If it’s flat: add 1 straight round
Mistake 3: Lopsided Eyes
Cause: Placing eyes without counting or marking
Fix:
- Mark the center front line
- Count stitches between the eyes across the front
- Use pins first, then install
Mistake 4: Ears Flop Down
Cause: Ears placed too low or sewn too loosely
Fix:
- Attach ears higher
- Use tighter whip stitches and sew through multiple stitches on the body
Mistake 5: Chenille Yarn Snaps or Sheds While Sewing
Cause: Chenille can be fragile when pulled tightly
Fix:
- Sew with a smooth, matching yarn strand (acrylic/cotton) for strength
- Or use doubled pink embroidery floss for the nose/cheeks
Yarn Substitution Guide
This crochet mouse pattern is written for chunky velvet/chenille, but you can easily substitute other yarns.
- Hook: 3.0–3.5 mm for amigurumi tightnessThe finishedd mouse will be smaller and the stitches more defined
- You may need to use 8–10 mm safety eyes
- Hook: 2.5–3.0 mm
- Even smaller finished size—great as a keychain mouse
- Hook: 5.0–6.0 mm
- Mouse will be larger; consider 12–14 mm eyes
- Stuff more firmly to maintain shape
General rule:
Choose a hook 1–3 sizes smaller than the yarn label suggests for sturdy amigurumi fabric.
Safety Notes (Especially for Kids)
This is a cute, easy crochet stuffed animal, but safety matters:
- Safety eyes are not safe for children under 3 (choking hazard).
- For baby toys: embroider eyes with black yarn/floss instead.
- Secure all parts firmly: ears, tail, nose, and any decorations.
- Avoid long tails or cords for very young children.
- Use washable yarn and secure knots tightly.
If you’re making this as a handmade crochet gift idea for a baby, choose embroidered features and reinforced stitching.
Care Instructions
Plush yarn items can be delicate, but they can still be cared for easily.
Washing
- Best: Spot clean with mild soap and cool water.
- If needed: Handwashesh gently in cool water; do not wring.
Drying
- Squeeze gently with a towel to remove moisture.
- Air dry completely (reshape while damp).
Brushing (Optional)
Once dry, lightly fluff the yarn with your fingers. Avoid aggressive brushing—Chenille can fuzz.
Customization Ideas (Make It Your Own)
This kawaii crochet pattern is easy to personalize, which makes it extra fun.
Color Variations
- Classic: gray body + pink cheeks/nose
- Sweet: white body + pastel pink accents
- Cozy: beige/tan body + brown nose
- Fun: lavender mouse + rosy cheeks
Keychain Version
Turn it into a tiny DIY crochet mouse keychain:
- Use DK or worsted yarn to make it smaller
- Add a keychain loop:
- Insert a small metal keyring into the top of the mouse
- Reinforce with a strong thread/yarn and several passes
Baby Toy Version
- Use embroidered eyes
- Skip any hard parts
- Use extra-strong stitching and washable yarn
- Consider adding a gentle rattle insert (only if securely enclosed and age-appropriate)
Extra Details (Still Beginner-Friendly)
- Add whiskers with embroidery floss
- Stitch a tiny smile under the nose
- Add a mini bow, flower, or heart patch
Conclusion (Your New Favorite Tiny Plush)
This plush mouse is the kind of project that makes crochet feel instantly rewarding: it’s fast, soft, adorable, and doesn’t require complicated shaping or loads of sewing. With chunky chenille yarn and simple rounds, this crochet mouse tutorial helps you create a cuddly companion that’s perfect for gifting, decorating, or collecting.
If you try this amigurumi mouse pattern, customize your colors and cheeks, and make it your own, then crochet a whole little family of mice. It’s a truly satisfying, quick crochet project and a wonderful way to build confidence withlow-seww amigurumi.