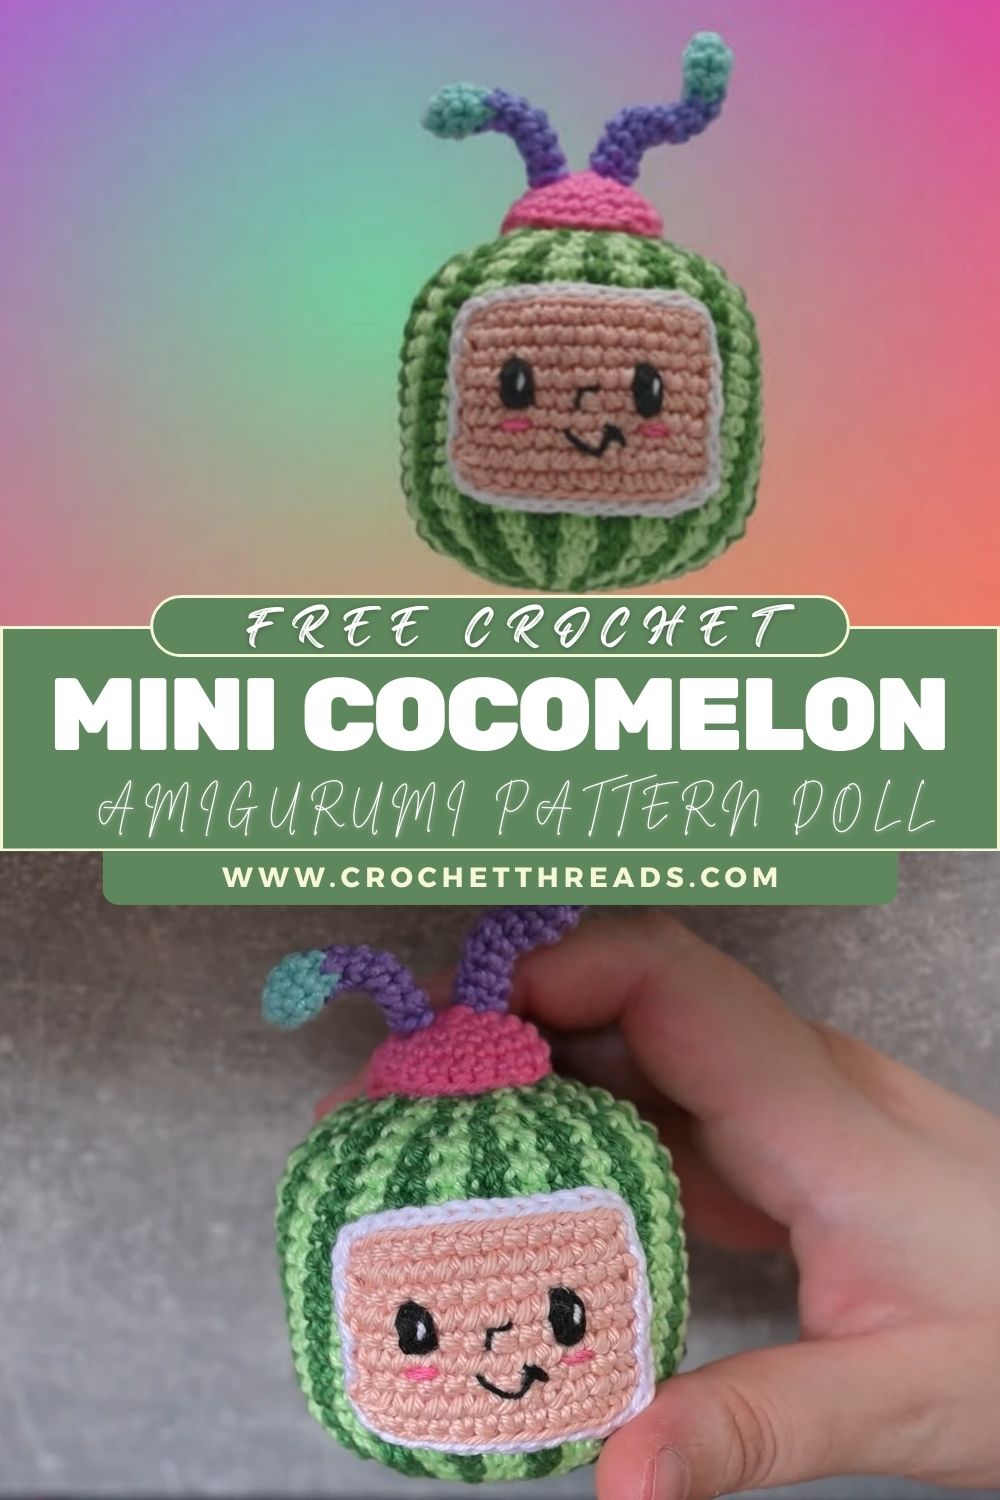
Luxurious Crochet Mini Cocomelon Amigurumi Pattern Doll
This Crochet Cocomelon project is a cute, compact amigurumi doll pattern inspired by the beloved watermelon-style character. You’ll crochet a rounded green body, add a square peach face panel, and finish with sweet embroidered details. If you’re looking for a beginner-friendly, giftable crochet mini Cocomelon or cartoon doll pattern, this is the perfect quick make.
A Crochet Cocomelon amigurumi doll is a small, plush-style crochet character with a watermelon-themed body and a simple, adorable face. This design focuses on clean shaping (easy rounds in single crochet), a contrasting face panel, and minimal pieces—so it comes together smoothly even if you’re new to amigurumi. Cartoon amigurumi dolls are popular because they’re instantly recognizable, cheerful, and full of personality, even with simple features. They also look fantastic in photos for social media, craft fairs, and gift packaging, especially when made in bright, playful colours.
A Crochet Cocomelon amigurumi doll is a small, plush-style crochet character with a watermelon-themed body and a simple, adorable face. This design focuses on clean shaping (easy rounds in single crochet), a contrasting face panel, and minimal piecing, es so it comes together smoothly even if you’re new to amigurumi. Cartoon amigurumi dolls are popular because they’re instantly recognizable, cheerful, and full of personality,ity even with simple features. They also look fantastic in photos for social media, craft fairs, and gift packaging, especially when made in bright, playful colours.
This amigurumi doll pattern is beginner-friendly because the body is worked in one continuous piece, the face panel is a simple square, and details are added with straightforward embroidery. You’ll practice core amigurumi skills like increasing, decreasing, stuffing, and basic sewing without complicated shaping.
Finished Doll Description
This mini doll features a watermelon-style green body shaped like a soft oval capsule—rounded at the bottom and gently domed at the top. The front features a square, peach-coloured face panel that creates a clear “character” look and makes the facial embroidery stand out.
On top, the doll is finished with antenna-like stems—small decorative pieces that give the design its signature cartoon feel. The colour combination is vibrant and classic: green body, peach face, small accents in dark green/black (details), plus optional pink cheeks.
Size (with DK/light worsted yarn + 3.0–3.5 mm hook): about 4–5 in (10–13 cm) tall,l including the top stems, depending on yarn and tension.
Materials Needed
Yarn (DK / light worsted recommended):
- Green (main body)
- Light green (optional stripes or highlight lines)
- Peach / skin tone (face panel)
- Black (embroidery for eyes, mouth, outline)
- Optional: White (tiny eye highlights), Pink (cheeks)
Tools & Notions:
- Crochet hook: 3.0 mm (tight stitches for amigurumi)
- Polyester fiberfill stuffing
- Yarn needle (tapestry needle)
- Stitch marker (or scrap yarn)
- Scissors
- Safety eyes (optional) or black embroidery thread/yarn (recommended for a cute cartoon look and baby-safe finish)
Crochet Abbreviations
- MR = Magic Ring
- sc = Single crochet
- inc = Increase (2 sc in the same stitch)
- dec = Decrease (single crochet 2 stitches together)
- sl st = Slip stitch
- ch = Chain
- st(s) = Stitch(es)
- BLO = Back loop only
- FLO = Front loop only
- ( ) = Repeat instructions within parentheses
- [ ] = Stitch count at end of round
Step-by-Step Crochet Pattern
Pattern Notes (Read First)
- Work in continuous rounds unless stated otherwise.
- Use a stitch marker to track the first stitch of each round.
- For cleaner shaping, use invisible decreases.
- Stuff firmly and evenly for a smooth, luxurious finish.
Part 1 – Crochet Cocomelon Body (Green)
Round 1: MR, 6 sc into MR. [6]
Round 2: inc around. [12]
Round 3: (sc, inc) around. [18]
Round 4: (2 sc, inc) around. [24]
Round 5: (3 sc, inc) around. [30]
Round 6: (4 sc, inc) around. [36]
Round 7: (5 sc, inc) around. [42]
Rounds 8–13: sc around. [42] (6 rounds)
Optional watermelon “stripe” accent:
On Rounds 10–12, you can surface-slip-stitch vertical lines in a darker green later, or switch to a slightly darker/lighter green for one round for a subtle band.
Round 14: (5 sc, dec) around. [36]
Round 15: (4 sc, dec) around. [30]
Round 16: (3 sc, dec) around. [24]
Round 17: (2 sc, dec) around. [18]
Start stuffing. Keep the shape oval and smooth.
Round 18: (sc, dec) around. [12]
Add more stuffing until firm.
Round 19: Dec around. [6]
Fasten off, close the hole neatly, and weave in ends.
Part 2 – Crochet Face Panel (Peach Square)
Work in rows to create a clean square panel.
Ch 9 (or adjust for your preferred face size).
Row 2: ch 1, turn, sc across
Row 3: ch 1, turn, sc across
Row 4: ch 1, turn, sc across
Row 5: ch 1, turn, sc across
Fasten off, leave a long tail for sewing.
Optional outline (for a crisp cartoon look):
Join black yarn and sc evenly around the square, working 3 sc in each corner. Fasten off, leaving a small tail to weave in.
Part 3 – Crochet Head Top (Green Cap/Detail)
This small top piece creates a neat base for the antenna stems.
Round 1: MR, 6 sc. [6]
Round 2: inc around. [12]
Round 3: (sc, inc) around. [18]
Round 4: sc around. [18]
Fasten off, leave a tail for sewing. Lightly stuff or leave unstuffed for a flatter cap.
Part 4 – Crochet Antenna Stems (Make 2, Green)
These are quick, thin stems with a little rounded tip.
Stem (make 2):
- Round 1: MR, 4 sc. [4]
- Round 2: (sc, inc) around. [6]
- Rounds 3–6: sc around. [6] (4 rounds)
Lightly stuff the tip only (optional).
Flatten the open end and sc through both layers across to close (3 sc).
Fasten off, leave a tail for sewing.
Alternative faster stem: ch 9, sl st back down the chain, fasten off. (This gives a cute curly look if you twist it slightly.)
Part 5 – Facial Details (Embroidery)
Attach your face panel first (see assembly), then embroider.
Eye placement: centre the eyes roughly on the upper half of the peach square, spaced about 3–4 stitches apart.
Embroidered eyes (kawaii style):
- Stitch two small vertical ovals or “U” shapes using black thread/yarn.
- Optional: add a tiny white highlight stitch on the upper side of each eye.
Mouth:
- Make a small curved smile centred below the eyes.
- Optional: add a tiny vertical stitch above the smile for a cute philtrum look.
Cheeks (optional):
- Add two small pink blush dots or short horizontal stitches.
Part 6 – Assembly Instructions
1) Attach the Face Panel
- Position the peach square on the front of the green body.
- Centre it horizontally and place it slightly above the midpoint for a “character” look.
- Pin or tack in place, then sew around the edges using small whip stitches.
- Keep stitches even so the panel lies flat and crisp.
2) Add the Head Top
- Place the small green cap centred on the top of the doll.
- Sew it down firmly around the edge.
- If you want a slightly raised top, add a pinch of stuffing before closing.
3) Attach Antenna Stems
- Place the two stems on top of the cap, slightly forward of the centre, and evenly spaced.
- Sew each stem securely with multiple passes (these are the most handled parts).
- Angle them outward slightly for a lively cartoon feel.
4) Final Shaping
- Add a bit more stuffing through any seam gap before fully closing (if needed).
- Roll the doll gently between your hands to smooth out lumps and shape it into an oval.
Beginner Tips (Amigurumi Success)
- Use a smaller hook than normal to prevent gaps and keep stuffing hidden.
- Count stitches every round—consistent counts keep the body smooth and symmetrical.
- Mark the first stitch of each round to avoid drifting.
- Stuff gradually (not all at once). This prevents lumpy areas.
- Pin pieces before sewing so your face panel and top details are centred.
Customization Ideas
- Yarn colour:s Try mint green + pastel peach for a soft nursery palette, or neon green for a bold, cartoon-like pop.
- Size: Use chunky yarn and a 4.5–5.0 mm hook for a larger plush, or crochet thread for a tiny keychain version.
- Facial expressions: Sleepy eyes, big sparkly eyes, winky face, or tiny eyebrows for extra personality.
- Decorations: Add a little bow, a mini star appliqué, embroidered “seed” dots, or a tiny crocheted diaper/onesie to make it extra gift-worthy.
FAQs
1) What yarn is best for a Crochet Cocomelon amigurumi doll?
DK or light worsted acrylic/cotton blends work beautifully. Cotton gives crisp stitches; acrylic is soft and plush.
2) How do I keep my stitching tight for amigurumi?
Use a smaller hook, keep steady tension, and avoid pulling stitches too loose. Tight fabric is key for a polished plush.
3) Can I use safety eyes instead of embroidery?
Yes, but embroidery gives the cutest cartoon look and is the best choice for baby-safe gifting. If using safety eyes, place them before final stuffing.
4) My face panel cu. How do I fix it?
Add one more row (or block it lightly), and sew it down with even tension. An optional black border round also helps it lie flat.
5) How do I make the doll more “luxurious”?
Use high-quality yarn, embroider with neat, layered stitches, stuff firmly for a smooth surface, and take time to align the face panel and top details.
Conclusion
This Luxurious Crochet Mini Cocomelon Amigurumi Pattern Doll is a fun, beginner-friendly way to create a charming crochet cartoon character with a watermelon body, square face panel, and adorable antenna stems. The pattern works up quickly, uses simple stitches, and leaves lots of room for personalization, perfect for gifts, décor, or a cute and made collectable. Grab your green yarn, stitch up the body, and enjoy bringing this mini character to life!