Mini Crochet Pucca & Garu Keychain Dolls Amigurumi Pattern
This Mini Crochet Pucca & Garu Amigurumi Pattern (Keychain Dolls) is perfect if you want a mini crochet keychain doll that looks cute, neat, and anime-inspired. In this guide, you’ll learn an inspired crochet Pucca pattern and matching Garu design with simple shaping, tiny outfits, and expressive faces—ideal as a beginner amigurumi doll project and a cute crochet anime doll gift.
If you love tiny character dolls, this Pucca and Garu crochet pattern is a fun way to create two palm-sized besties as keychain-style handmade toys. Amigurumi is the Japanese art of crocheting small stuffed toys, and it’s especially popular for miniature dolls you can clip onto bags, keys, or backpacks. Most amigurumi projects are made in separate parts and assembled together for example, head, body, hair, arms, and legs are crocheted individually and then sewn into place for a clean finish.
This article shares an inspired pattern based on the design details provided and common amigurumi techniques (magic ring starts, increase rounds, and decrease shaping). You’ll get clear steps for:
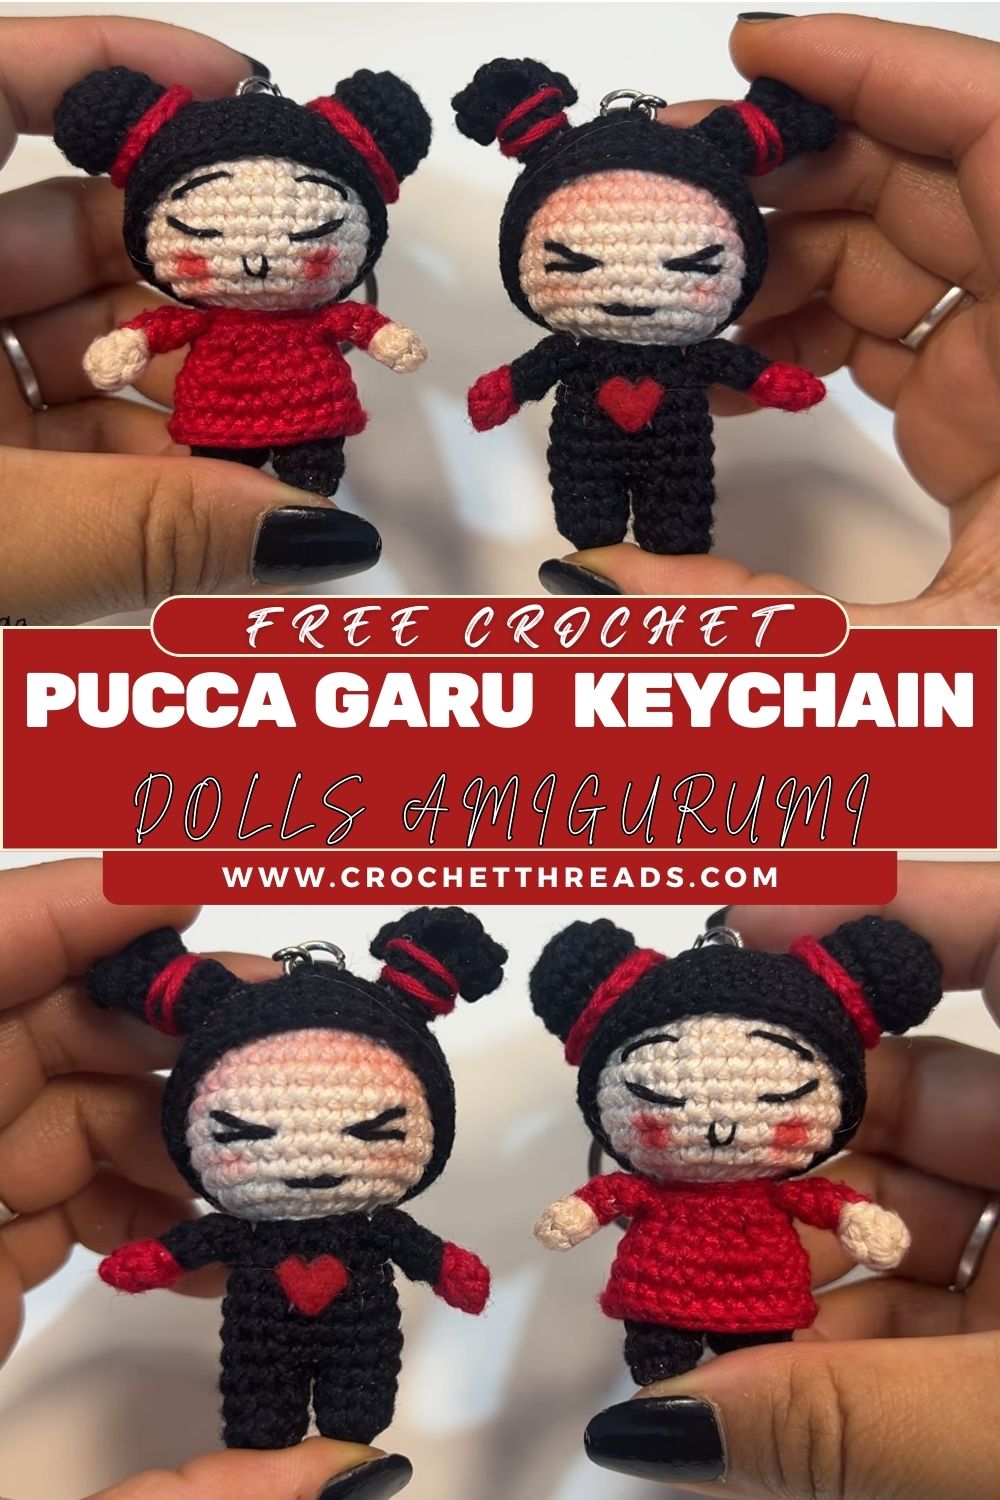
- Pucca’s cream face, black hair with two buns, red ties, closed eyes, and blush cheeks
- Garu’s cream face, black hair, black outfit, red heart on the chest, and expressive eyes
Because this is keychain-sized, the biggest secret is tight stitches + careful symmetry. When the face and buns are evenly placed, your dolls instantly look more professional.
Important note: Stitch counts can vary by yarn and tension. This is a sample/inspired pattern, not an exact copy of any original tutorial.
Materials
Yarn (smooth is best for details):
- Cream / skin tone (for faces)
- Black (hair + Garu outfit)
- Red (Pucca dress + hair ties + Garu heart)
- Optional: pink (blush) or use blush powder
Tools & notions:
- Crochet hook: 2.0–2.75 mm (use a smaller hook than yarn label for tight amigurumi fabric)
- Fiberfill stuffing
- Tapestry needle (for sewing parts)
- Stitch markers
- Scissors
- Small embroidery needle (helpful for face details)
Keychain finishing (optional but recommended):
- Keychain ring + short chain
- Jump ring or lobster clasp
- Strong thread or yarn for reinforcement
Optional face supplies:
- Safety eyes 4–6 mm (for Garu)
For keychains, embroidered eyes are often safer and flatter. - Black embroidery floss / thin black yarn (eyes, brows, mouth)
- White thread (tiny highlight dot for Garu’s eyes)
Crochet Abbreviations
- MR = magic ring
- ch = chain
- sc = single crochet
- inc = increase (2 sc in same stitch)
- dec = invisible decrease (sc2tog)
- sl st = slip stitch
- st(s) = stitch(es)
- rnd = round
- BLO = back loop only (optional)
- FO = fasten off
Finished Size
- Palm-sized / keychain size: about 7–10 cm (2.75–4 in) tall
Size depends on yarn thickness and hook.
8. Skill Level
Beginner to Intermediate
- Beginner-friendly stitches (sc, inc, dec)
- Intermediate step is mainly assembly and tiny details (hair buns, facial features, outfit finish)
Color Details (Pucca vs Garu)
Pucca (cute + sweet)
- Face: cream
- Hair: black with two buns
- Dress: red
- Hair ties: red (small ties at bun base)
- Eyes: closed (embroidered curves)
- Cheeks: blush pink
Garu (cool + expressive)
- Face: cream
- Hair: black (simple top hair + buns)
- Outfit: black
- Chest: small red heart
- Eyes: open and expressive (embroidered or safety eyes)
Pattern Overview
You will crochet these pieces separately and sew them together:
- Head (cream) for both dolls
- Hair cap + buns (black) – slightly different styling for Pucca vs Garu
- Body (dress/outfit color)
- Legs (small; often built into body or made separately)
- Arms (small tubes)
- Outfit details: Pucca dress shaping, Garu simple outfit
- Garu heart appliqué
- Face details (embroidery + blush)
- Keychain loop (optional)
This “parts + assembly” method is standard for amigurumi and helps the dolls look tidy and symmetrical.
11. Step-by-Step Pattern (Detailed)
General note for both dolls: Work in continuous rounds (no joining) unless stated. Use a stitch marker to mark the first stitch of each round.
H2: Head (Cream) Make 2
This is a classic amigurumi head shape using a magic ring start, increases, and decreases.
Rnd 1: MR, 6 sc (6)
Rnd 2: inc x6 (12)
Rnd 3: (sc, inc) x6 (18)
Rnd 4: (2 sc, inc) x6 (24)
Rnd 5: (3 sc, inc) x6 (30)
Rnd 6–9: sc around (30)
Begin stuffing lightly by Rnd 9 (keep it soft but round).
Rnd 10: (3 sc, dec) x6 (24)
Rnd 11: (2 sc, dec) x6 (18)
Stuff a bit more (smooth round shape).
Rnd 12: (sc, dec) x6 (12)
Rnd 13: dec x6 (6)
FO, close hole.
Head shaping tip: Roll the head gently between your palms after stuffing this helps it look even and professional.
H2: Hair & Buns (Black)
H3: Hair Cap (base for both) Make 2
The hair cap is a shallow “helmet” that sits on the top half of the head.
Rnd 1: MR, 6 sc (6)
Rnd 2: inc x6 (12)
Rnd 3: (sc, inc) x6 (18)
Rnd 4: (2 sc, inc) x6 (24)
Rnd 5: (3 sc, inc) x6 (30)
Rnd 6: sc around (30)
FO leaving a long tail for sewing.
Fit check: Place it on the head. It should cover the crown and stop around the upper-mid face area. If it feels too large, stop one round earlier.
H3: Hair Buns Make 4 total (2 per doll)
Small buns should be round and slightly puffy.
Rnd 1: MR, 6 sc (6)
Rnd 2: inc x6 (12)
Rnd 3: sc around (12)
FO, leave tail.
Lightly stuff each bun (or leave unstuffed for a flatter “anime bun” look).
H3: Pucca Bun Ties (Red) optional but recommended
Make 2 tiny ties (one per bun):
- ch 10–12, sl st back to form a little cord
Wrap once at bun base and tie at the back, or stitch a short red band around the base.
H3: Garu Hair Style Note
Garu’s hair can be simpler:
- Use the same cap + buns
- Position buns slightly lower or closer to the sides for a different silhouette
H2: Face Details (Eyes, Blush, Expression)
H3: Pucca Face (closed eyes + blush)
- Closed eyes: embroider two curved lines (like small smiles) on the face.
- Place eyes around upper-middle of face, leaving room for cheeks.
- Optional eyelashes: add one tiny stitch at the outer edge of each eye.
- Mouth: very small curved smile, centered and low.
- Blush cheeks:
- Use pink yarn to make 2 tiny stitched ovals, or
- Apply blush powder lightly with a cotton swab.
Pucca placement guide: Keep the eyes a little wider apart than you think—this makes the face look cuter and less crowded on a small head.
H3: Garu Face (expressive eyes)
Options:
- Embroidered eyes (flat + keychain-friendly):
Stitch two oval/almond shapes, then add a small white dot highlight. - Safety eyes (fast):
Place 4–6 mm eyes between rounds 7–8 of the head, about 6–7 stitches apart.
Add:
- Small eyebrows (short angled stitches)
- Tiny mouth (straight or slight frown/smirk)
Garu expression tip: Slightly angled brows instantly create a bold “Garu” look.
H2: Body (Keychain Doll Scale)
H3: Pucca Body Base (Red) — Make 1
Rnd 1: MR, 6 sc (6)
Rnd 2: inc x6 (12)
Rnd 3: (sc, inc) x6 (18)
Rnd 4–5: sc around (18)
Neck shaping (optional):
Rnd 6: (sc, dec) x6 (12)
Rnd 7: sc around (12)
Stuff as you go (firm enough to hold shape).
FO leaving tail for sewing to head.
H3: Garu Body Base (Black) Make 1
Same as Pucca body, just in black:
- Work the same rounds for a matching “pair” look.
- Keep Garu’s body a touch straighter by skipping the extra flare (see outfit section below).
H2: Dress (Pucca)
Pucca’s dress should read clearly as a red outfit. For an easy beginner method:
H3: Simple Dress Flare (worked onto body)
After finishing Pucca’s body (at the bottom round of 18 sts):
- Join red yarn at the back (if not already).
- Skirt Rnd 1: (2 sc, inc) x6 (24)
- Skirt Rnd 2: sc around (24)
FO.
This creates a small flare so it looks like a dress rather than a tube.
Optional collar detail:
Surface stitch a thin line (cream or darker red) at the neck to suggest a collar.
H2: Outfit (Garu)
Garu’s outfit is a clean black look:
- Keep the body more compact (no big skirt flare).
- Optional: add a tiny “shirt edge” line with surface sl st in black or dark gray at mid-body.
Simple finish: leave Garu’s body as a neat black cylinder with a slight neck.
H2: Arms Make 4 (2 per doll)
(Use red for Pucca sleeves if you want, black for Garu, or cream hands.)
Rnd 1: MR, 5 sc (5)
Rnd 2–5: sc around (5)
Lightly stuff only the lower half.
FO with tail.
Pro option (cute hands): Switch to cream for the last 1–2 rounds to create tiny hands.
H2: Legs Make 4 (2 per doll)
Tiny legs keep the doll balanced and keychain-friendly.
Rnd 1: MR, 6 sc (6)
Rnd 2: sc around (6)
Rnd 3: sc around (6)
FO with tail, lightly stuff.
Alternative (simpler): Skip separate legs and stitch small “foot bumps” with embroidery—useful if you want a flatter keychain doll.
H2: Heart Detail (Garu Chest) Make 1 (Red)
A small appliqué heart:
- ch 3
- In 3rd ch from hook: make 3 dc, ch 1, 3 dc (all into same stitch)
- sl st to finish
FO leaving a tail.
Sew it to the center of Garu’s chest.
Placement: centered, slightly above mid-body so it’s visible even when the head is attached.
H2: Assembly
Because these are mini dolls, assembly makes the biggest difference. Go slowly.
Suggested order:
- Sew hair cap onto head (pin first).
- Attach buns symmetrically (measure distance from center line).
- Add face details (especially embroidery) after hair placement, so everything aligns.
- Sew head to body (strong seam).
- Sew arms to sides, slightly forward (cute “hug” posture).
- Sew legs to bottom front so the doll can sit.
- On Garu: sew heart last (or before head—either works).
- Add keychain loop.
Round-by-Round / Stitch Guidance (Inspired by Standard Amigurumi)
For mini dolls, the most common shaping rhythm is:
- Start with MR (tight center)
- Increase rounds to widen (inc patterns like (sc, inc))
- Straight rounds to build height (sc around)
- Decrease rounds to close and shape (dec patterns like (sc, dec))
If your doll looks too big/small, adjust by:
- Adding/removing one “straight round”
- Stopping increases one round earlier
- Changing hook size (smaller hook = tighter, smaller doll)
Stufing and Shaping Tips
- Use small pieces of stuffing and push them into curves with the back of your hook.
- For heads: stuff firm but not stretched (avoid showing gaps).
- For arms: light stuffing keeps them slim and neat.
- For keychains: don’t overstuff the top of the head where the loop will attach—leave space to reinforce stitching.
Assembly Tips (Hair Buns + Face Alignment)
- Create an imaginary center line down the face. Place features evenly around it.
- Bun symmetry trick:
Attach the first bun, then count the same number of stitches across the hair cap to place the second bun. - Put Pucca’s buns a little higher and rounder for her signature look.
- For Garu, slightly lower buns plus angled brows makes him look more “serious.”
- Always pin before sewing. Take a quick photo mistakes are easier to spot in a picture.
Common Beginner Mistakes to Avoid
- Loose stitches (stuffing shows): use a smaller hook and keep tension steady.
- Uneven buns: not measuring placement—count stitches and use pins.
- Face too low/high: place eyes first, then balance mouth and blush around them.
- Overstuffing small parts: makes arms/legs look lumpy.
- Weak keychain loop: always reinforce with extra stitches and strong thread/yarn.
Customization Ideas (Keychain, Colors, Expressions)
- Make a mini crochet keychain doll set: add a sturdy loop on top of each head.
- Change Pucca’s dress color (pink, purple) while keeping black hair + cream face.
- Add tiny accessories:
- Pucca: small bow on dress or extra blush
- Garu: tiny scarf stripe or different heart size
- Try different expressions:
- Pucca: happy closed eyes, sleepy eyes, or a tiny “o” mouth
- Garu: smirk, surprised eyes, or determined brows
- Add initials or a date tag for gifts.
Simple keychain loop (top of head):
- With strong black thread/yarn: stitch a small loop through several head stitches.
- Or crochet: ch 12–15, sl st back to form loop, then sew down firmly.
Care Instructions
- Keychain dolls get handled a lot use tight stitches and secure knots.
- Spot clean with mild soap and cool water.
- Air dry fully, then reshape gently.
- Avoid machine washing unless you place them in a laundry bag and accept possible fuzzing.
Uses of Finished Dolls
These tiny dolls are not only adorable they’re practical too:
- Keychain charm for bags, backpacks, or keys
- Gift item for birthdays, anime lovers, and handmade doll fans
- Decoration for desks, shelves, or car mirrors (hang safely and keep away from driving visibility)
Conclusion
Making Pucca and Garu in miniature amigurumi form is one of those projects that feels extra special: small enough to finish quickly, detailed enough to be impressive, and cute enough to make people smile. With this inspired crochet Pucca pattern and matching Garu instructions, you’ll practice the core amigurumi method—crocheting in parts, shaping with increases/decreases, then carefully sewing for symmetry until your dolls look clean, balanced, and truly gift-worthy.Now it’s your turn: try this Pucca and Garu crochet pattern, save it for your next weekend project, and share it with a friend who loves cute crochet anime dolls (or make a matching pair as a heartfelt handmade gift).