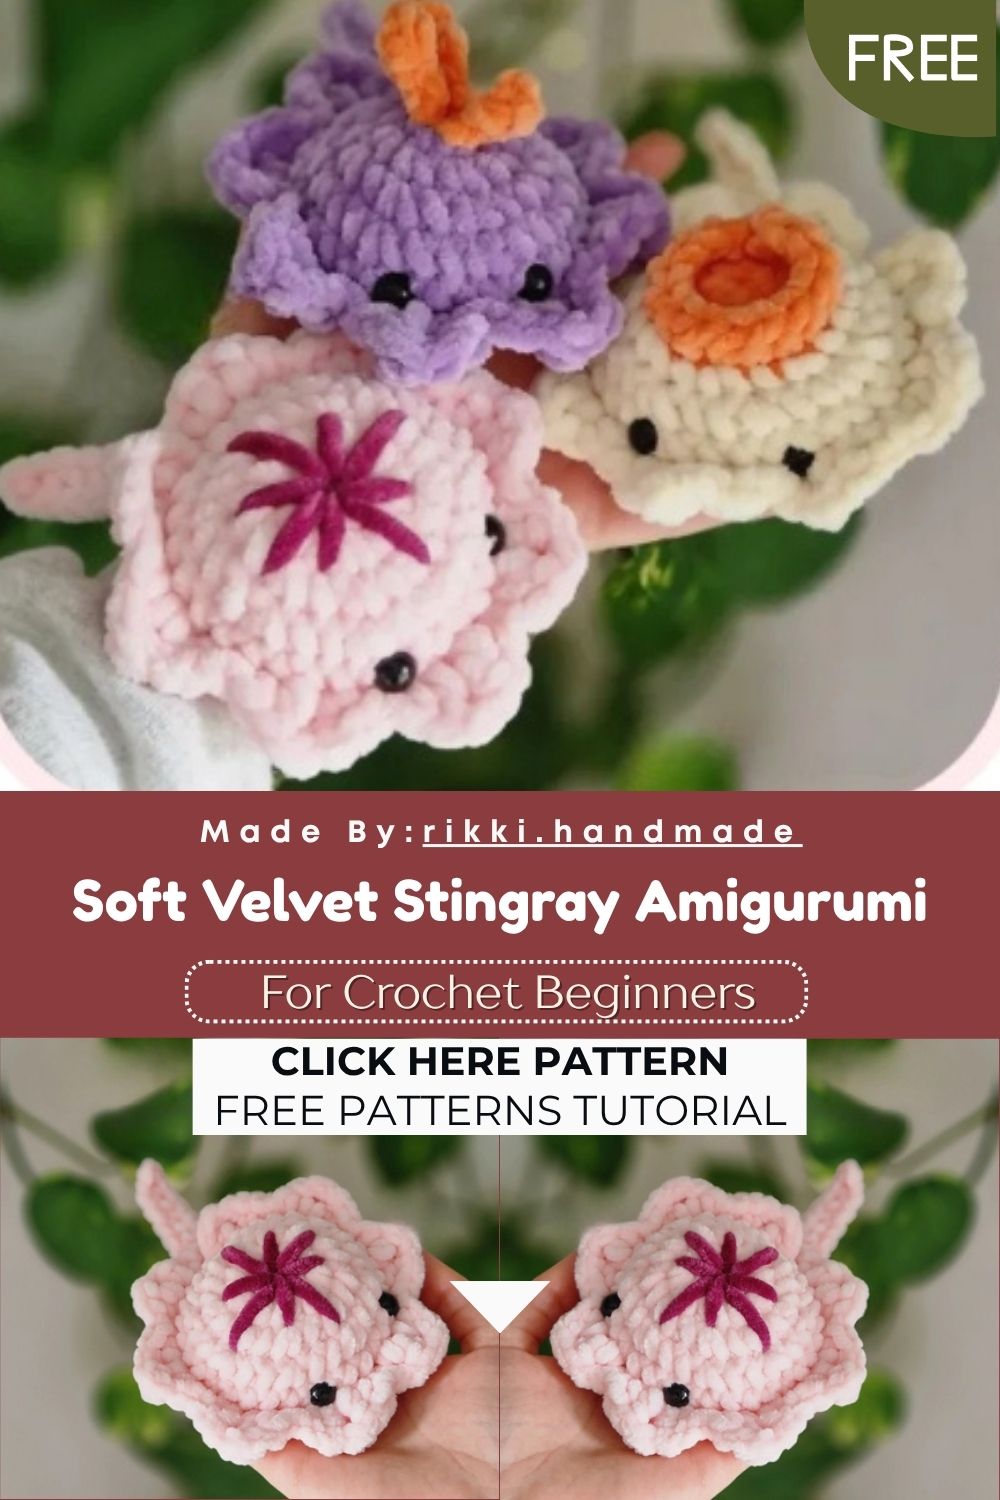
Soft Velvet Stingray Amigurumi – Free Crochet Plush Pattern
Flat, fluffy, and shaped like a sakura blossom, this pink stingray plush is the sweetest ocean creature you will ever crochet!
Stingrays are rarely the first creature that comes to mind when someone mentions amigurumi. This pattern changes that completely. Worked in soft super-bulky chenille yarn, this sakura stingray sits flat rather than round, giving it a naturally elegant silhouette that resembles a cherry blossom from above.
The petal round worked in front loops creates the signature scalloped edge that makes this stingray instantly recognizable. Meanwhile, the white belly is added through the back loops of the same round, giving the piece a two-toned finish without any extra construction. A short chain tail, embroidered darker pink center, and tiny safety eyes complete a finished plush that feels genuinely artistic and unique.
Skill Level
Beginner-friendly. Single crochet in continuous rounds is the main technique used throughout. Additionally, the front loop petal round and back loop belly continuation introduce useful new skills in a very manageable way.

Materials You Will Need
Yarn:
- Pink super bulky chenille yarn — Honey Bunny recommended
- Plum chenille yarn for the sakura center embroidery
- White yarn — YarnArt Dolce for the belly
- Black cotton yarn — Friends Cotton 8/4 for embroidery details
Other Supplies:
- Crochet hook — 4mm
- Safety eyes — 8mm
- Stitch marker
- Stuffing
- Yarn needle
- Scissors
Abbreviations
- MR — Magic Ring
- SC — Single Crochet
- DC — Double Crochet
- HDC — Half Double Crochet
- TR — Treble Stitch
- ST — Stitch(es)
- R — Round(s)
- CH — Chain
- SLST — Slip Stitch
- DEC — Invisible Decrease (insert hook through front loops only)
- INC — Increase
- CC — Color Change
- FO — Fasten Off
- BLO — Back Loop Only
- FLO — Front Loop Only
- BO(3) — Bobble Stitch pulled through 3 loops on hook
Important: This pattern is worked in continuous rounds unless stated otherwise. Place a stitch marker into the first BLO stitch of R6 to find it more easily when working the belly section.
Pattern: Sakura Stingray
Starting with pink yarn
R1: 8 sc in MR (8)
R2: 8 in (16)
R3: (sc, inc) x8 (24)
R4: (2sc, inc) x8 (32)
R5: sc around (32)
Petal Round
R6: In FLO only [(slst, hdc), (dc, tr), (dc, hdc), (slst)] x8
Everything written inside the brackets is worked into the same stitch. This creates 8 raised petal shapes around the outer edge of the stingray, giving it the characteristic sakura blossom silhouette.
Tail
At the end of R6, make the tail:
Chain 8. Starting in the 2nd chain from the hook: sc down the chain, then slst back into the same stitch (7)
This creates a slim, naturally curved tail that sits behind the stingray without requiring any separate construction or sewing.
Fasten off pink yarn and color change to white for the belly.
Belly
Work into the BLO of R6; these are the back loops left free from the petal round worked above.
(2sc, dec) x8 (24)
R7: (sc, dec) x8 (16)
Place safety eyes between R5 and R6, approximately 5 stitches apart.
Stuff the stingray lightly at this point. Do not overstuff; keeping the filling light preserves the naturally flat shape that gives this piece its elegant silhouette.
R8: 8 dec (8)
Fasten off, close the hole, and hide all yarn ends securely.
Face and Center Details
Safety Eyes
Position both eyes between R5 and R6 with approximately 5 stitches of space between them. The eyes should sit on the top pink side of the stingray rather than the white belly side.
Sakura Center Embroidery
Using plum or darker pink yarn, embroider a starburst pattern at the very center of the top surface. Work 5 to 6 straight stitches radiating outward from the center point. This mimics the characteristic stamen cluster of a real cherry blossom and transforms the finished stingray from simply pink into a genuinely botanical piece.
Alternatively, use powder blush applied with a small brush for a softer, more subtle center effect.
Optional Mouth
Embroider a small curved mouth between the eyes on the white underside of the stingray using black cotton yarn. This optional detail adds a sweet, sleepy expression to the belly side of the finished piece.
Customization and Variation Ideas
- First, try making this stingray in soft lavender with a white belly for a wisteria-inspired variation that looks completely different from the pink original while using the same construction.
- Additionally, use a cream chenille body with a pale yellow center embroidery for a magnolia blossom stingray that feels warm and vintage in tone.
- Moreover, add a tiny crocheted seaweed piece beside the finished stingray for a complete ocean floor display scene that photographs beautifully on a light background.
- Furthermore, make five stingrays in different soft pastel shades and display them together as a full sakura blossom arrangement. The flat shape means they stack and fan out like real petals.
- Also, experiment with the petal count by adjusting the number of bracket repeats in R6. Fewer repeats create larger petals while more repeats produce a tighter, more flower-like outline.
- Finally, skip the safety eyes entirely and embroider closed sleepy eyes using black cotton thread for a softer, more relaxed expression that suits the flat shape beautifully.
Common Mistakes to Avoid
- First, placing the stitch marker too late: The stitch marker must go into the first BLO stitch immediately after completing R6. Missing this step makes finding the back loops for the belly section very difficult once the petal round is worked.
- Additionally, working R6 into both loops: The petal round must be worked in front loops only. Using both loops leaves no back loops available for the belly continuation and collapses the two-section construction entirely.
- Also, overstuffing the body: This stingray is meant to stay flat and light. Overstuffing pushes the petals outward and creates a rounded shape that loses the characteristic blossom silhouette.
- Furthermore, making the tail chain too tightly: A tight tail chain curls inward rather than lying naturally behind the body. Keep your tension relaxed through all 8 chains for the most graceful finished tail.
- Moreover, adding eyes after closing the belly: Safety eyes must go in between R5 and R6 before the belly decreases, so that the piece does not close too much for comfortable access. Mark the position with pins before locking them in place.
- Finally, using thick yarn for the center embroidery: The sakura center detail needs fine yarn or a single strand of thinner thread. Thick embroidery yarn creates a blurry, oversized starburst that overwhelms the delicate petal shapes around it.
Finishing Tips
- First, after closing the belly, gently press the entire stingray flat between your palms and hold for a moment. This settles the light stuffing evenly and restores the flat, pancake-like silhouette that defines the finished piece.
- Additionally, use the tip of a tapestry needle to gently lift and separate each petal after completing R6. Chenille petals can compress during the belly construction and benefit from a light fluff afterward.
- Moreover, work the center embroidery stitches in a consistent length and pull each one to the same tension. Even starburst stitches look far more intentional and professional than irregular ones.
- Furthermore, photograph the finished stingray from directly above on a light surface. The top-down angle shows the full petal shape, the embroidered center, and the tiny tail all in one perfectly composed image.
- Also, if using powder blush for the center, apply it with a very dry brush in gentle circular motions. Building up the color gradually prevents harsh edges and creates a soft, naturally shaded finish.
- Finally, store finished stingrays flat rather than folded or stacked under heavy objects. Keeping the shape flat between uses means the petals always look their best when displayed or photographed.
Gifting Ideas
- First, place the finished stingray inside a shallow white box lined with dried cherry blossom petals or pink tissue paper for a spring-themed presentation that looks genuinely beautiful before it is even opened.
- Additionally, pair the stingray with a small glass bottle containing pink bath salts or dried rose petals for a botanical gift set that ties together the sakura theme from the crochet piece to the packaging.
- Moreover, these stingrays make wonderful Mother’s Day gifts. The combination of a soft ocean creature and a cherry blossom shape creates a gift that feels poetic and personal in equal measure.
- Furthermore, make a set of three stingrays in graduating pink shades: blush, rose, and deep pink, and present them together as a cherry blossom collection that looks stunning arranged on a small wooden tray.
- Also, attach a handwritten tag with the yarn name and color used. Recipients who crochet always appreciate knowing the exact materials so they can recreate or complement the piece themselves.
- Finally, these stingrays sell beautifully at spring craft markets and handmade boutiques. The flat shape, the petal outline, and the soft chenille texture together create a display piece that draws immediate attention and genuine admiration.
Conclusion
This sakura stingray is one of the most creative and satisfying beginner amigurumi patterns available. The flat construction is refreshingly different from standard round plush designs. Furthermore, the front loop petal round and back loop belly technique together produce a result that looks genuinely complex while remaining completely accessible. Therefore, place your stitch marker the moment R6 is complete, stuff lightly, and take your time with the center embroidery. In addition, do not rush the eye placement; eyes set precisely between R5 and R6 define the entire expression of this little creature. In conclusion, this pink stingray is waiting to bloom right in your hands.