How to Crochet a Raccoon Amigurumi Pattern Plush
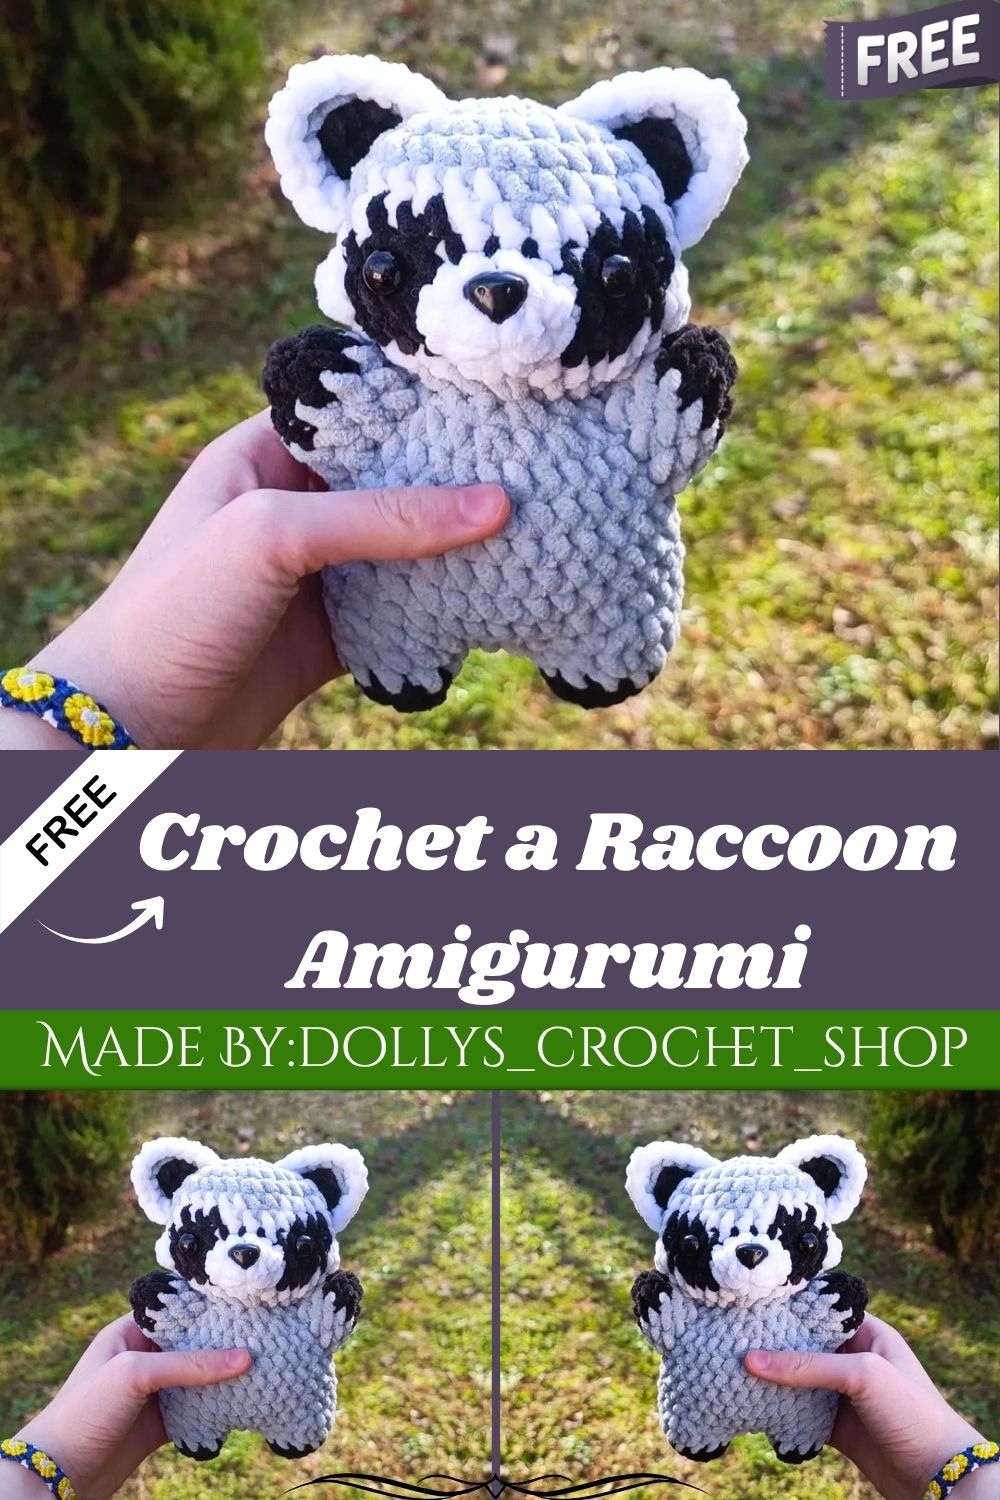
Grabbing attention instantly with its distinctive masked face and striped tail, the Crochet Raccoon Amigurumi Pattern is a fantastic pick for any crocheter wanting to add a charming woodland critter to their amigurumi collection. Built using easy shaping and basic stitches, it’s beginner-friendly without sacrificing detail.
Skill Level
Intermediate-leaning, mainly due to frequent color changes across the head and tail. Comfortable magic ring, bobble stitch, and basic shaping skills make each piece manageable despite the detailed color work.
Pattern Overview
- Head — worked in grey with white and black color-change sections forming the mask, plus bobble stitches for texture around the eyes
- Snout — a small white piece sewn onto the face between the eyes, with a safety or embroidered nose
- Body and legs — legs are made first in black and grey, then joined and continued upward into one connected body piece
- Arms — two small black-and-grey pieces sewn near the top of the body, close to the head
- Tail — alternating black and grey stripes for the raccoon’s signature ringed tail
- Ears — worked flat in rows, then finished with a glued felt triangle for the classic two-tone ear look
Special Techniques
- Color changes within a single round are used heavily on the head and tail, so keeping tension even where colors switch avoids gaps
- Bobble stitch (BO) adds subtle raised texture around the eye area on R8 of the head
- sc3tog closes off the ear tip in one smooth decrease, giving it a clean point
- Working flat in rows (rather than continuous rounds) shapes the ears so they lie flat before the felt is added
- Joining two pieces mid-round, as done when connecting the legs into the body, keeps the transition seamless without a visible seam
Materials
- Stuffing
- Grey, black, and white chenille baby yarn
- 5mm crochet hook
- Black felt
- 12mm safety eyes
- Small safety nose (or black yarn as an alternative)
- Scissors and darning needle
Abbreviations
- FO: Fasten off
- MR: Magic ring
- ch: Chain
- dec: Decrease
- inc: Increase
- rep: Repeat
- sc: Single crochet
- st/sts: Stitch/stitches
- bobl: Bobble stitch
- R: Round
- sc3tog: Single crochet 3 together
Head
Start in GREY. R1. 8sc in MR (8) R2. 8inc (16) R3. (sc, inc)*8 (24) R4. (3sc, inc)*6 (30) R5. 9sc, WHITE: 5sc, GREY: 2sc, WHITE: 5sc, GREY: 9sc (30) R6. 9sc, WHITE: sc, BLACK 3sc, WHITE: 4sc, BLACK: 3sc, WHITE: sc, GREY: 9sc (30) R7.
Put eyes between R7-8, 6 stitches apart.
R10. (sc, dec)*3, WHITE: (sc, dec)*4, GREY: (sc, dec)*3 (20) R11. (2sc, dec)*5 (15)
Cut and leave a tail for sewing. Stuff firmly.
Snout
In WHITE. R1. 8sc in MR (8) R2. (2sc, 2inc)*2 (12)
Cut and leave a long tail for sewing. Insert the safety nose between R1-2 here. Sew the snout between R7-9 of the head, between the eyes, stuffing as you sew along. Without a safety nose, use black acrylic yarn and a darning needle to sew a small nose once the snout is attached, going over it 3-4 times for a fuller look.
Body
Start in BLACK. Make the legs first, two total. R1. 5sc in MR (5) R2. 5inc (10)
Switch to GREY. R3. 10sc (10)
Cut the yarn short for the first leg. For the second leg, repeat R1-3, then ch2. Connect leg 2 to leg 1 with a sc — the first sc on R4 is that connecting stitch.
R4. [(sc, inc)*5, 2sc]*2 (34) R5. 4sc, dec, 3sc, dec, 10sc, dec, 3sc, dec, 6sc (30) R6-11. 30sc (30) R12. (sc, dec)*10 (20) R13. (2sc, dec)*5 (15)
Cut, no tail needed. Stuff firmly, especially the feet, then sew the head to the body.
Arms (make 2)
Start in BLACK. R1. 5sc in MR (5) R2. 5inc (10)
Switch to GREY. R3-5. 10sc (10)
Cut and leave a long tail for sewing. Stuff firmly, then sew between R10-13 of the body, as close to the head as possible.
Tail
Start in BLACK. R1. 8sc in MR (8) R2. 8inc (16) R3. 16sc (16) R4. GREY: 16sc (16) R5. (sc, dec, sc)*4 (12) R6. BLACK: 12sc (12) R7. (sc, dec)*4 (8) R8. GREY: 8sc (8)
Stuff and leave a long tail for sewing. Sew between R6-8 of the body.
Ears (make 2)
In GREY, worked in rows. R1. ch6, starting in the second ch from hook, 5sc (5) R2. ch1, turn: dec, sc, dec (3) R3. ch1, turn: 3sc (3) R4. ch1, turn: sc3tog (1)
Cut a black felt triangle smaller than the ear and glue to the front. Optionally, sc around the ear in white, working an inc at the tip. Sew both ears between R2-7 of the head, 5-6 stitches behind the eyes.
Customization and Variation
- Swap the chenille yarn for a soft acrylic if you prefer a matte, less textured finish
- Use a lighter grey or add brown tones for a more realistic raccoon coloring
- Skip the felt ear triangles and embroider the two-tone pattern instead for a fully yarn-based look
- Make the tail slightly longer with extra grey and black rounds for a more dramatic silhouette
- Add tiny paw pads in black felt or yarn under each foot for extra detail
Common Mistakes
- Losing tension where colors switch mid-round, leaving small visible gaps in the mask pattern
- Placing the safety eyes before the snout is sewn on, throwing off the final face balance
- Under-stuffing the legs and feet, making the raccoon unable to sit upright on its own
- Gluing the felt ear triangles before the ears are fully sewn onto the head
- Rushing the leg-to-body join, which can leave a visible seam if stitches aren’t lined up
Frequently Asked Questions
Can I use a different yarn than chenille? Yes, any worsted or DK weight yarn works fine, though chenille gives a softer, fuzzier texture.
Is a safety nose required? No, black acrylic yarn embroidered over the snout works just as well as a safety nose.
How long does this pattern take to finish? Most crocheters finish the whole raccoon, including sewing, over a couple of relaxed evenings.
Can I skip the felt on the ears? Yes, an all-yarn ear with embroidered detailing looks just as good without any felt.
Finishing Tips
- Stuff the head slightly firmer than the body for a rounder, more defined face shape
- Pin pieces in place with stitch markers before sewing to check proportions first
- Sew the tail at a slight downward angle for a more natural, relaxed pose
- Brush chenille yarn lightly with a soft brush for extra fluff once assembly is done
- Double-check eye and ear placement from the front before committing to final stitches
Gifting Ideas
- Pair with a woodland-themed plushie set for a nature-loving child’s gift
- Wrap as a camping or forest-trip souvenir for kids or collectors
- Add to a baby shower gift as a soft, huggable keepsake
- Give as a birthday gift alongside a small storybook about forest animals
- Turn into a car or bag charm version for teens who love amigurumi
Conclusion
Raccoon amigurumi rewards a little extra patience with color changes, delivering a plush packed with personality once every piece comes together. Between the masked face, ringed tail, and poseable little limbs, this pattern makes a satisfying project for anyone ready to move past the basics.