Handmade Crochet Snowy Owl Plush Amigurumi Pattern
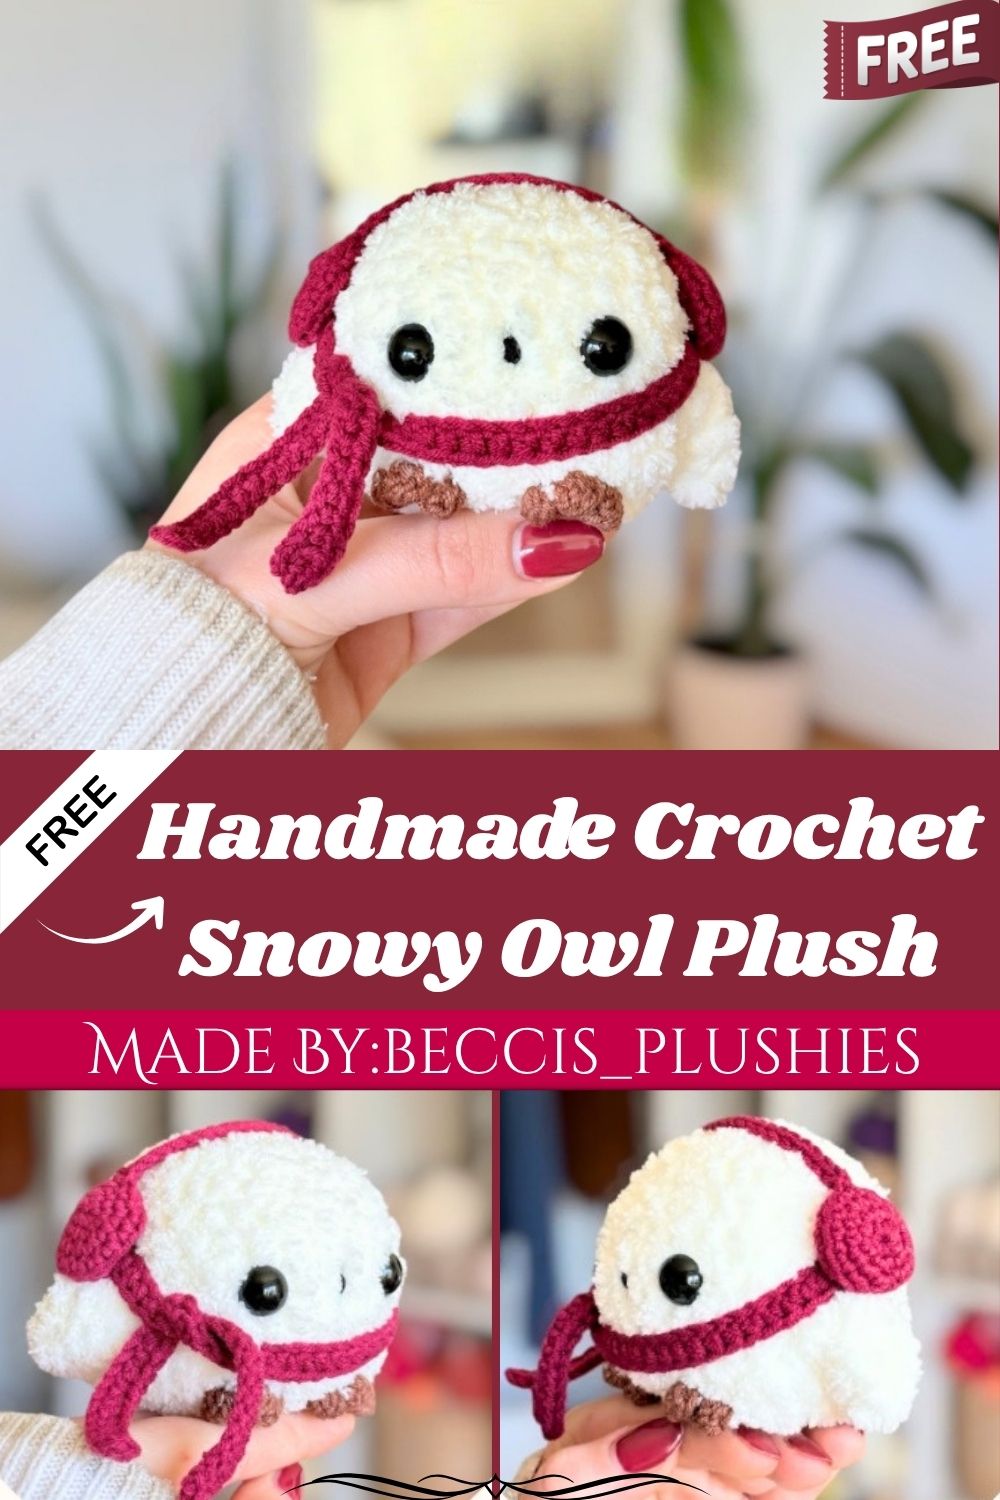
Bringing the charm of winter to life, the Crochet Snowy Owl Amigurumi Pattern captures cozy seasonal magic in a soft, handmade character. Thanks to its simple pattern and easy shaping, this project suits any crocheter wanting to add a unique design to their winter or Christmas amigurumi collection.
Skill Level
Intermediate friendly, thanks to the shaped wings, bobble-stitch legs, and separate accessory pieces. Comfortable with magic ring, back loop only, bobble stitch, and basic increases or decreases will finish this owl without much trouble.
Pattern Overview
- Body — a single rounded piece in white yarn, shaping the head and body together with no separate join
- Wings — two small folded pieces sewn diagonally onto each side of the body
- Legs — bobble-stitch triangles worked directly into the body’s front loops in brown yarn
- Scarf — a simple half double crochet strip in red yarn, wrapped and tied around the neck
- Earmuffs — two round ear pads connected by a chained headband, both in red yarn
Special Techniques
- Back loop only (BLO) is used on the body’s decrease round and on the ear pads, leaving a visible ridge for a cleaner shaping line
- Bobble stitch (BO) worked directly into the body’s stitches forms the owl’s tiny triangular legs without a separate sewn-on piece
- Folding a small round piece in half before securing it with a few single crochets is what gives the wings their flat, feather-like shape
- Working a chain directly between two finished pieces, as done for the earmuff headband, joins parts without extra sewing
- Using two different hook sizes across the pattern keeps the body soft and rounded while the smaller accessory pieces stay firm and neat
Materials
Suggested yarn:
- #3 light worsted weight (Alize Softy Plus) — white
- #2 fine weight cotton (YarnArt Jeans) — brown, red
Tools and extras:
- Black acrylic yarn for the beak
- 5mm crochet hook
- 3mm crochet hook
- Tapestry needle
- Scissors
- Stuffing
- Stitch marker
- 4mm safety eyes (or your preferred size)
- Optional: hot glue gun
Abbreviations
- BO: Bobble stitch (4 unfinished double crochet, 5 loops on hook)
- BLO: Back loop only
- CH: Chain
- DEC: Decrease
- F/O: Fasten off
- INC: Increase
- MR: Magic ring
- R: Row/round
- SC: Single crochet
- SLST: Slip stitch
- ST: Stitch
Body (with white yarn & 5mm hook)
R1: 8sc in MR (8) R2: inc x8 (16) R3: (sc, inc) x8 (24) R4: (2sc, inc) x8 (32) R5-R11: sc around 7 rounds (32) R12: BLO, (2sc, dec) x8 (24) R13: (sc, dec) x8 (16)
Place safety eyes between R7-R8, about 3 stitches apart, and stuff firmly.
R14: dec x8 (8)
F/O and sew the hole closed. Embroider the beak between the eyes vertically.
Wings (with white yarn & 5mm hook)
R1: 4sc in MR (4) R2: (sc, inc) x2 (6) R3-R4: sc around 2 rounds (6) R5: fold the wing in half and make 3sc through both halves, do not stuff (3)
F/O and leave a tail for sewing. Sew the wings to each side of the body between R7 and R11. Keep them slightly diagonal, with the back part starting at R7 and the front part ending at R10, about 3 stitches from each eye. If the wings stick out too much, sew them closer to the body to flatten them.
Legs (with brown yarn & 3mm hook)
Insert your hook into a front loop of R12 of the body and pull up a loop, ch1, (BO, slst into the same stitch of the body, slst in the next stitch of the body) x3.
F/O and leave a tail for shaping. Using your darning needle, insert it into the back of the first BO, pull tight to form a triangle shape, and weave in all ends. Repeat on the other side of the body.
Scarf (with red yarn & 3mm hook)
R1: Make a slipknot and ch81 (or the length you need for your owl) R2: start in the 2nd ch from hook, 80hdc down the chain (80)
F/O and weave in ends. Wrap around the neck and tie loosely.
Earmuffs
Ear pads (make 2, with red yarn & 3mm hook)
R1: 5sc in MR (5) R2: inc x5 (10) R3: (sc, inc) x5 (15) R4: sc around (15) R5: BLO, sc around (15) R6: (sc, dec) x5 (10) R7: dec x5 (5)
No need to stuff. F/O and sew the hole closed, weave in all ends.
Headband (with red yarn & 3mm hook)
Insert your hook into a front loop of R5 of one ear pad and pull up a loop, ch19 (adjust length if needed), slst into a front loop of R5 of the other ear pad, slst into the next stitch of the ear pad, slst down the chain, and slst into the next stitch of the first ear pad.
Sew or glue the earmuffs to your owl’s head.
Customization and Variation
- Swap the red scarf and earmuffs for a different color set to match a specific holiday theme
- Use speckled or grey yarn for the body for a more realistic barn owl look instead of snowy white
- Skip the earmuffs and add a tiny knit-look hat instead for a different winter accessory
- Make the scarf longer for a dangling, draped look rather than a simple wrap
- Add small black felt tips to the wings for a more detailed feather effect
Common Mistakes
- Sewing the wings too straight instead of slightly diagonal, which flattens the finished look
- Losing the front-loop-only step when starting the legs, making the bobble stitches sit unevenly
- Placing the safety eyes before checking the spacing against the body’s rounds
- Pulling the darning needle too loosely when shaping the legs, leaving them floppy instead of triangular
- Making the scarf chain too short, which leaves it too tight to tie comfortably
Frequently Asked Questions
Can I use a single yarn weight for the whole pattern? Yes, though mixing weights as suggested gives the body a softer feel than the accessories.
Do the legs need extra stuffing? No, the bobble-stitch legs are shaped by pulling the yarn tight rather than stuffing them.
Is a hot glue gun required? No, it’s optional. Sewing the earmuffs on works just as well without glue.
Can the scarf length be adjusted? Yes, the chain length in the pattern can be shortened or lengthened to fit your owl.
Finishing Tips
- Stuff the body evenly before closing R14 to keep the owl’s shape nicely rounded
- Check wing placement from the front before final sewing to keep both sides symmetrical
- Pull the leg-shaping tail firmly but gradually to avoid puckering the body fabric
- Weave in all ends neatly before adding the scarf and earmuffs as final touches
- Steam the scarf lightly if the hdc strip curls after finishing
Gifting Ideas
- Pair with other winter-themed amigurumi for a cozy holiday gift set
- Wrap as a Christmas stocking stuffer alongside a small ornament
- Give as a teacher’s gift during the winter holiday season
- Add to a baby’s first winter gift box as a soft keepsake
- Turn into a festive shelf display piece for holiday home décor
Conclusion
Snowy owl amigurumi combines simple round shaping with just enough seasonal detail to make it feel special. Between the folded wings, tiny bobble legs, and cozy scarf-and-earmuff set, this pattern offers a satisfying mix of technique and charm perfect for the winter season.