Creating a crochet pumpkin costume amigurumi pattern can be a fun and charming project for anyone who loves crochet and Halloween. The inspiration for this delightful pattern comes from the cozy, festive vibes that pumpkins bring to the fall season. Amigurumi, the Japanese art of crocheting small, stuffed yarn creatures, has gained immense popularity due to its cute and detailed designs. This blog post will guide readers through crafting a crochet pumpkin costume amigurumi, promising a rewarding and enjoyable experience.
Step-by-Step Instructions The basic crochet stitches used in this pattern include single crochet, double crochet, and slip stitch. Following this detailed step-by-step guide:
Start with the pumpkin’s main body using single crochet stitches in a continuous round pattern. Shape the pumpkin segment using increases and decreases. Add leaves and vines using green yarn and crochet techniques like chaining and slip stitching. Finally, attach the face using safety eyes and embroidery for additional details. Specific tips include maintaining even tension and regularly counting stitches to avoid mistakes.
The pumpkin shape is achieved by crocheting in continuous rounds and shaping segments with increases and decreases. Details such as leaves, vines, and a classic jack-o-lantern face give it character. The finished pumpkin costume typically measures about 6-7 inches tall and can be customized in size.
Customization
Readers can personalize their pumpkin costume by choosing different yarn colors or adding embellishments like glittery threads or beaded eyes. Variations could include adding a cute hat or a bowtie to make the costume unique.
Troubleshooting and Tips
Common mistakes to watch for include uneven tension and missed stitches. Readers can fix or prevent these by counting stitches regularly and using stitch markers to keep track. Ensuring consistent stitches throughout the project helps maintain a neat appearance.
Finishing Touches
Assembling the pumpkin involves attaching the leaves, vines, and face securely. Weaving in yarn ends neatly and ensuring all parts are firmly attached will give the costume a polished finish.
Closing Thoughts
Completing a crochet pumpkin costume amigurumi typically takes a few hours to a couple of days, depending on skill level. Previous crafters have enjoyed the process and shared their adorable results, and the project promises to bring joy and a sense of accomplishment.
Additional Resources
For further reading and tutorials, online communities such as Reddit and crochet blogs offer additional patterns and tips. More crochet patterns and craft ideas can be found on websites like Etsy and Instagram, providing endless inspiration for crochet enthusiasts.
Materials
Crochet 2.00 mm
Cotton thread in orange, green, and
café.
Point marker
Go to work
Scissors – Glue
Piece of felt or scarf
black color
Tissue development
Level: Basic
It is woven in spirals and in rows. When you tile in rows remember:
• Start in the second ch from the crochet.
• At the end of the row, go up with a ch to add height and turn the fabric to start a new row.
From this moment start weaving in a spiral. Leave the first point marked when you start.
V1-2. 34pb (34)
V3. 8pb, 1aum, 16pb, 1aum, 8pb (36)
V4. (5pb, 1aum) x 6 (42)
V5. 42pb (42)
V6. (6pb, 1aum) x 6 (48)
V7-9. 48pb (48)
V10. (7pb, 1aum) x 6 (54)
V11-12. 54pb (54)
V13.
(8pb, 1aum) x 6 (60)
V14.
4pb, 1aum, (9pb, 1aum) x 5, 5pb (66)
V15-20.66pb
(66)
V21.
(9pb, 1dis) x 6 (60)
V22.
4pb, 1dis, (8pb, 1dis) x 5, 4pb (54)
V23
(7pb, 1dis) x 6 (48)
V24. 3pb, 1dis, (6pb, 1dis) x 5, 3pb (42)
End with a ps. Using a wool needle, make a false stitch to achieve a neater finish. Finish off and hide the strand.
Suit Collar
In green:
Knit 2 rows to form the collar of the suit, the first row will be a sc base and the second row will be a picot stitch sequence:
Crochet 27 ch
F1.
26pb (26)
F2. 1sc, 3ch, 1sc hooking into the two visible strands of the sc, 1sc (at the base). Repeat this sequence in picot stitch throughout the row (13 times total). Leave a long thread to sew to the suit.
little shoes
Weaves in a spiral on a chain base.
In brown:
Crochet 10 ch
V1.
1aum, 7pb, 1aum triple, 8pb
(20)
V2.
2aum, 7pb, 3aum, 7pb, 1aum
(26)
V3.
(1pb, 1aum) x 2, 7pb, (1pb, 1aum) x 3, 8pb,
1aum (32)
V4.
BLO 32pb (32)
V5.
32pb (32)
Changes to orange:
V6-7. 32pb (32)
V8. 10pb, 8dis, 6pb (24)
Change to green:
V9.
7pb, 6dis, 5pb
(18)
V10. 1ch Turn the fabric and do the following sequence in picot stitch throughout the round:
1sc, 3ch, 1sc (in the two visible strands of the sc, 1sc (repeat throughout the round).
Finish with 1 sc in the first sc of the round. Finish off and hide strands.
You can sew or glue the flights of the shoe.
Cap
Knit in a spiral. In brown:
Knit in a spiral.
V1. 6pm and am (6)
In orange:
V2-6. 6pb (6)
V1. 6pm and am (6)
V2.
6aum (12)
V3.
(1pb, 1aum) x 6
(18)
V4.
(2pb, 1aum) x 6
(24)
V5-6. 24pb (24)
V7.
(3pb, 1aum) x 6 (30)
End with a ps. With a wool needle, make a false stitch to achieve a neater finish. Finish off and hide the strand.
An argument
You will knit 1 round on a chain base.
In green:
Crochet 7 ch
V1. 1pb, 1pma, 1aum pa, 1pma, 1bp, 1pma, 2pa, 1pma (all knits in the last cad), 1pb, 1pma, 1aum pa, 1pma, 1pb
Make a sc in the last stitch, knit 31 chains in the air right there, and then make 30 sc. ends with PD.
Final details
Sew the neck to the suit. In black felt or cloth, make the eyes, nose, and mouth of your pumpkin (guided by the photograph). Glue them to the suit well-centered.
Glue or sew the stem and leaf to the hat.
if
Congratulations!
You now have the finished Pumpkin Costume, I hope you enjoyed this pattern, if you have any questions, do not hesitate to contact me, and I will be happy to help you.
Pumpkin Suit is a free pattern by @franlanitas created by Carolina Ortiz Cossio, remember to mention me as the author when you publish your creations, I will be happy to share them.
If you’re a crochet lover and a fan of the adorable Labubu character, it’s time to bring your creativity to life by designing your own crochet Labubu outfit patterns! Whether you’re dressing up your favorite Labubu plushie or making tiny outfits for display, crocheting custom clothes adds a whole new layer of fun. From cozy…
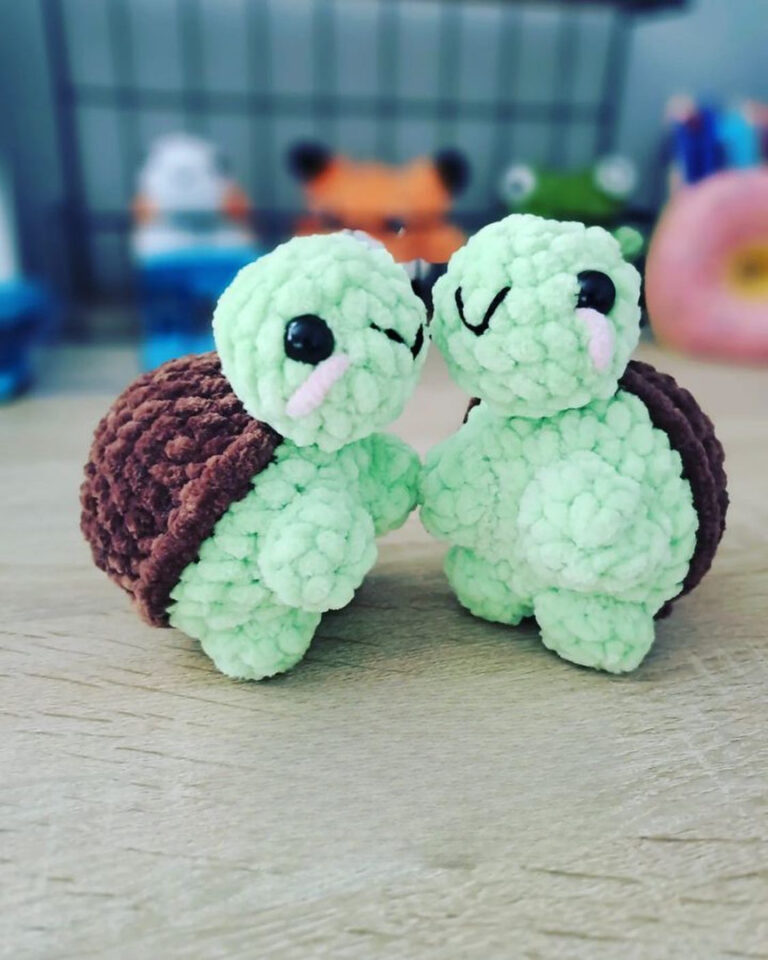
Round, squishy, and utterly impossible to put down, this mint green velvet turtle is the easiest amigurumi you will ever fall in love with! Turtles have a quiet, gentle charm that translates beautifully into crochet. This mini velvet turtle captures every bit of that charm in a small, squishy package worked in soft Himalaya Dolphin…
Cute & Cuddly Crochet Cabbage Amigurumi Patterns bring the charm of garden vegetables to life in soft, huggable form. These adorable creations blend the worlds of crochet and gardening, resulting in delightful handmade cabbage replicas. From realistic green cabbages to whimsical, colorful versions, these patterns offer a fun way to celebrate nature’s bounty through needlework….
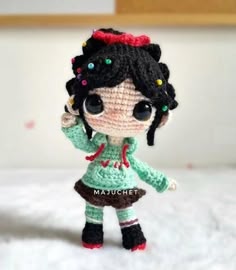
If you’re a Disney fan and love the magic of handmade toys, this Free Crochet Mini Merida Doll Pattern (Brave Inspired) collection is going to brighten your day! These beginner-friendly amigurumi tutorials show you how to crochet adorable mini princess dolls, with Merida at the heart of it all. Each project is fun, giftable, and…
Introducing the Amazing Crochet Chubby Duck Bag Charm Amigurumi Pattern, quick, beginner-friendly, and irresistibly squishy. Instantly brighten backpacks and keys with a cute, giftable make that works up fast. Brighten every bag with the Amazing Crochet Chubby Duck Bag Charm Amigurumi Pattern, an irresistibly squishy, beginner-friendly make that works up fast. Using small amounts of…
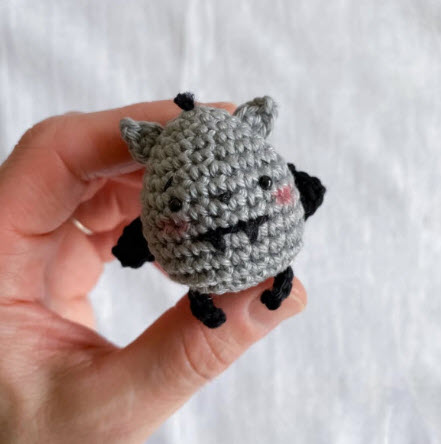
A tiny Crochet Grey Bat Toy with soft wings and round ears brings spooky charm without any real scare. This amigurumi suits Halloween decor, gift boxes, or a cuddly year-round companion piece. Honestly, bats do not have to look creepy, and this little Crochet Grey Bat Toy guy proves it easily. With a plump stuffed…