Cute Crochet Birthday Cupcake Amigurumi Pattern
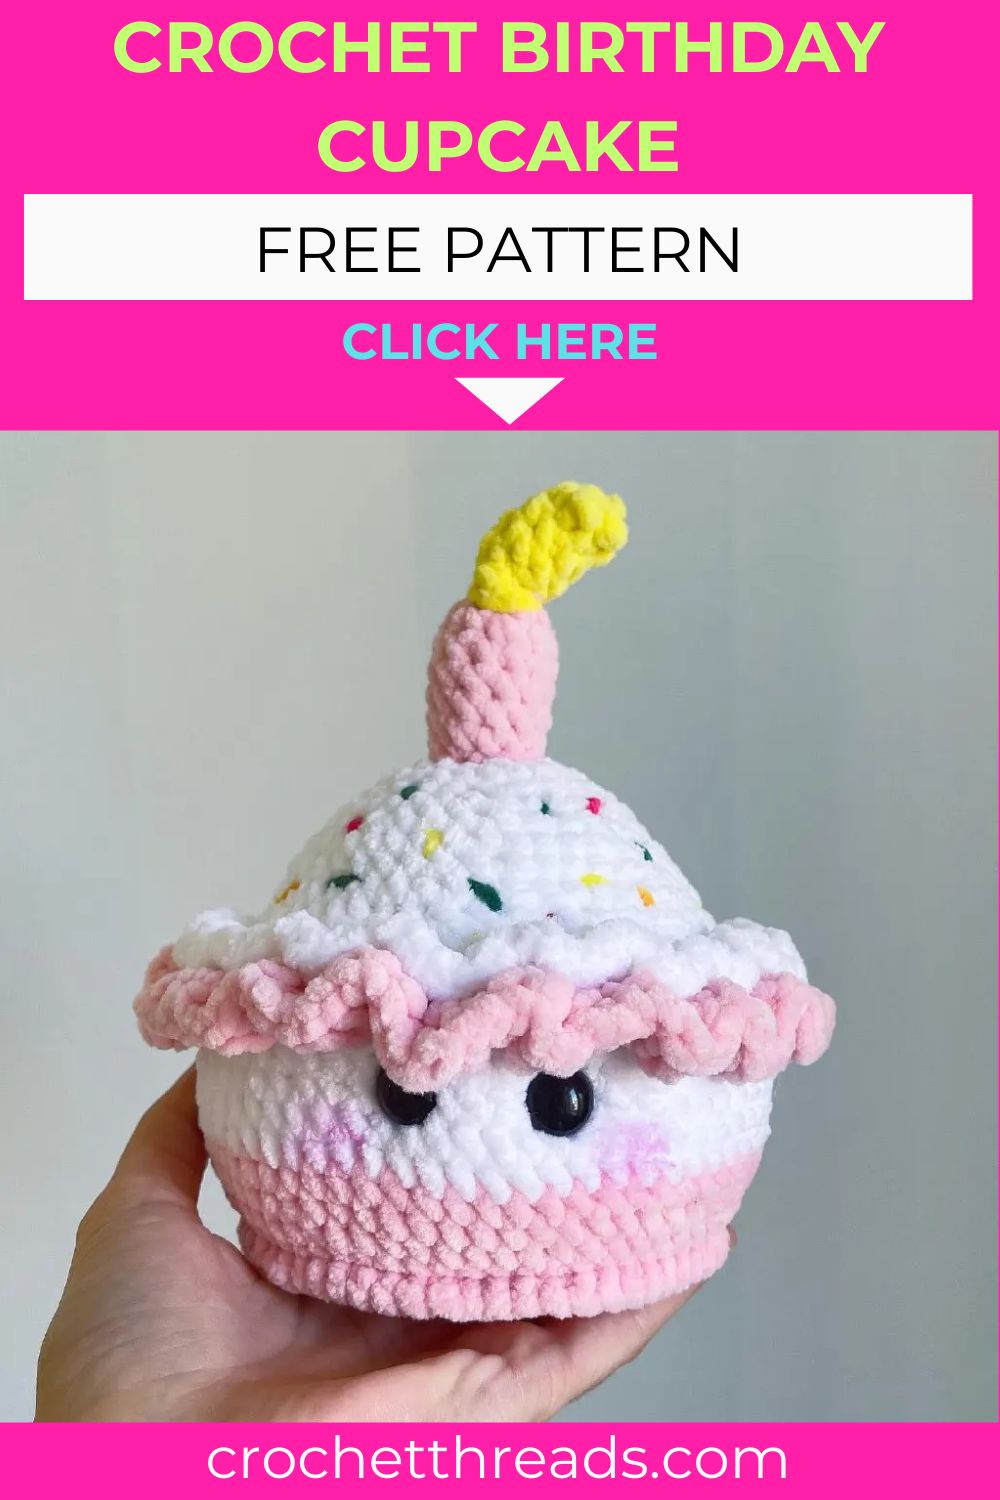
Amigurumi projects rarely capture celebration quite like this tiny birthday cupcake does. Its pink and white layered base, colorful sprinkles, and little candle on top capture all the joy of a real birthday treat. Made with thick, soft yarn, this project comes together quickly, making it the perfect choice for a handmade gift, party decor, or a sweet addition to any amigurumi collection.
This cupcake amigurumi builds a pink and white striped base using continuous single crochet, finished with a decorative front-loop border for texture. No joke, a tiny candle topper and sprinkle details turn a simple shape into a birthday treat. You’ll work the candle in two pieces, stuff separately, then stack and sew it onto the finished base. Real talk, this pattern makes a gift, party decoration, or dessert-themed shelf addition.

Skill Level
EASY TO INTERMEDIATE: This pattern suits crocheters comfortable with color changes, front-loop borders, and basic shaping. Honestly, the layered striping takes patience, but the finished cupcake is worth it.
Materials
- Himalaya Dolphin Baby (6, Super Bulky) in Light Pink, Yellow, and White
- Scrap yarn in different colors, for the “sprinkles”
- 4mm crochet hook
- 10mm safety eyes
- Polyester fiberfill
- Blush or fabric paint, for cheek details
Abbreviations
- MR: Magic Ring
- Sc: Single Crochet
- HDC: Half Double Crochet
- DC: Double Crochet
- Inc: Increase
- Dec: Decrease
- sl st: Slip Stitch
- ch: Chain
Full Pattern Instructions
BASE (stuff as you go, start with Pink yarn)
- 8sc in MR [8]
- inc x8 [16]
- (1sc, inc) x8 [24]
- (2sc, inc) x8 [32]
- (3sc, inc) x8 [40]
- (4sc, inc) x8 [48]
- (5sc, inc) x8 [56]
- (6sc, inc) x8 [64]
- BLO sc in all 64 sts [64] 10-12. (3 rounds) sc in all 64 sts [64]
Change color to White.
13-17. (5 rounds) sc in all 64 sts [64]
Change color to Pink.
- BLO sc in all 64 sts [64]
Change color to White.
- BLO (6sc, dec) x8 [56]
- sc in all 56 sts [56]
- (5sc, dec) x8 [48]
Insert 10mm safety eyes between rows 16 and 17.
- sc in all 48 sts [48]
- (4sc, dec) x8 [40]
- sc in all 40 sts [40]
- (3sc, dec) x8 [32]
- sc in all 32 sts [32]
- (2sc, dec) x8 [24]
- sc in all 24 sts [24]
- (1sc, dec) x8 [16]
- dec x8 [8]
CANDLE
Pink yarn:
- 6sc in MR [6]
- inc x6 [12] 3-7. (5 rounds) sc in all 12 sts [12]
Cut the yarn, leaving a long tail for sewing.
Yellow yarn:
- 3sc in MR [3]
- inc x3 [6]
- 5sc, inc [7]
- 6sc, inc [8]
- 7sc, inc [9]
Cut the yarn, leaving a tail for sewing.
Stuff the pink part of the candle and sew it to the top of the cake. Then stuff the yellow part and sew it on top of the candle.
SPARKLES
Use whatever scrap yarn you wish and thread it on the needle. Go around the top of the cake and make small lines in random places to create the sprinkles effect. Then switch to a different color and repeat as many times as you like.
Using blush or fabric paint, create cheeks under the eyes.
Pattern Overview
- Base: a single stuff-as-you-go piece worked in pink and white stripes, shaped through increases and decreases
- Decorative borders: three separate front-loop rounds worked back into earlier rows for a layered, textured finish
- Candle: two stacked pieces, a pink base and a yellow flame tip, each stuffed and sewn separately
- Sprinkle details: scrap yarn stitched randomly around the top of the cake for a festive sprinkle effect
- Face details: safety eyes plus painted or blushed cheeks for a soft, friendly expression
Special Techniques
- BLO shaping rounds: working in back loops only on select rounds leaves the front loops open, which is what allows the decorative borders to be added afterward
- Stuff as you go: filling the base gradually while crocheting keeps the shape firm and even without needing a closing seam later
- Front-loop border stitches: returning to earlier rows and working 2HDC or 2DC into each front loop creates a raised, ruffled stripe effect around the cake
- Two-part candle construction: the pink base and yellow flame are worked, stuffed, and stacked separately before being sewn together as one unit
- Random sprinkle stitching: using scrap yarn to make short random lines across the top mimics real sprinkles without needing a set pattern
Common Mistakes
- Working the decorative border rounds into the wrong loop, since they rely on the front loops left open earlier
- Skipping the stuff-as-you-go step and trying to fill the base after it’s already closed
- Overstuffing the candle pieces, which makes them too rigid to sit naturally on top of the cake
- Placing the safety eyes before reaching the correct row, throwing off the finished proportions
- Rushing the sprinkle stitching, which can make the scrap yarn lines look clumped instead of scattered
Assembly
- Crochet and stuff the striped base as you go, following the color changes in order
- Insert the safety eyes at the specified row before continuing the shaping rounds
- Return to row 19’s front loops and work 2HDC in each stitch using white yarn
- Return to row 18’s front loops and work 2DC in each stitch using pink yarn
- Return to row 9’s front loops and work 1sc in each stitch using pink yarn
- Stuff the pink candle piece and sew it to the top of the cake
- Stuff the yellow flame piece and sew it on top of the candle
- Use scrap yarn to stitch random sprinkle lines across the top of the cake, switching colors as desired
- Add blush or fabric paint under the eyes for soft cheek details
Important Remarks
- The yarn weight listed is bulky, so switching to a thinner yarn will noticeably change the finished size
- Insert safety eyes securely before adding the decorative borders, since the base becomes harder to access afterward
- For toys made for small children, consider embroidering the face instead of using safety eyes
- Sprinkle placement is fully random, so feel free to use as many or as few scrap colors as you like
- This pattern is intended for personal crafting use
Conclusion
This birthday cupcake amigurumi takes a handful of simple techniques- stuff-as-you-go shaping, front-loop borders, and a two-part candle- and turns them into a genuinely festive little dessert. Trust me, the layered pink and white stripes paired with the scattered sprinkle details are what really sell the birthday theme, and none of it requires advanced skills to pull off.
Once the candle is stacked and the sprinkles are stitched on, you’ll have a sweet handmade piece that works as a gift topper, a party decoration, or a fun addition to a dessert-themed amigurumi shelf. Real talk, this is an easy pattern to repeat in different color combinations, so don’t be surprised if one cupcake turns into a whole little bakery display.