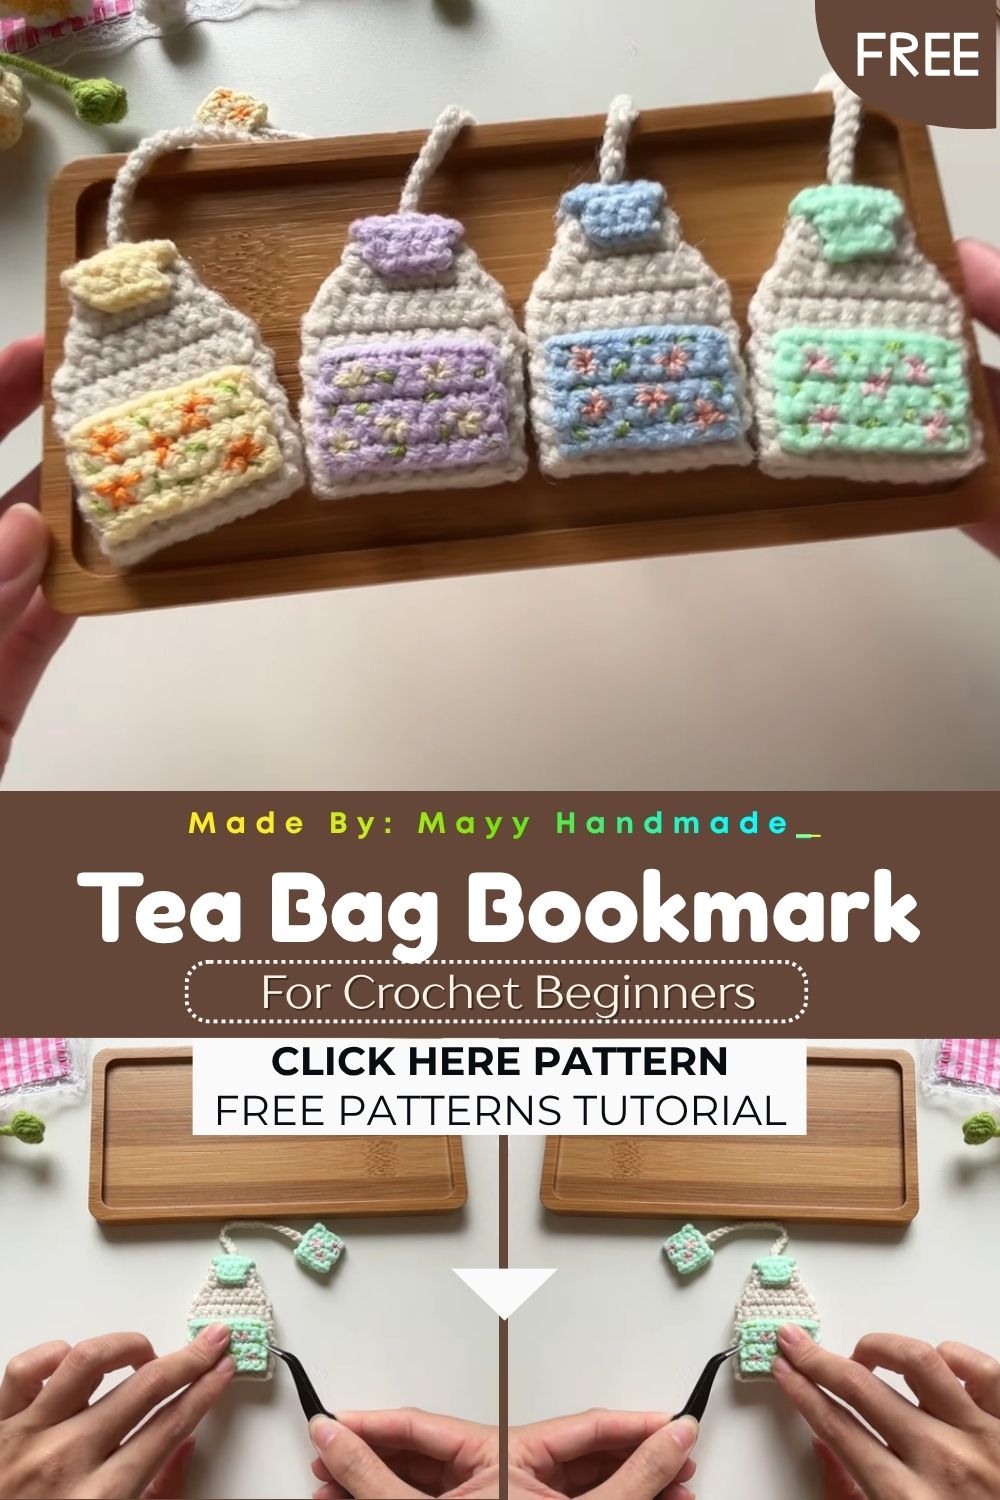
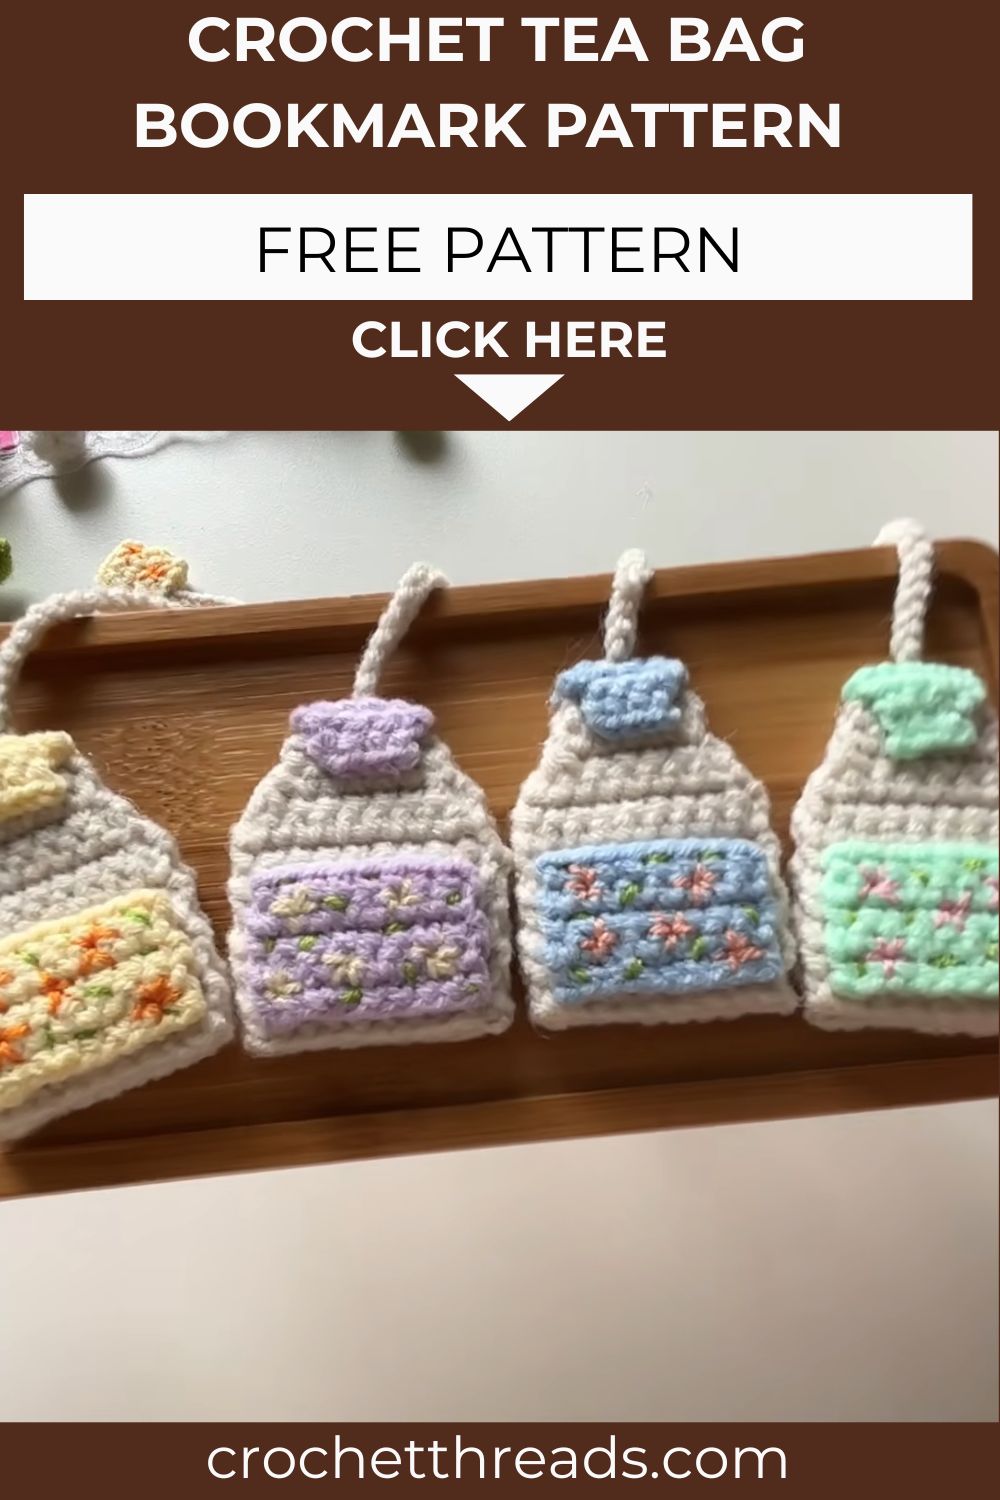
Mini Crochet Tea Bag Bookmark Pattern for Book Lovers
Honestly, there’s nothing better than curling up with a good book and a warm cup of tea. Now you can bring both of your favorite things together with this mini crochet tea bag bookmark. It’s a quick, beginner-friendly project that turns a handful of yarn scraps into the sweetest little reading accessory. Trust me, once you make one, you’ll want to whip up a whole set for your bookshelf.
This little bookmark is more than just cute it’s genuinely useful too. It slides right onto your page like a real tea bag hanging off the edge of a mug, keeping your spot safe while adding a cozy, handmade touch to your reading nook. Whether you’re a longtime crocheter or just picking up a hook for the first time, this pattern is a low-pressure, high-reward project you’ll finish in an afternoon.
What Is This Crochet Project All About?
This crochet pattern recreates a miniature tea bag, complete with a tiny tag and string, designed to work as a bookmark. It’s built from basic stitches worked in short rows and rounds, so it comes together fast without eating up your whole yarn stash. Because it uses so little yarn, it’s also the perfect crochet pattern for using up leftover scraps from bigger projects.
Book lovers, tea drinkers, and crochet beginners all seem to fall for this one. It also makes a lovely handmade gift idea — pair it with a real box of tea and a paperback for a thoughtful, budget-friendly present. Low-key, this might become your new go-to gift for every occasion.
Skill Level
This is a beginner-friendly crochet project. If you know how to chain, single crochet, and do a basic decrease, you already have everything you need. There’s no shaping magic or tricky stitch counts here, just simple, repetitive rows that are easy to follow even if this is your first amigurumi-style project. For real, if you’ve made a granny square before, you can make this bookmark too.
Materials and Supplies Needed
Here’s everything you’ll want to gather before you start:
Yarn Type
- Worsted weight (medium, 4) yarn in beige or tan for the tea bag body
- A small amount of white or cream yarn for the paper tag
- A small amount of green or brown yarn for the tag stitching detail
- Optional: a contrasting color for a decorative border or “steam” detail
Hook Size
- 3.5mm to 4mm crochet hook (US E/4 to G/6), depending on your yarn weight and tension
Extra Tools
- Yarn needle for weaving in ends
- Scissors
- Stitch marker (helpful for keeping track of rounds)
- Small amount of polyester stuffing, if you’d like a slightly puffy tea bag
- Optional: fabric glue or clear-drying craft glue for extra tag durability
Crochet Stitches and Abbreviations Used
- ch – chain
- sl st – slip stitch
- sc – single crochet
- hdc – half double crochet
- dec – decrease (single crochet two stitches together)
- inc – increase (two single crochet stitches in one stitch)
- st(s) – stitch(es)
- rep – repeat
Step-by-Step Crochet Instructions
Part 1: The Tea Bag Pouch
Start with your beige yarn.
- Round 1: Ch 6, then sc into the second chain from the hook and each chain across. (5 sts)
- Rounds 2–6: Ch 1, turn, sc in each stitch across. (5 sts)
- Round 7: Ch 1, turn, dec 1, sc 1, dec 1. (3 sts)
- Fasten off, leaving a long tail for sewing.
This creates the small rectangular pouch shape that forms the base of your tea bag. Don’t worry if your rows curl a little at this stage, that’s completely normal for such a small piece.
Part 2: The Paper Tag
Switch to your white or cream yarn.
- Row 1: Ch 4, sc into the second chain from the hook and each chain across. (3 sts)
- Rows 2–3: Ch 1, turn, sc in each stitch across. (3 sts)
- Row 4: Ch 1, turn, dec 1, sc 1. (2 sts)
- Fasten off, leaving a tail.
With your green or brown yarn, stitch a simple straight line or a small “leaf” shape across the tag for decoration. This tiny detail makes the tag look just like a real tea tag.
Part 3: Assembly
- Fold the top edge of the tea bag pouch forward slightly and sew it in place using the matching beige tail. This gives the bag its signature folded-top look.
- Sew the side seams of the pouch together, adding a small pinch of stuffing before closing it up completely if you want a slightly plumped shape.
- Cut a length of yarn (about 10–12 inches, or as long as you’d like your bookmark string to be) and secure one end to the top of the tea bag.
- Attach the other end of the string to your paper tag using a small knot or a few stitches.
- Weave in any remaining ends with your yarn needle.
And that’s it, your mini tea bag bookmark is ready to slip into your favorite book.
Helpful Beginner Tips
- Keep your stitches tight and even, since this project is small and any gaps will be easy to spot.
- Use a smaller hook than you’d normally choose for your yarn weight. This helps keep the fabric dense enough to hold its shape.
- Count your stitches after every row for the first few tries. Small pieces make it easy to lose track.
- Leave longer yarn tails than you think you’ll need. It’s much easier to trim excess yarn than to run out mid-seam.
- Practice your decrease stitch separately first if you’re new to shaping, since it shows up at the corners of both pieces.
Common Mistakes and How to Fix Them
- Uneven edges: This usually happens when tension changes row to row. Try to keep your hand relaxed and your yarn tension consistent throughout.
- Tea bag looks too bulky: Skip the stuffing or use just a tiny pinch. Overstuffing a piece this small can distort the flat, folded look of a real tea bag.
- String is too short or too long: Measure against the book you plan to use it in before cutting your string, rather than guessing the length.
- Tag doesn’t lay flat: Press it gently with your fingers after sewing, or add a small dot of fabric glue to help it hold its shape.
- Colors bleed together in the tag detail: Use a yarn needle with a sharp point and go slowly when adding the stitched line, keeping your stitches short and neat.
Pattern Customization Ideas
- Swap the beige yarn for green, chamomile yellow, or berry red to represent different tea flavors.
- Add a tiny pom-pom or bead charm to the end of the string for extra flair.
- Make a matching set in different colors to gift as a bundle to a book club or tea-loving friend.
- Personalize the tag with embroidered initials instead of the leaf detail.
- Turn the pattern into a keychain or bag charm instead of a bookmark by attaching a keyring to the string.
Size and Color Suggestions
The finished tea bag bookmark typically measures around 2 inches tall and 1.5 inches wide, making it light enough to slip into any book without adding bulk. Adjust the string length based on your book size, longer for hardcovers, shorter for slim paperbacks.
For colors, classic beige or tan gives the most realistic tea bag look, while soft pastels or bold jewel tones work beautifully if you’re making a fun, decorative version instead. Mixing several color variations is a great way to build a little collection.
FAQ Section
How long does this project take to make?
Most crocheters finish this bookmark in under an hour, making it a great quick project for a slow afternoon.
What yarn weight works best?
Worsted weight yarn is the easiest to work with for beginners, though cotton or fingering weight yarn also works well if you prefer a smaller, more delicate finish.
Can I make this without stuffing?
Yes. The bookmark holds its shape just fine without stuffing, and a flatter tea bag actually sits more naturally between book pages.
Is this pattern good for using leftover yarn?
Definitely. This project uses very small amounts of yarn, so it’s ideal for scrap-busting.
Can I sell items made from this Crochet Tea Bag Bookmark pattern?
Handmade tea bag bookmarks are popular items at craft markets and online shops, so this pattern works well for small handmade businesses too.
Conclusion
This mini crochet tea bag bookmark proves that small projects can bring big smiles. It comes together fast with just a little yarn and a few quiet minutes with your hook, making it a sweet gift for any book and tea lover. Once you make your first one, you’ll probably want a whole set in different colors.