Unique Cute Crochet Bunny Coaster Easter & Spring Pattern Table Decor
A Crochet Bunny Coaster is the kind of project that instantly warms and brightens your table. It is practical enough to hold a mug, but cute enough to leave out as everyday decor.
This design combines a flat round coaster with a little bunny head, soft ears with pink inner details, and tiny paws on the sides. The result is a cozy Easter and spring-themed piece that is beginner-friendly and giftable.
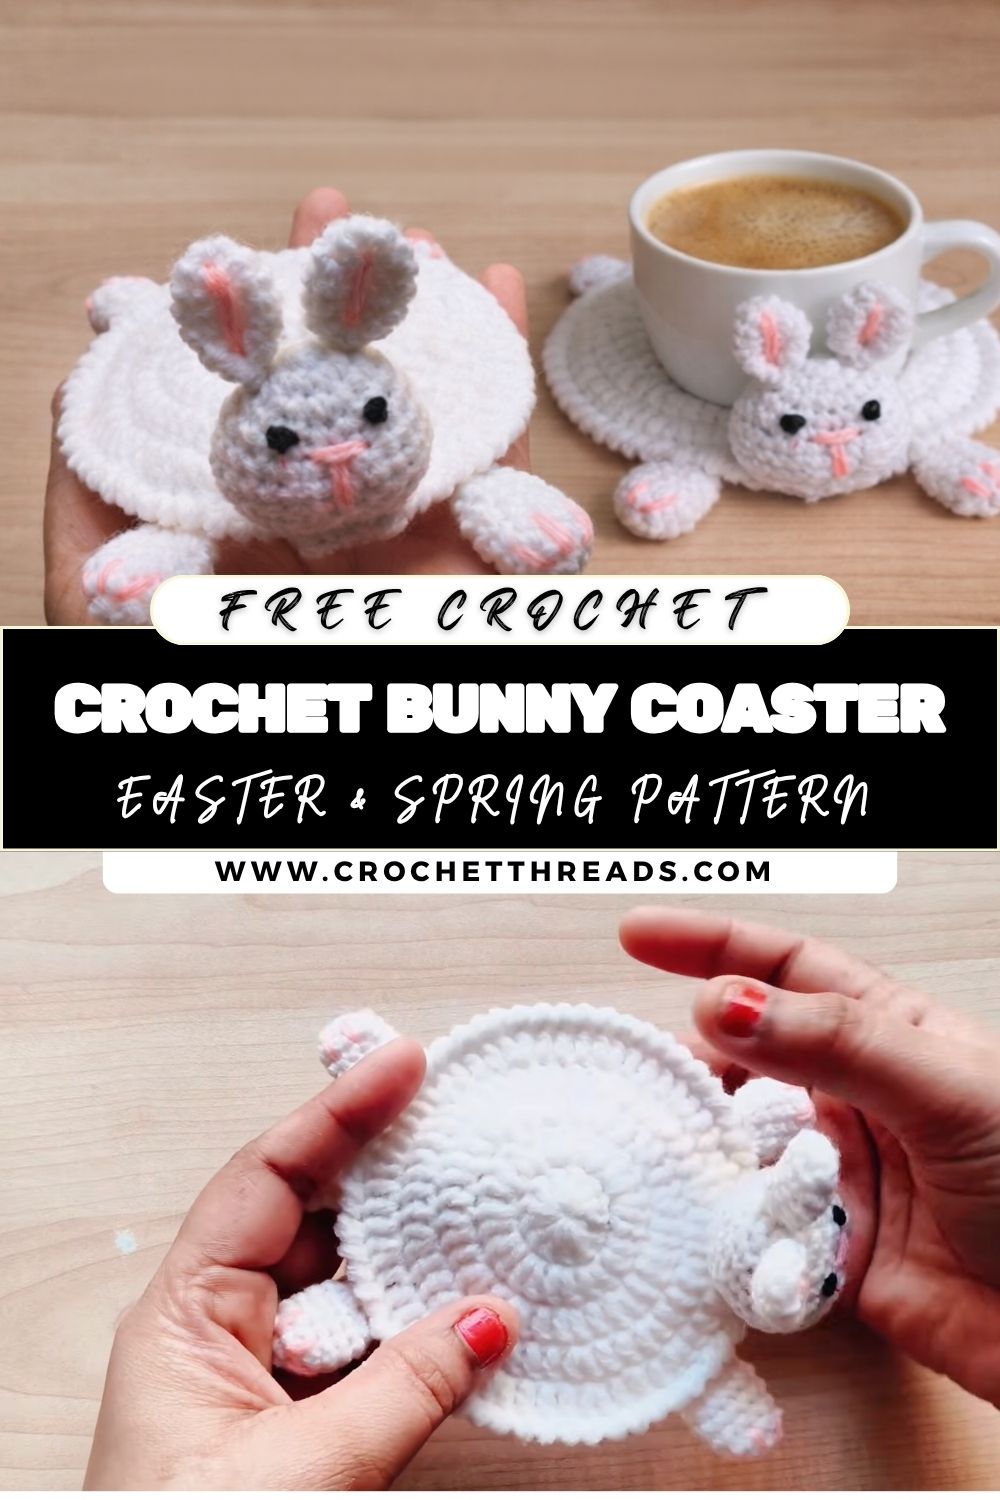
The bunny details are what make it feel extra special. The ears are soft and slightly plush with a pink inner section, and the face is stitched with simple embroidery rather than hard pieces. Meanwhile, the tiny bunny paws on the coaster edges add a playful “peeking over the rim” effect that fits perfectly with spring decorating.
It is also a very satisfying project because it is small and quick. You can make one coaster as an afternoon treat, or later create a full matching set for Easter brunch, a baby shower, or a cute gift bundle. A soft cotton yarn keeps it absorbent and easy to wash, so it is both functional and adorable.
Materials Needed
- Cotton yarn, white (main): 35 g
- Cotton yarn, pink (inner ears and optional blush): 5 g
- Cotton yarn, black (eyes and nose): 2 g (or black embroidery thread, about 2 m)
- Crochet hook: 3.5 mm (usable range 3 mm to 4 mm)
- Fiberfill stuffing (for head): 3 g
- Yarn needle: 1
- Stitch marker: 1
- Scissors: 1
- Optional: blush thread (light pink) or a tiny bit of fabric blush
Skill Level
Beginner-friendly.
You will mainly use basic stitches to make a flat circle and a small, rounded head. The details are simple and forgiving, and embroidery keeps the face safe and easy.
Time Planning at a Glance
- Coaster base time: 20 to 30 minutes
- Bunny head time: 15 to 25 minutes
- Assembly time (ears, paws, face, sewing): 20 to 30 minutes
- Total time: 55 minutes to 1 hour 25 minutes
Sizing Tips
- Use thinner cotton yarn and a 3 mm hook for a smaller coaster, or thicker cotton and a 4 mm hook for a wider mug base.
- To maintain a flat circle, increase each round evenly and stop when it reaches your preferred size.
- If your coaster starts to ripple, your increases may be too many. If it starts to cup, your increases may be too few, or your tension is too tight.
Instructions
a. Coaster Base (Round Circle)
Making time: 20 to 30 minutes
- First, start the center. Make a magic ring or chain loop and crochet your first round into it.
- Next, build a flat circle. Increase evenly in each round so the base expands without curling. Choose joined rounds for a clean seam, or continuous rounds for speed.
- Meanwhile, check flatness often. Lay the coaster on a table every few rounds. If it lifts at the edges, add a few more increases.
- Later, add decorative edging. Finish with a simple border, such as a neat single-crochet round or a gentle scallop, for a cute, polished rim.
- Finally, fasten off and weave the end lightly. Save a longer tail only if you plan to sew the head with it.
b. Bunny Head
Making time: 15 to 25 minutes
- First, crochet a small ball. Work a tiny amigurumi sphere using increases, even rounds, then decreases.
- Next, lightly stuff the head. Add a small amount of fiberfil,l so it feels soft but not stretched.
- Later, close and shape. Finish the decreases, close the opening, and roll the piece gently to even out the stuffing.
c. Ears Creation
Making time: 12 to 18 minutes
- First, crochet two ear shapes. Make them oval and slightly tapered at the top for a soft bunny look.
- Next, add inner pink detail. Crochet a smaller pink insert or stitch pink onto the center of each ear with a simple panel effect.
- Meanwhile, position them on the head. Place the ears slightly angled outward so they look relaxed and cute.
- Finally, sew neatly. Attach with small stitches and weave ends through the head so nothing pokes out.
d. Paws (Decorative Detail)
Making time: 8 to 12 minutes
- First, crochet two small paw shapes. Keep them rounded like tiny pads, not long arms.
- Next, place them on the coaster edge. Position them so the bunny appears to be holding the coaster rim.
- Finally, attach evenly. Sew both paws at the same height and distance from the bunny’s head for a balanced look.
e. Face Detailing
Making time: 8 to 12 minutes
- First, mark placement. Use pins or scrap yarn to preview where the eyes and nose will sit.
- Next, embroider the eyes. Small vertical stitches or tiny dots look gentle and kawaii.
- Meanwhile, stitch the nose and mouth. A small triangle or “Y” style nose works well, with a short mouth line underneath.
- Later, add blush. Use a few light pink stitches or a tiny blush dab on each cheek.
- Finally, secure threads inside. Knot and weave through the stuffing to keep the face neat.
Assembly Instructions
- First, attach the bunny head to the coaster. Sew it near the upper edge so there is still a flat space for a cup.
- Next, double-check alignment. Make sure the head faces forward and does not tilt.
- Meanwhile, secure ears and paws. Reinforce each attachment with a few extra stitches, as coasters are handled often.
- Later, weave in all ends. Run yarn tails through stitches on the back to hide them cleanly.
- Finally, press the coaster flat. Shape it by hand so the circles sit smoothly on the table.
Basic Tips for Beginners
- First, count stitches each round to keep the coaster perfectly circular.
- Next, use cotton yarn for absorbency and crisp stitch definition.
- Meanwhile, keep tension steady so the base stays flat.
- Later, embroider the face slowly and step back to check symmetry.
- Finally, sew pieces with strong thread paths since coasters are used and washed.
Common Mistakes to Avoid: The coaster curls
- g upward because of too much tension or not enough increases.
- Uneven increases that create corners or a wobbly circle.
- Overstuffing the bunny head can make it look stretched and lumpy.
- Misplaced facial features that sit too high or too far apart. Test placement first.
Variations to Personalize
- Try different bunny colors like cream, beige, grey, or pastel tones for spring.
- Add a small bow, mini flower, or a tiny carrot applique near the ear.
- Create themed coaster sets: Easter pastels, baby shower neutrals, or a mixed bunny family with different expressions.
- Make a larger version for bowls by increasing a few more rounds on the base.
Finishing Tips
- Weave ends neatly and avoid bulky knots on the underside.
- Shape the coaster flat with your hands, then let it rest under a book for a few minutes.
- Light blocking helps if the edges wave. Mist lightly with water, reshape on a flat surface, and let dry fully.
Tutor Suggestions for Beginners
First, follow the video slowly as a visual guide for shaping, then pause after each section and compare your piece. Next, repeat any round that makes the coaster ripple. Meanwhile, practice crocheting a flat circle with scrap yarn before starting the final coaster. Finally, take your time with embroidery since small changes in placement make a big difference.
Conclusion
This Crochet Bunny Coaster is a sweet mix of cute decor and everyday usefulness. First, crochet a flat round base with a tidy edge. Next, add the lightly stuffed bunny head, soft ears with pink centers, and tiny paws. Meanwhile, embroider a simple face to bring it to life. Finally, make a set and enjoy spring all year.