Fearless Crochet Giraffe Toys Amigurumi Step-by-Step Pattern for Starters
Bright, playful, and full of personality, this crochet giraffe amigurumi instantly catches the eye with its long neck and charming handmade details. It’s the kind of project that not only looks adorable but also feels rewarding as each part comes together beautifully.
Perfect for adding a handmade touch to gifts or creating a cute toy for kids, this crochet giraffe offers a fun and relaxing experience. Its simple structure and creative shaping make it an enjoyable project for anyone who loves crafting soft and unique amigurumi designs.
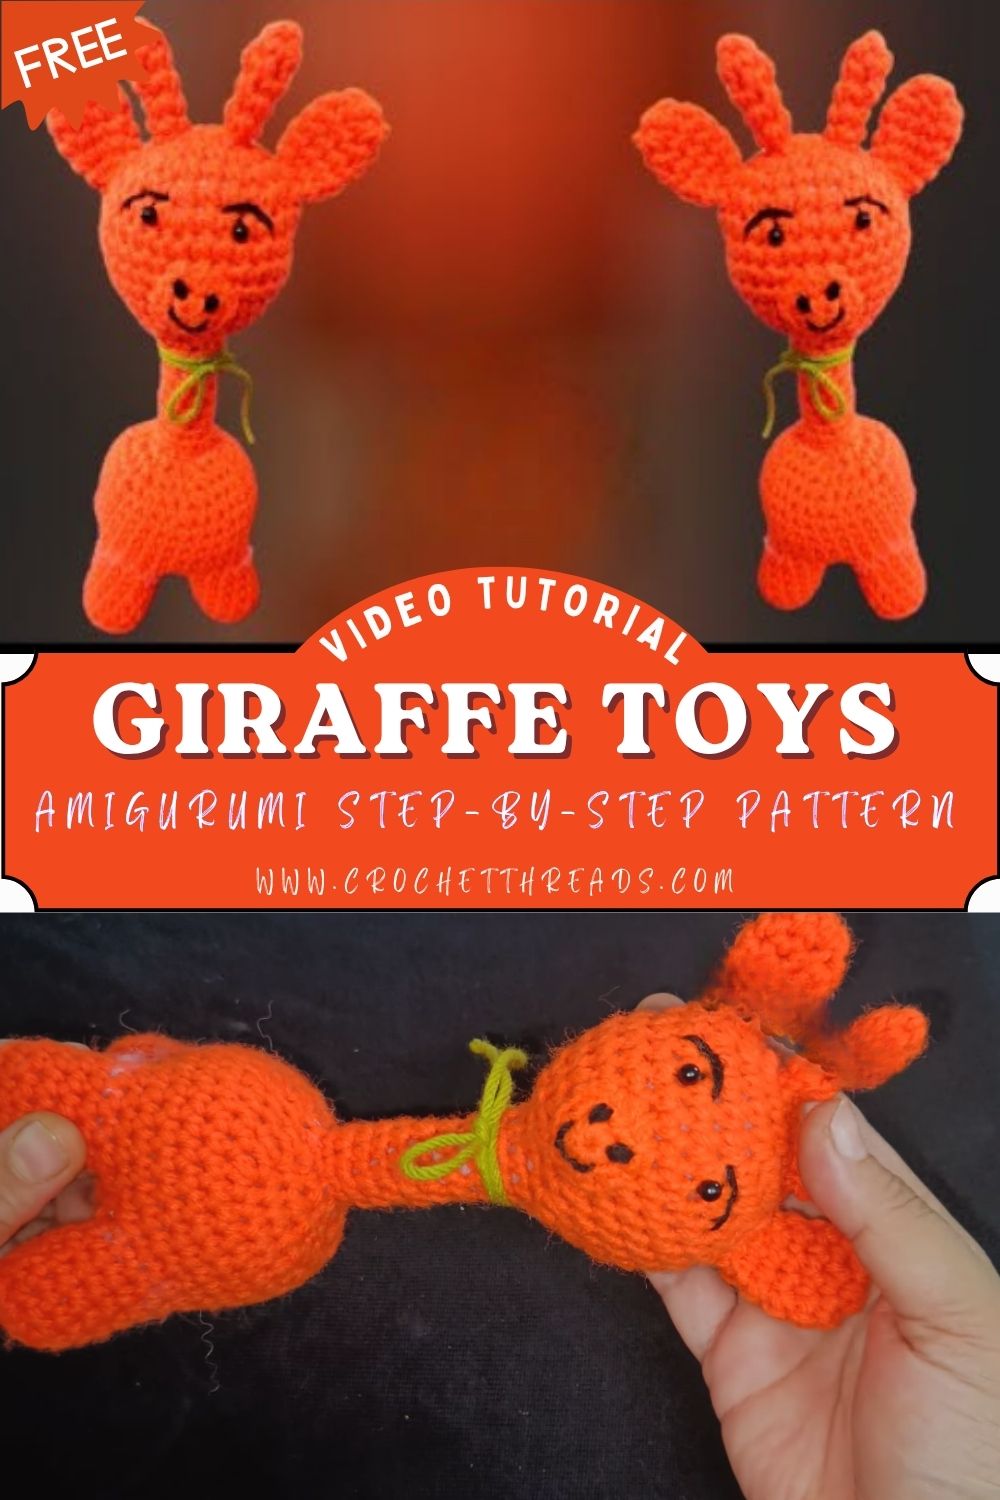
Amigurumi is the Japanese-inspired art of crocheting small stuffed shapes, most often animals, using tight stitches, simple shaping, and a bit of stuffing magic. The best part is that you don’t need fancy techniques to get an adorable result. With basic rounds, increases, and decreases, you can build a toy that looks polished and professional, even if you’re still learning.
Giraffes are especially popular as amigurumi toys because their features are naturally “cute-friendly”: a rounded body, a long neck that’s fun to hug, small ears, tiny horns (ossicones), and lots of room to add personality with embroidered details. This little friend makes a thoughtful baby shower gift, a sweet kids’ toy (with safety choices in mind), or a playful piece of nursery decor. You’ll mainly use single crochet, increases, decreases, and a little embroidery for the face; these simple steps come together in a really satisfying way.
Materials Needed
- Acrylic or cotton yarn (orange/yellow for giraffe, small contrast for details)
- Crochet hook (2.5mm–3.5mm)
- Safety eyes (8–10mm)
- Polyester fiberfill stuffing
- Yarn needle
- Stitch marker
- Scissors
- Black thread (for facial details)
Abbreviations
- sc = single crochet
- inc = increase (2 sc in same st)
- dec = decrease (single crochet two stitches together)
- sl st = slip stitch
- ch = chain
- st = stitch
Skill Level
Beginner-friendly. If you can crochet in continuous rounds and are comfortable counting stitches, you can make this giraffe. The shaping is gentle, and the details are small enough to feel fun rather than overwhelming.
Step-by-Step Pattern
HEAD
Work in continuous rounds. Use a stitch marker to track the first stitch of each round.
R1: Magic ring, 6 sc (6)
R2: inc x6 (12)
R3: (sc, inc) x6 (18)
R4: (2 sc, inc) x6 (24)
R5: (3 sc, inc) x6 (30)
R6: (4 sc, inc) x6 (36)
R7–R11: sc around (36)
At this stage, your head should look like a smooth little dome. If it’s starting to curve too sharply, check that your stitch count stayed consistent. Tight, even tension helps the head hold its shape nicely.
Insert eyes: Place 8–10mm safety eyes between R9 and R10, about 7–8 stitches apart. Adjust spacing based on the expression you want; for a cuter “baby” look, slightly wider spacing feels more relaxed.
R12: (4 sc, dec) x6 (30)
R13: (3 sc, dec) x6 (24)
R14: (2 sc, dec) x6 (18)
Start stuffing the head firmly now. Use small bits of fiberfill and press them into place so the cheeks look rounded rather than lumpy.
R15: (sc, dec) x6 (12)
R16: dec x6 (6)
Don’t fasten off, keep going to build the neck from the head.
NECK (LONG PART)
The neck is worked straight to get that classic giraffe look. A little stuffing along the way is key—think “supported but not stiff.”
R17: inc x6 (12)
R18–R33: sc around (12) for 16 rounds
As you continue, add light stuffing every few rounds. The neck should feel stable, but still slightly squishy. If you pack it too tightly, it can look rigid and may push the head upward awkwardly.
BODY
Now the fun part: watch the shape grow from a slim neck into a rounded belly.
R34: (sc, inc) x6 (18)
R35: (2 sc, inc) x6 (24)
R36: (3 sc, inc) x6 (30)
R37: (4 sc, inc) x6 (36)
R38–R43: sc around (36)
Begin stuffing the body more firmly than the neck. I like to pause here and gently squeeze the sides to check for gaps or thin spots, then add a bit more stuffing where it needs support.
R44: (4 sc, dec) x6 (30)
R45: (3 sc, dec) x6 (24)
R46: (2 sc, dec) x6 (18)
R47: (sc, dec) x6 (12)
Add final stuffing, shaping the belly so it’s rounded and balanced under the long neck.
R48: dec x6 (6)
Fasten off, weave the tail end through the final stitches, and close neatly.
LEGS (4 SMALL PARTS)
Make 4. Stuff lightly so they keep their shape without feeling like hard pegs.
R1: Magic ring, 6 sc (6)
R2: inc x6 (12)
R3–R6: sc around (12)
R7: (2 sc, dec) x3 (9)
R8–R9: sc around (9)
Fasten off, leaving a long tail for sewing. Add a small pinch of stuffing and shape each leg into a short cylinder.
EARS
Make 2. These are small ovals that fold slightly when attached, which gives a sweet, gentle look.
R1: ch 5
Work along the chain: sc in 2nd ch from hook, sc in next 2 ch, 3 sc in last ch.
Working on the other side of the chain: sc in next 2 ch, 2 sc in last ch (10)
R2: sc around (10)
sl st to close. Fasten off, leave a sewing tail.
If you like a slightly cupped ear, fold it gently at the base before stitching.
HORNS (OSSICONES)
Make 2. These little tubes are quick, and they instantly say “giraffe.”
R1: Magic ring, 6 sc (6)
R2–R4: sc around (6)
Fasten off, leave a sewing tail.
Add a tiny pinch of stuffing if you want them to stand up more, or leave them unstuffed for a softer look.
Assembly
Take your time here—assembly is where the personality shows up.
- Place the horns (ossicones): Sew them on top of the head, sitting a little toward the front rather than perfectly centered at the back. Keep them evenly spaced.
- Attach the ears: Position each ear slightly to the side of the horns, a touch lower. Stitch the base securely so the ear has a gentle outward angle.
- Attach the legs: Turn the body so the closing round is the bottom. Pin or hold the legs in place evenly, two at the front, two at the back, ack so that the giraffe can sit nicely. Sew each leg firmly around the top edge.
- Check the face placement: Before tightening all finishing stitches, hold the giraffe at eye level and make sure the eyes feel centered and friendly.
A helpful trick is to set the giraffe on a table and nudge the legs until it sits balanced, then sew them down in that exact spot.
Finishing Touch
Thread black embroidery thread (or thin black yarn) onto a needle and add the face details. A small, curved smile and a tiny nose line can completely change the mood in the best way.
- Embroider the nose: A short vertical stitch or a tiny “V” shape works well.
- Add a smile: Stitch a gentle curve under the nose, keeping it small and simple.
- Shape the toy: Use your hands to smooth the stuffing, pinch the cheeks slightly, and straighten the neck.
- Hide all yarn ends: Weave ends into the body and trim after pulling the tail through different directions so it won’t creep out later.
If you want even more character, you can embroider small eyelashes or add a few tiny spots using your contrast yarn—just keep them subtle so the face stays the star.
Tips for Beginners
- Keep tension even so the stuffing doesn’t show through the stitches.
- Count stitches carefully at the end of each round to stay on track.
- Use a stitch marker every round (it saves so much frustration).
- Don’t overstuff the neck; a little support is enough for a nice shape.
- Take time shaping details—small changes in eye spacing and embroidery make a big difference.
Conclusion
Making a Crochet Giraffe Amigurumi is one of those projects that feels relaxing. At the same time, you work and it’s extra rewarding when it’s done, especially when that long neck and sweet face finally come together. Try changing the colors for a modern nursery vibe, add embroidered spots, or even make a tiny scarf for a cozy twist. However you customize it, your giraffe will end up with its own lovable personality, stitched in by your hands.