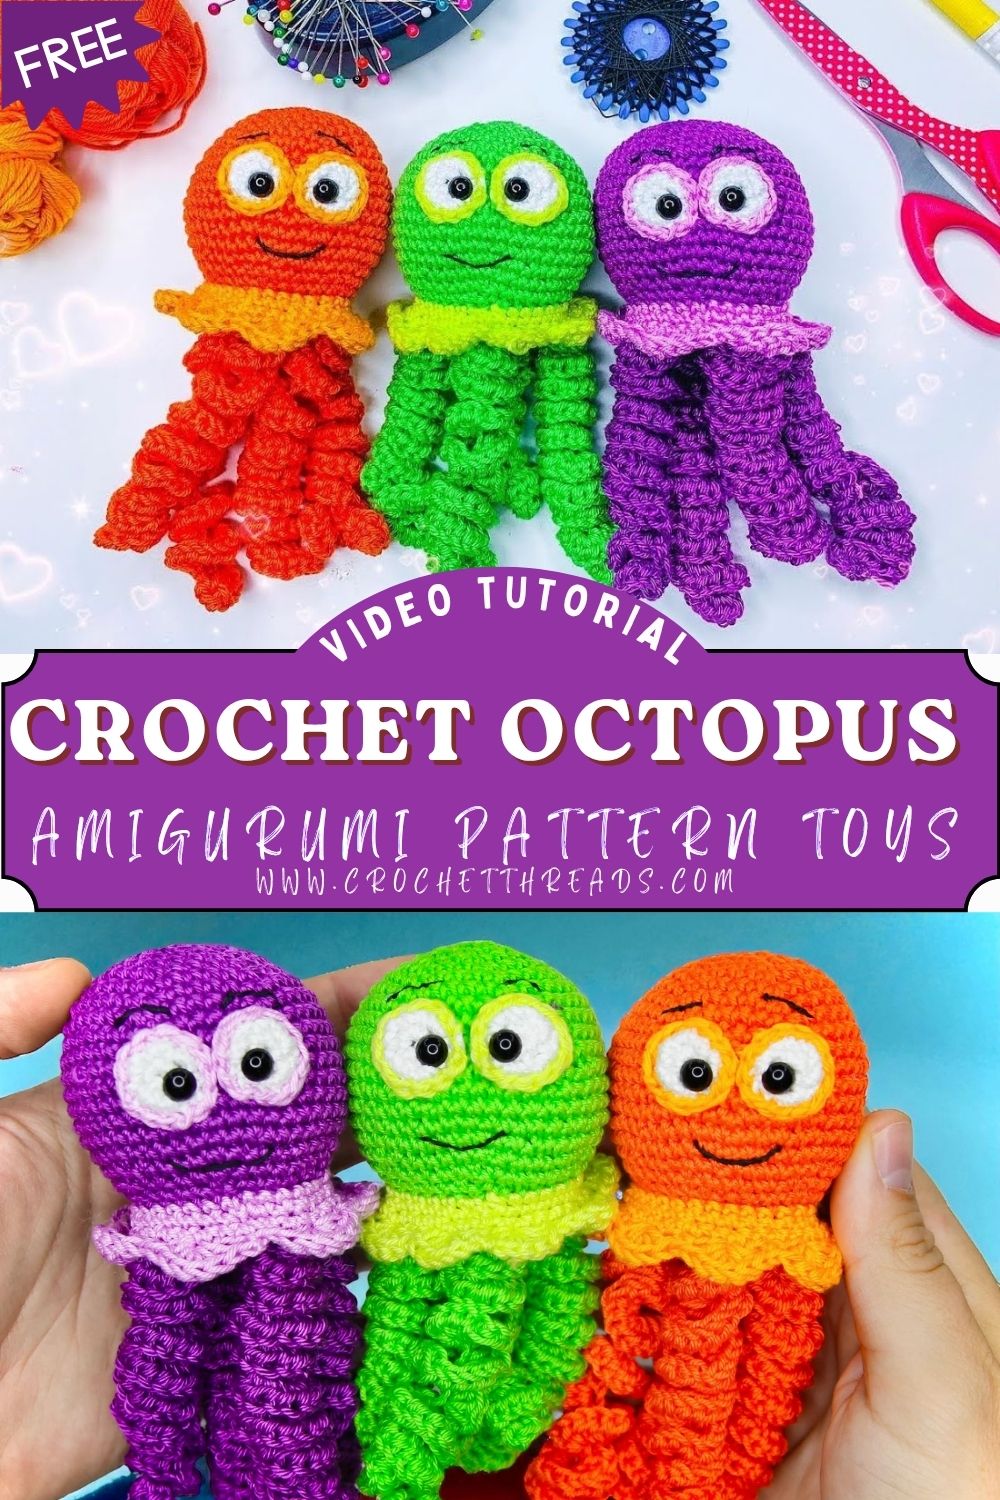
Adorable Crochet Octopus Amigurumi Toys Pattern for Absolute Beginners
Ocean cuteness, bright yarn, and a squishy little shape make the perfect cozy project. Crochet octopus amigurumi brings instant charm to any crochet basket, especially with big eyes and bouncy curls.
Soft spirals, a frilly collar, and playful colors turn a mini crochet octopus into a quick favorite. A simple, easy octopus crochet pattern like this one makes a sweet beginner amigurumi toy and an extra cute crochet sea animal for gifts and decor.
Octopus amigurumi stay popular for a reason. That round head and body create a classic “plush” look with very little shaping, so the project feels relaxing rather than complicated. Big expressive eyes add personality fast, even with only a few embroidery stitches. Then the curly tentacles bring the fun, because the spirals look fancy but use easy repeats.
Small octopus toys also fit iseamlessly nto everyday life A bright little octopus can become a baby shower gift, a cheerful desk buddy, a comforting stress toy, or a backpack charm. Keychains work great too, especially in bold colors like purple, green, orange, and pink. One base pattern, endless color combinations, and a whole ocean of character.
Materials Needed
- Yarn (DK or worsted, pick one and stay consistent)
- Main color (choose one): purple, green, orange, pink: 25 g
- Contrast color for collar (optional): 10 g
- White yarn for eye whites (optional): 2 g
- Black yarn for embroidery details: 2 g
- Crochet hook: 2.75 mm to 3.5 mm (use a smaller hook for tighter stitches)
- Safety eyes: 8 mm (or embroider eyes with black yarn)
- Stuffing: 20 g polyester fiberfill
- Needle: tapestry needle
- Stitch marker
- Scissors
- Optional: blush powder, tiny bow, small stitch-on decorations
Abbreviations
- MR = magic ring
- sc = single crochet
- inc = increase (2 sc in one stitch)
- dec = decrease (single crochet 2 together)
- sl st = slip stitch
- ch = chain
- BLO = back loop only
- FLO = front loop only
- hdc = half double crochet
Skill Level
Beginner / Easy Beginner
Simple rounds, basic increases and decreases, and repeatable curly tentacles. The frill uses one easy ruffle round, and assembly stays minimal.
Estimated Time
- Total time: 1.5 to 3 hours
- Head/Body: 30 to 50 minutes
- Frill/Collar: 10 to 15 minutes
- Tentacles (8): 25 to 45 minutes
- Facial details + assembly: 15 to 25 minutes
Important Notes Before Starting
- Work in continuous rounds unless stated otherwise.
- Use a stitch marker to track the first stitch of each round.
- Keep stitches tight to avoid stuffing showing through.
- Stuff gradually for a smooth, round shape.
- Maintain symmetry by checking eye and tentacle spacing as you go.
Step-by-Step Pattern
Finished size: about 8-11 cm tall, depending on the yarn and hook.
Gauge: not critical, just keep stitches tight and even.
Head/Body (Main Piece)
- Start with a magic ring
- Round 1: MR, 6 sc (6)
- Round 2: inc around (12)
- Round 3: (sc, inc) around (18)
- Round 4: (2 sc, inc) around (24)
- Round 5: (3 sc, inc) around (30)
- Build a rounded dome
- Round 6: (4 sc, inc) around (36)
- Rounds 7 to 10: sc around (36)
- Eye placement guidance
- Place safety eyes between Rounds 8 and 9, about 7 to 8 stitches apart.
- For extra expression, angle the eyes slightly so the octopus looks curious.
- Start decreasing to close the shape
- Round 11: (4 sc, dec) around (30)
- Round 12: (3 sc, dec) around (24)
- Stuffing timing
- Start stuffing firmly now. Keep the top round and smooth, then fill the sides.
- Round 13: (2 sc, dec) around (18)
- Add more stuffing, especially around the lower half.
- Round 14: (sc, dec) around (12)
- Round 15: dec around (6)
- Fasten off and close the opening. Weave in the end.
Next comes the frill. It sits around the base and adds that soft “collar” look.
Frill/Collar
The frill is worked around the base of the body using FLO from a chosen round. For a neat collar line, use the stitches from Round 12 (the 24-stitch round area). A contrast color looks extra cute, but matching yarn works too.
- Join yarn with a sl st into any front loop of Round 12.
- Work in FLO around: (sl st, ch 2, 2 hdc in the same stitch), then skip 1 stitch.
- Repeat around the full circle.
- Finish with a sl st, fasten off, weave in ends.
Keep the ruffles even by repeating the same “ruffle cluster” count all the way around.
Tentacles (Make 8 Curly Spirals)
Each tentacle is crocheted as a chain that curls up because of extra stitches worked into each chain.
- Ch 18 (make longer or shorter for different curl lengths).
- Starting in the second ch from hook: work 2 sc in each chain across.
- The strip will naturally spiral.
- Fasten off, leave a tail for attaching.
Even spacing tip:
- Turn the octopus upside down and imagine a clock. Place tentacles at “12, 1:30, 3, 4:30, 6, 7:30, 9, 10:30.”
- Pin or hold in place first, then secure.
Facial Details
- Large eyes
- Safety eyes already placed, or embroider circles with black yarn.
- Optional: stitch a tiny white highlight dot to make eyes look shiny.
- Smile
- With black yarn, embroider a small curved smile centered under the eyes.
- Keep it simple: one gentle curve is often enough.
- Optional blush
- Add a soft blush circle under each eye.
- Pink yarn stitches also work for a permanent blush look.
Assembly
Minimal sewing keeps the project beginner-friendly.
- Attach tentacles
- Sew the top of each spiral to the bottom of the body.
- Use small, strong stitches, so tentacles stay secure for play.
- Check balance
- Set the octopus on a flat surface.
- Adjust the tentacle spacing so it sits evenly rather than tipping.
- Final stuffing check
- Add a bit more stuffing through a small gap if the body feels too soft, then close and tidy.
Finishing Touches
- Shape the body with gentle squeezing to round out the dome.
- Fluff the frill so the ruffle edge shows clearly.
- Stretch and twist tentacles lightly to bring out the curl.
- Hide yarn ends neatly inside the body.
Tips for Beginners
- For tight stitches, use a hook slightly smaller than the yarn label suggests.
- For neat spirals, keep tension even while making the chain, then work consistently “2 sc per chain.”
- To avoid gaps, stuff slowly and do not overpull stitches.
- To place eyes evenly, count stitches between them and check from the front before securing.
Common Mistakes
- Loose stitches: stuffing shows through. Fix by tightening the tension or using a smaller hook.
- Uneven tentacles: different chain lengths create mismatched curls. Count chains for all 8.
- Wrong eye placement: eyes too high can look surprised. Eyes too low can look sleepy. Test placement with pins first.
- Overstuffing: the body becomes lumpy and stretches the stitches. Add stuffing gradually, stopping when plush, not hard.
Customization Ideas
- Mix bright color combos: purple body + pink frill, green body + orange frill, orange body + white frill.
- Turn it into a mini keychain octopus by sewing a small loop on top for a clip.
- Make a reversible mood octopus concept by creating two bodies in different expressions and stitching them together (advanced but fun).
- Add accessories like a tiny bow, mini hat, or a little starfish appliqué.
- Create an ocean set: jellyfish, whale, turtle, crab, and seahorse, all the same size and style.
Conclusion
Colorful yarn and simple stitches make a crochet project feel extra comforting. A bright crochet octopus amigurumi with a frill collar, big eyes, and curly tentacles brings instant personality, and the size stays perfect for quick gifts and cheerful little keepsakes.
Try a whole rainbow, swap collar colors, and experiment with different tentacle lengths. A basket of mini octopus toys in purple, green, orange, and pink looks like a tiny underwater party, ready to brighten any room.