Refreshing Crochet Orange Tomato Keychain Amigurumi Pattern Perfect for Newbies
A tiny amigurumi that you can clip to your keys instantly feels more special than a regular crochet toy. This Crochet Orange Tomato Keychain Plush is a small, round, fruit-shaped charm with a sweet, kawaii face, blush cheeks, and funny, dangling legs that swing as you walk.
It also works beautifully as a backpack charm or a car hanging accessory. The stitches are tight and smooth, so the finished plush looks clean, sturdy, and gift-worthy even for beginners.
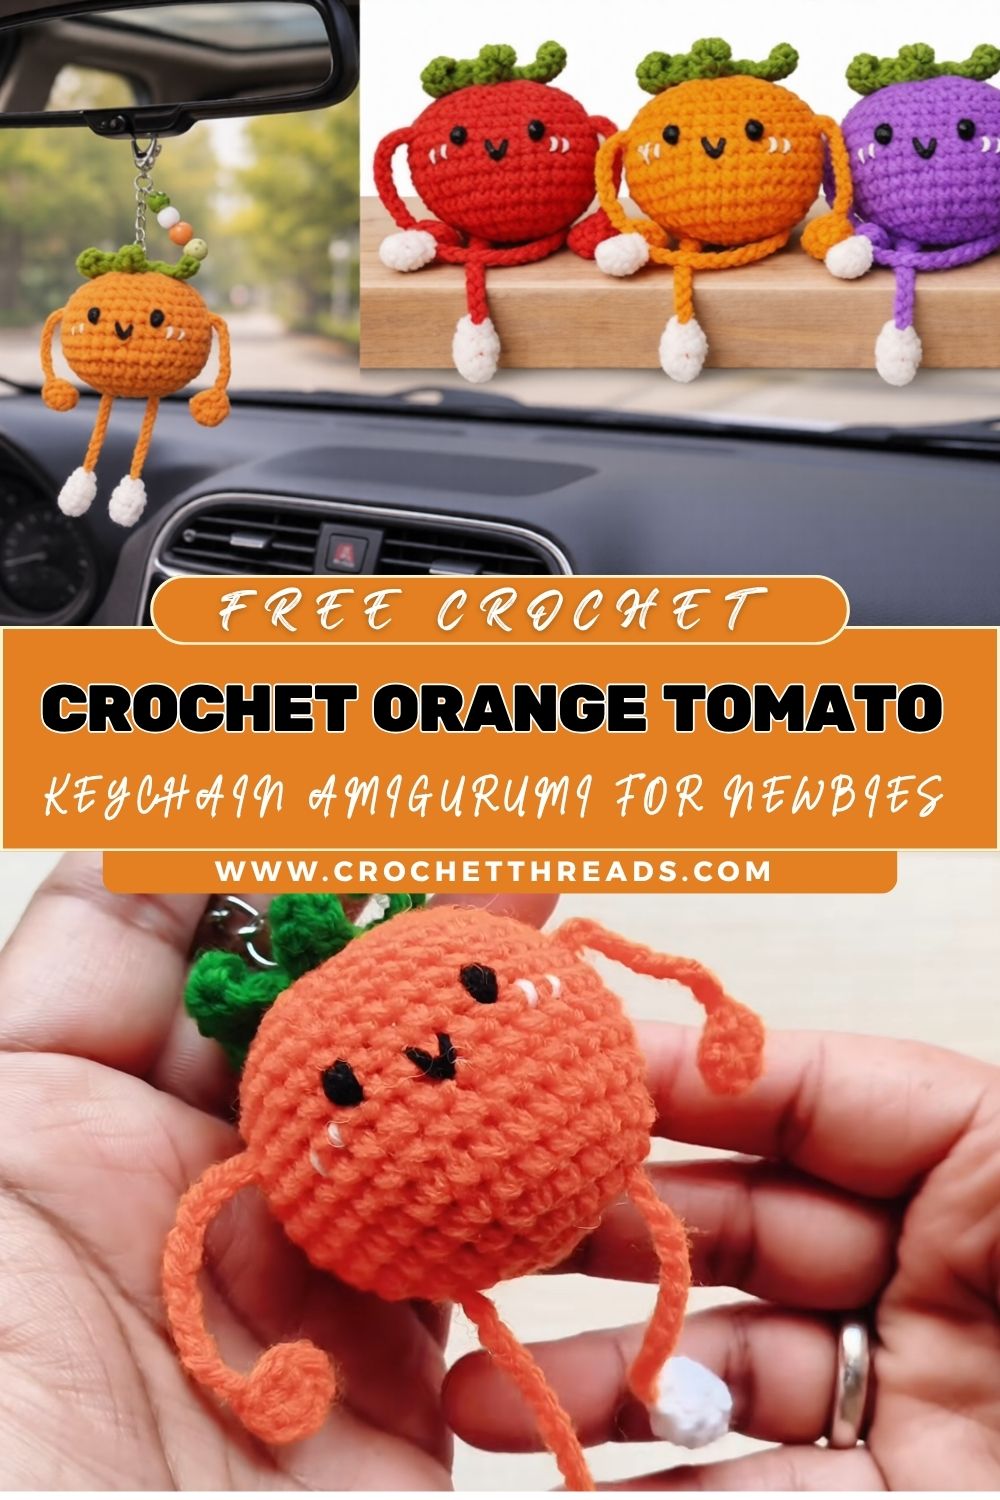
The plush has tiny embroidered eyes, a small smiling mouth, and soft blush details on the cheeks. On the sides, there are short looped arms that look like little handles, and at the bottom, there are extra-long dangling legs finished with small white feet. Those legs give a charming sense of movement, so it looks playful and alive while hanging.
Because the parts are small, this is a great portable crochet project. It is easy to carry the yarn and hook in a pouch, and you can finish it in short sessions. The Crochet Orange Tomato Keychain Plush is also an excellent handmade gift idea for friends, students, teachers, or anyone who loves cute accessories. With a few color changes, you can turn the same pattern style into multiple fruit characters.
Materials Needed
- Cotton or acrylic yarn (orange or tomato red, main body): 22 g
- Cotton or acrylic yarn (green, leaf cap): 5 g
- Cotton or acrylic yarn (white, feet): 6 g
- Black yarn or black embroidery thread (eyes and smile): 2 g or about 2 to 3 m
- Optional pink yarn or blush thread (cheeks): 1 g or fabric paint (tiny amount)
- Crochet hook: 3.0 mm (usable range 2.5 mm to 3.5 mm)
- Fiberfill stuffing: 12 g
- Keychain ring or lobster clasp: 1 piece (25 to 30 mm is a good size)
- Yarn needle: 1
- Stitch marker: 1
- Scissors: 1
Skill Level
Beginner-friendly.
This project uses basic amigurumi shaping with increases and decreases, plus simple chains for the arms and legs. Embroidered facial features keep it safe and easy, and you do not need advanced joining techniques.
Time Planning at a Glance
- Body making time: 30 to 40 minutes
- Limbs time (arms, legs, feet): 30 to 40 minutes
- Face detailing time: 10 to 15 minutes
- Finishing time (leaf cap, keychain, weaving ends): 10 to 15 minutes
- Total time: 1 hour 20 minutes to 1 hour 50 minutes
Sizing Tips
- Lighter yarn makes a smaller keychain that feels less bulky in a pocket, while thicker yarn creates a larger plush that is better as a bag charm.
- A 2.5 mm hook produces tighter stitches and a firmer finish; a 3.5 mm hook works faster but may create small gaps.
- Tight, consistent tension matters because stuffing can show through loose stitches, especially on a smooth, round body.
Step-by-Step Instructions
a) Body (Round Fruit Shape)
Making time: 30 to 40 minutes
- Start in continuous rounds. Make a tight ring and crochet the first round into it. Place a stitch marker in the first stitch, because the rounds will be worked without joining.
- Increase to widen the fruit. Add increases evenly over several rounds until the circle becomes a shallow bowl, then a rounded half-sphere. Count carefully so the shape stays symmetrical.
- Build the middle height. Crochet a few rounds evenly with no increases. This section gives the fruit body its “plump” look and creates room for stuffing.
- Begin decreasing and stuffing. Start decreasing evenly to close the ball. Insert stuffing in small pieces and spread it around with your fingers. Focus on the edges too, so the fruit stays smooth and round, not lumpy.
- Close the opening. Finish the last decreases, close the hole neatly, and weave the yarn end inside. Roll the body gently between your palms to even out the shape.
b) Top Leaf Cap
Making time: 10 to 15 minutes
- Crochet a small green base. Make a small circle or cap that fits the top of the fruit body without covering it too much.
- Add leaf points. Create a few leaf shapes using short chains and slip stitches to form pointed loops. Keep them small and slightly curved for a cute cartoon look.
- Attach it neatly. Sew the cap to the top center of the fruit body with tight stitches. Make sure it sits flat and does not tilt to one side.
c) Arms (Side Loops)
Making time: 5 to 8 minutes
- Mark arm placement. Choose spots on the left and right sides of the fruit, slightly above the midpoint. This makes the character look balanced.
- Create each arm loop. Attach the yarn, chain a short length, then slip-stitch back into the body close to where you started, forming a small loop.
- Secure and weave ends. Pull gently to check the loop shape, then weave ends inside so the arms do not loosen with handling.
d) Legs With Feet
Making time: 25 to 32 minutes
- Plan the leg spacing. The legs look best when they are attached near the bottom front area, spaced evenly left and right.
- Crochet long dangling legs. Attach yarn and chain a long strand for the first leg. To make it sturdier, you can slip-stitch or single-crochet back along the chain, then fasten off. Repeat for the second leg with the same length.
- Make tiny white feet. Using white yarn, crochet two small, rounded foot pieces. Keep them simple, like little ovals or mini circles, so they look like shoes.
- Join the feet to the legs. Sew or crochet the feet securely onto the bottom of each leg. Tug gently to confirm the join is strong, because keychains move a lot.
e) Face Detailing
Making time: 10 to 15 minutes
- Choose the front. Pick the smoothest side of the fruit body as the face side. Lightly pinch the body to see where the “front” sits naturally.
- Embroider the eyes. Use black thread or thin black yarn to make two tiny eyes. Small vertical stitches or tiny dots both work well for a kawaii style.
- Add the smile. Stitch a small curved smile centered below the eyes. Keep it short and gentle so the expression stays cute.
- Add blush. Use pink thread to make tiny cheek marks, or carefully dab fabric paint. Keep blush subtle, because too much can overpower the face.
- Hide and secure ends. Tie off inside the plush, then run the thread through the stuffing to prevent slipping.
Assembly Instructions
- Attach limbs evenly. Check that the arm loops are at the same height, and the legs are evenly spaced. Adjust before tightening knots.
- Secure the leaf cap. Stitch around the cap edge with several small passes so it cannot lift or twist.
- Stuff firmly but smoothly. Add stuffing until the fruit feels springy and full, not overstuffed. Use your fingers to push stuffing into any low spots.
- Add the keychain ring. Create a small hanging loop at the top using yarn, or stitch the ring through a strong point near the leaf cap base. Use multiple passes and knots so it holds up to daily use.
Basic Tips for Beginners
- Use a stitch marker and count rounds, because small amigurumi grows quickly, and mistakes are easy to miss.
- Keep stitches tight by using a slightly smaller hook, especially if you notice gaps when stretching the fabric.
- Stuff in small amounts and shape as you go, instead of pushing one big piece of stuffing inside.
- Test face placement with pins or scrap yarn before embroidering, because the face controls the whole look.
- Weave in ends in multiple directions, since keychains get tugged and twisted frequently.
Common Mistakes to Avoid
- Uneven stuffing that creates bumps or flat spots along the fruit body.
- Loose stitches that allow white stuffing to show through, especially around the decreases.
- Placing eyes too high, too wide, or off-center can make the expression look odd.
- Attaching legs at different lengths, which can make the charm hang crooked.
- Weak knots in the keychain loop can cause the plush to detach over time.
Variations to Personalize
- Switch colors to create different fruit characters: bright orange, tomato red, peach, berry pink, or even lemon yellow.
- Add a longer hanging strap for a rearview mirror accessory, using a chain strap or a ribbon loop.
- Change the facial expression: sleepy eyes, a wink, tiny eyebrows, or a small open mouth.
- Add surface details like a tiny leaf vein stitch, a little belly patch, or a mini heart applique.
- Make a “pair set” by crocheting one orange and one tomato, then gifting them together as best-friends charms.
Finishing Tips
- Weave in ends slowly and securely, and avoid cutting too close until you are sure nothing slips.
- Shape the fruit by gently rolling it in your hands to smooth the surface and distribute the stuffing.
- Reinforce the keychain attachment by stitching through the top area multiple times.
- If using fabric paint blush, let it dry fully before attaching the keychain and packing it as a gift.
Tutor Suggestions for Beginners
Work slowly and treat the tutorial like a guide rather than a script. Pause after each section, especially after the increases and before the closing decreases. Practice single crochet in the round and invisible decreases on scrap yarn first if those stitches feel unfamiliar. Keep your stitch counts written down, and rewatch short parts instead of guessing.
Conclusion FOR ( Crochet Orange Tomato Keychain )
This Crochet Orange Tomato Keychain Plush is small, cheerful, and beginner-friendly. The round fruit body works up quickly, and the green leaf cap adds a fresh top detail. Long dangling legs with white feet make it extra playful, while the cute embroidered face and blush bring it to life. Clip it on, gift it, and enjoy making more.