
Stunning Crochet Splash Spheres Bundle Pattern for Home Decor
Bring a splash of color into your space with this Crochet Splash Spheres Bundle. Worked on a crochet grid and finished with cross stitch, sequins, and pearls for shine.
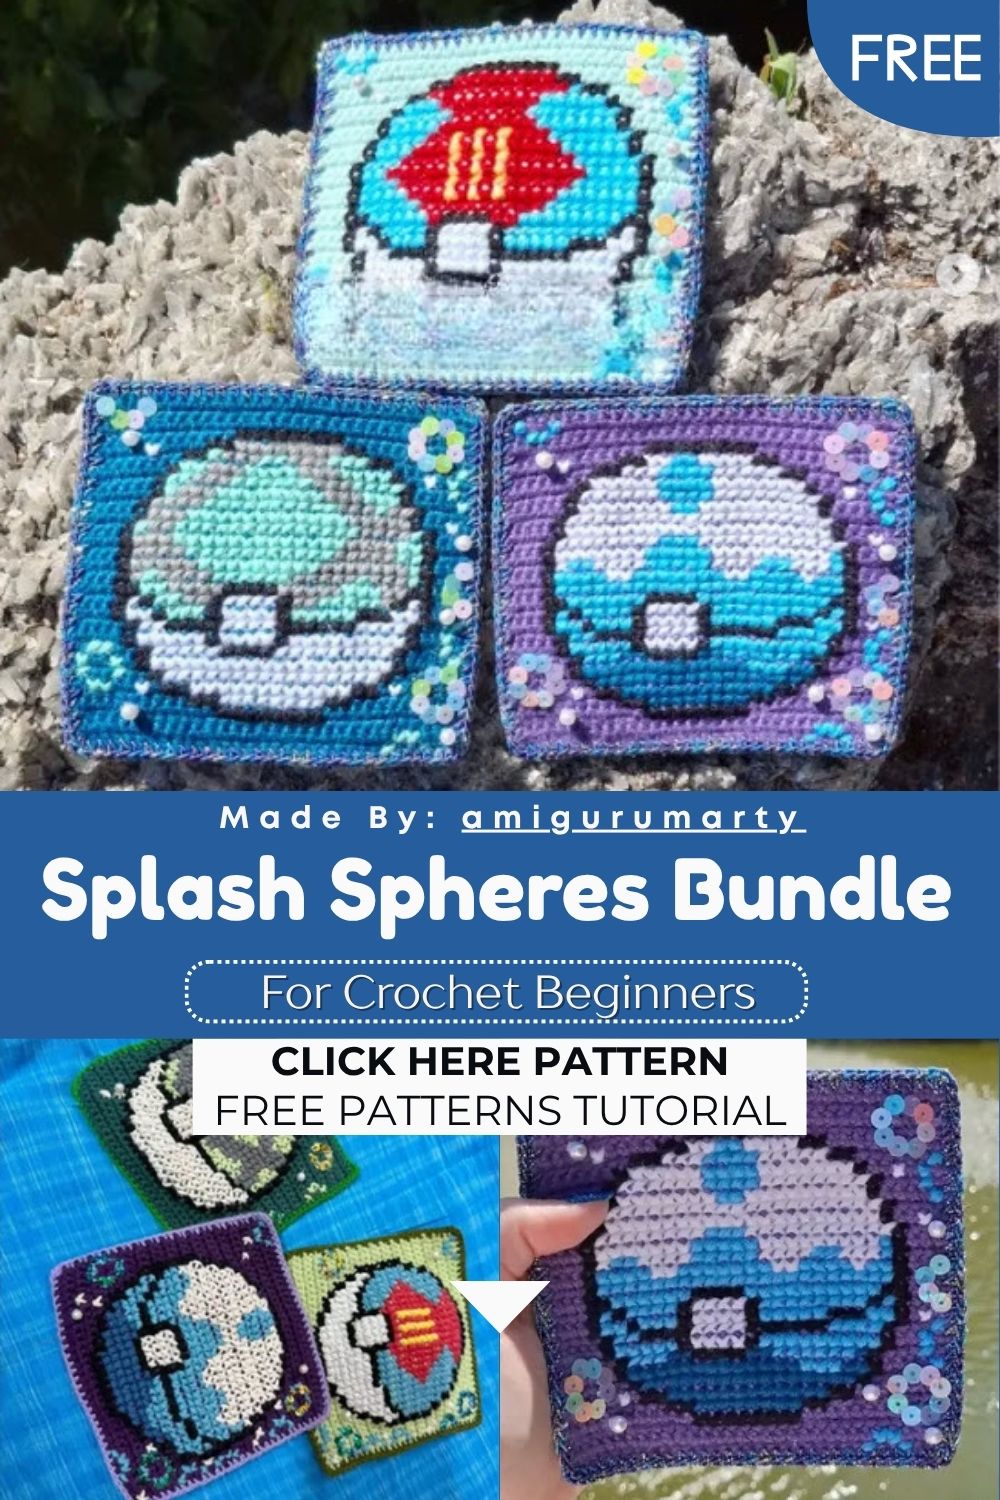
This Crochet Splash Spheres Bundle is a little different from your usual crochet project. Instead of shaping a stuffed toy, you build a flat 30-by-30 grid and turn each stitch into a pixel. Then you cross-stitch a glowing sphere design on top, add sparkle, and you have three dazzling decor pieces ready to hang or frame.
Pattern Overview
Here is what makes this bundle so much fun to stitch:
- Three spheres in one set: Aqua, Marine, and Ocean, each starting from a different base color so the bundle feels cohesive yet varied.
- Pixel-grid technique: every single crochet becomes one pixel, which gives you a clean canvas for the cross-stitch art.
- Mixed hook sizes: three hooks (3.00 mm, 2.5 mm, and 2.00 mm) are used at different stages to keep edges crisp and the grid even.
- Cross stitch on top: the actual sphere image is created with cross stitches, so you are blending two crafts in one project.
- Sparkle finish: sequins and pearls are added at the end for that wet, splashy shine.
- Flat and frameable: because each piece is flat, it is easy to mount, frame, or turn into a wall hanging or coaster-style accent.
Special Techniques
The heart of this Crochet Splash Spheres Bundle pattern is the crochet pixel grid. You chain a foundation, then work into the back spine of each chain so the bottom row stays tidy and matches the rest of the grid. Turning without a chain at the end of each row keeps the side edges straight, which really matters when every stitch needs to read as a square pixel.
The second key skill is counted cross stitch worked directly into your crochet. The golden rule here is consistency: every cross must lean the same way, whether you choose bottom-left to top-right or the reverse. Pick one direction and stick to it across the whole design, because mixed crosses catch the light unevenly and spoil the smooth look. Keep most of your travelling threads vertical on the back, and tuck your tails under those vertical lines instead of tying knots. Knots create lumps and can show through a flat piece, so weaving in is always the cleaner choice.
Skill Level
This project suits confident beginners and up. You only need chains and single crochet, but neat tension and patience, even cross-stitching, are what really bring these spheres to life beautifully.
Materials
Aqua Sphere and Marine Sphere
- 3.00 mm hook
- 2.5 mm hook
- 2.00 mm hook
- Yarn needle
- Thread needle
- Black acrylic wool
- White acrylic wool
- Light turquoise acrylic wool
- Turquoise acrylic wool
- Red acrylic wool
- Yellow acrylic wool
- Yarn of choice for the border
- Sequins
- Pearls
- Warm glue
Ocean Sphere
- 3.00 mm hook
- 2.5 mm hook
- 2.00 mm hook
- Yarn needle
- Thread needle
- Black acrylic wool
- White acrylic wool
- Purple acrylic wool
- Light blue acrylic wool
- Dark blue acrylic wool
- Yarn of choice for the border
- Sequins
- Pearls
- Warm glue
Abbreviations
- ch – chain
- sc – single crochet
- r – row
Note: this pattern uses US terms.
The Pattern
Crochet Base
Choose your base color depending on which sphere you are making:
- Aqua Sphere: use light turquoise yarn
- Marine Sphere: Use dark turquoise yarn
- Ocean Sphere: Use purple yarn
For a 30 x 30 grid you will need 31 sc, so:
- With the 3.00 mm hook: ch 31 + 1 ch = 32.
- Switch to the 2.5 mm hook and begin crocheting from the 2nd ch from your hook, working through the spine behind the chains. (Photo 1)
- Work 30 rows in total. I prefer to turn without a chain at the end of each row so the borders stay straighter.
- Row 1/30: 31 sc = 31.
The finished grid is 30 x 30 sc. The edge stitches on the sides marked in red do not count as part of the grid. (Photos 2 & 3) Remember, every sc is one pixel. (Photo 3)
The Border
- Switch to the 2.00 mm hook.
- Before you start cross stitching, work sc all the way around the edges of the square. This frames the grid and makes it much easier to see each pixel.
- Cut the yarn and fasten off.
How to Cross Stitch
- Consistency is everything in cross-stitch. Each cross must face the same direction; you decide which way, but they must all match.
- Try to avoid making knots while you cross-stitch.
- Most of your lines should run vertically behind the work. (Photos 4, 5 & 6)
- Once every cross stitch is done, hide the tails under those vertical lines using a thread needle. (Photos 5 & 6)
Decorations
- Add the sequins and pearls to the background using warm glue, or sew them on if you prefer a more secure finish.
Common Mistakes
A handful of small errors can throw off the whole grid, so keep an eye on these:
- Miscounting the foundation chain. You need 32 chains to get a 31 sc base. Count twice before you turn, because one missing chain shifts every pixel.
- Working into the wrong loop. The first row goes through the back spine of the chain. Skipping this step gives you a messy, uneven bottom edge.
- Adding a turning chain. This pattern turns without a chain on purpose. An extra chain widens the sides and your squares stop lining up.
- Mixing cross-stitch directions. Half your crosses leaning one way and half the other is the most common look-spoiler. Lock in one direction from the very first stitch.
- Tying knots on the back. Knots create bumps that show through a flat piece. Always weave tails under the vertical threads instead.
- Gluing decorations too early. Wait until all the cross-stitch is complete, or sequins can get in the way of your needle.
Assembly
Since these pieces are flat, putting them together is really about finishing and displaying. Here is the order I follow:
- Block the crochet grid lightly so the square sits flat and the pixels are even before any stitching.
- Work the border sc round, then cross stitch the full sphere design from your chart, keeping every cross consistent.
- Weave in all yarn tails under the vertical lines on the back for a smooth, clean reverse.
- Add the sequins and pearls last, building up the splashy shine across the background.
- Press or block the finished piece once more if needed, then mount, frame, or hang each sphere however you like.
- Line up all three spheres together to enjoy the full bundle effect on your wall or shelf.
Important Remarks
- Each sphere starts from a different base color, so keep your yarns labeled to avoid mixing them up mid-project.
- Tension matters here more than usual, because uneven sc will make your pixels look crooked once the cross stitch goes on.
- Use a good light source while cross-stitching so you can clearly see each pixel and keep your counts accurate.
- The border yarn is your choice, so feel free to pick a shade that frames each sphere nicely.
- If you plan to wash the finished piece, sewing the sequins and pearls is safer than gluing them.
- Take your time on the cross stitch; this is the slow, satisfying part that gives each sphere its glow.
Conclusion
And there you have it, a bundle of three Crochet Splash Spheres Bundle ready to brighten any room. Blending a crochet pixel grid with classic cross stitch makes this set feel special, and the sequins and pearls give it that final wow factor. Whether you stitch the Aqua, Marine, or Ocean version, or the whole trio, take it one pixel at a time and enjoy the journey.


